DIY flowers made from thin fabric. DIY fabric flowers for a wedding celebration. Calico flower
It is difficult to find a person who does not love fresh flowers, their beauty and freshness, and delicate aroma. Unfortunately, plants created by nature are not suitable for every situation: each of them lives according to its own rhythm and does not always bloom at the time we need. Compositions made from natural flowers quickly wither and lose their attractiveness; they are not suitable for permanent decoration. In stores it is not always possible to find bouquets made of fabric or polymer clay of the desired shape and color. The only way to get exactly what you want is to make artificial flowers with your own hands.
Imagine the envious glances of women and the admiration of men when you appear at a gala meeting in an elegant outfit, decorated with bouquets of delightful flowers. This decor will turn an ordinary hat into a flirty accessory; a single flower on a blouse will add piquancy to your entire look. Place bright flower arrangements in your apartment or office, or even just one flower, and the room will immediately come to life and become cozier.


When you admire a magnificent designer bouquet of artificial flowers, the thought may settle in your head: “I will never succeed.” Of course, it won’t work if you just look and doubt - get to work, and after a while your products will be difficult to distinguish from real flowers. It is not necessary to enroll in long, expensive courses; you can master this skill at home. It’s easy to learn how to create flowers from fabric; the master class will give you the necessary tips.

Basic materials used in flower making
To ensure that the work goes without annoying delays, prepare everything you need in advance. Let's start with choosing fabric. It is better for beginning craftsmen to use densely woven fabric; it holds its shape well. Please note that coarse, ugly fabrics will not make an elegant product; use shiny dense silk, satin or velvet. Try combining different types of fabrics, this way you will better reflect the diversity of the floral world. Perhaps you have some beautiful scraps left from some handicraft - do not neglect small scraps, it is very convenient to work with them.

The material has been selected, but before cutting can begin, it must be treated with a special compound.
Pour 3 teaspoons of gelatin with a glass of water, let it brew and heat until completely dissolved.
Soak the fabric in the solution and dry without wringing. After complete drying, the fabric is ready for cutting.
Fabric flowers step by step
Pattern of the future flower
Before you start cutting fabric, remember two basic rules. Firstly, any part should be located at an angle of 45 degrees to the grain thread; secondly, when transferring the outline to the material, you cannot use pencils and pens; a trace from them will ruin the entire appearance of the product. There are special crayons that are also great for drawing small pieces of soap on fabric.
Start by making a flower with 18 petals. Draw a pattern of a large, medium and small petal on paper and see if you have calculated their proportions correctly. The shape depends on your imagination, but at first it is better to avoid too fancy configurations. Start by copying the petals of a living flower; when you gain experience, you will be able to come up with the most intricate options.

Cut out 6 pieces of each size from the fabric and label them immediately. Be sure to indicate whether it is the large, small or middle part of the flower and mark the right and left sides. On the table everything seems clear, but after a while, if you don’t mark the cut, it will be difficult to understand the small shreds.
Making corrugated petals
Your fabric flower will look much more beautiful if the petals are made corrugated. The work will require the finest fabric, and at the same time it must be very durable, for example, chiffon or organza. Place the piece folded in half on additional material so that the fold line is 45 degrees with the grain of the thin fabric.

Press the entire surface of the petal firmly onto a flat surface and pull the additional fabric, turning it counterclockwise. The strength of the thin material plays an important role here; if it breaks, you will have to start all over again. Corrugated petals gain volume and look more natural.
Flower assembly
The finished petals need to be collected into a corolla. Sew large parts to each other and close the circle. To give the petals a bulge, make small folds at the bottom of each of them. The next turn forms a medium-sized cut; the smallest details complete the work.
Final finishing
The main work is done, now you need to close the stitches holding the petals together. To do this, cut a circle out of fabric, fold it in four and secure the sharp corner in the center of the flower with an invisible seam. Glue another circle on the outside, it will cover all the threads, and the fabric flower will look like a living plant. They can be used to decorate, for example, a baby’s hat.

Additional materials for making flowers
The choice of glue and paints is a responsible matter: these materials can ruin the entire work.
Paints and dyes
The color of the petals should be clean and even; when using low-quality dyes, stains and unpainted areas appear; such a product is unlikely to decorate clothes or interiors. To give the desired color to the fabric, you can use aniline and food dyes, photo paints, ink and ink.
By mixing the three primary colors in various proportions: red, yellow and blue, you can get any shade. The color intensity can be adjusted by diluting the dye. For dilution, water is used, or preferably alcohol or vodka, they give the color brightness and freshness. Mascara is used to make black parts, and if you dilute it, you get a gray dye.

Consider fresh flowers; they are very rarely colored the same throughout. Combine shades and color intensity, and the product will take on a natural look.
High quality glue
To create high-quality artificial flowers with your own hands, you need good glue.
The main requirement: after drying, the glue should not leave marks or change the color of the petals.
In addition, it must have sufficient strength so that the product does not fall apart on the second day after production. Trade offers many different types of glue, but its properties may not always satisfy the buyer.
Glue at home
Prepare the glue yourself, then you will be sure of the quality of the material. To make flowers, only two types of glue are enough.
To cook flour paste, stir 2 tbsp. spoons of flour in water (the mixture should be as thick as liquid sour cream). The solution is heated, stirring, until the flour is brewed and the paste becomes translucent.
Master classes: DIY fabric flowers.To prepare gelatin glue, soak 1 teaspoon of gelatin in a glass of cold water. When it swells, add a teaspoon of granulated sugar and 2 tbsp. spoons of flour, place on low heat and, stirring constantly, bring to a boil.
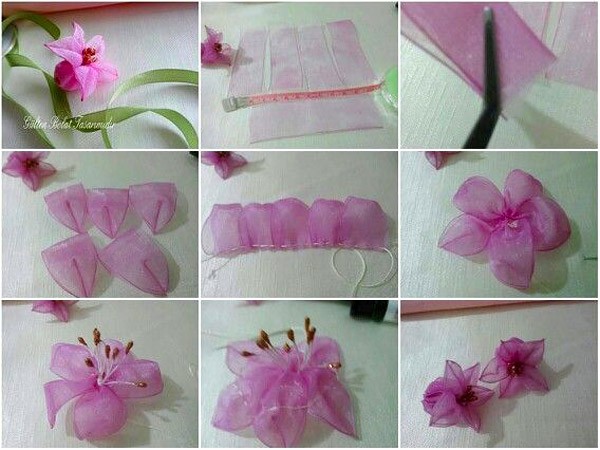
Satin ribbon flower
Master class with step-by-step photographs: How to make a flower from a satin ribbon with your own hands.
1. Take a ribbon 4 cm wide. Cut 5 pieces of ribbon 7.5 cm long and 5 pieces of ribbon 9 cm long. Lightly singe the edges.
2. Fold one piece of tape in half. We sew small stitches along the open cuts, departing 2-3 mm from the cut. The thread should be the same color as the ribbon.

3. We tighten it.

4. Without breaking the thread, sew a second piece of ribbon of the same length. In this way we collect 5 pieces of the same length for one thread. We tighten it.

5. Connect in a circle.

6. We do the same with blanks of a different size. Assemble the flower using glue or a glue gun. I used a button as the center. This flower has a very neat center and you don’t have to glue the button, but simply sew it on.

7. Cover the wrong side with a circle of felt (glued with a glue gun). The reverse side can be covered with a circle of cardboard covered with fabric. You can also cut a circle from a plastic bottle and cover it with fabric.

Using this flower you can make an elastic band, a brooch, or decorate a headband with it.

This flower is made from pieces of satin ribbon 8 cm and 9.5 cm long.

Rep ribbon flower
Cut the ribbon into pieces of equal length. Here I got pieces 7.5 cm long. We singe the sections with a lighter (match or candle) so that they do not unravel.

Fold it as shown in the photo.


Fold it so that all 4 corners are together.

Secure with a needle and thread.


Without breaking the thread, we collect the remaining petals in the same way.

Connect in a circle. And I once again pass the needle and thread in a circle to secure it more firmly.

I bring the needle to the wrong side and stitch there in a circle.

I'm sewing on a button. The middle can be decorated with sewn rhinestones, etc.

I sew an elastic band on the inside.

Satin ribbon rose
Master class with step-by-step photographs: How to make a rose from a satin ribbon with your own hands.
1. Satin ribbon 5 cm wide. This rose took 75 cm long. I singed the edges, but this is not necessary.

2. Fold the edge of the ribbon to the wrong side like this.

3. We begin to twist the corner.


4. Fix the twisted corner (the middle of the rose) with thread.

5. Bend the tape so that one edge of the tape runs along the other edge.


6. Bend along the line of contact of the edges of the tape.


7. Sew along the edge with a “forward needle” seam.


8. We bend the tape again so that one edge of the tape runs along the other edge.

9. Bend along the line of contact of the edges of the tape.

10. Sew along the edge with a “forward needle” seam.

11. And so we repeat until the end of the tape.

12. End of tape.

13. It turns out like this “spiral”.

14. Lightly tighten the seam, evenly distributing the folds.

15. The middle of the bud begins to curl on its own.

16. We begin to twist the bud, fixing each layer with thread or a glue gun.


The type of bud depends on how rigid the tape is, how tightly it was pulled and how tightly the layers are laid.
The tape I have here is quite stiff, it was pulled tight and the layers were not laid tightly.

Making leaves. I also made the leaves from ribbon 5 cm wide - there was no other suitable color.


View from the inside.


I glued the leaves with a glue gun. I covered the underside of the rose with a round piece of felt and also glued it with a glue gun. I glued it with a glue gun and a rubber band.


For a rose with a smaller diameter, 65 cm of satin ribbon was used and it was twisted more tightly. The tape itself is also softer.

Ribbon rose
In order to create such cute roses you will need very little time. They are very easy to implement and, best of all, do not require large financial outlays. It took me less than 10 rubles to make one such ring: 5 rubles for the blank for the ring and 2.5 rubles for the braid.
The roses are made from zig-zag braid (this braid is also called “snake” or “bindweed”).
For the large rose I used 50 cm of braid, for the smaller one - 46 cm.
Master class: Rose from braid
So we will need:
- snake braid
- threads in the color of the braid
- needle
- scissors
- lighter or matches
- glue gun or other suitable glue
1. Cut the braid to the required length.

2. Fold in half.

3. We intertwine (twist) the parts of the braid with each other.


4. Weaved to the end.

5. Carefully trim the ends of the braid and singe them with a lighter.

6. We begin to twist the bud and stitch it with thread on one side (the bottom of the rose or the wrong side). It is better to take the threads to match the braid - this way the work will look neater. For the master class, a contrasting thread was used for clarity.


7. Straighten the rose petals, slightly bending the outer layers.

8. The braid rose is ready.

In order to make a ring, we take a ring blank with a round platform.

Glue the ring blank to the rosette using a glue gun.


Fabric Circle Flower: Carnation
1. Cut out a template from cardboard - I have a circle with a diameter of 6.5 cm. Take a piece of synthetic fabric (the fabric should melt well over the fire). Cut out 12 circles from fabric.

2. We burn the edge of the circle over the candle in small sections and immediately, before it cools down, bend it in different directions (toward and away from ourselves). The edges of the circles are wavy.

3. Take one circle of fabric and fold it in half.

4. Then put it in half again.

5. Secure the corner with thread. We do this with all circles.

6. Cut out a circle from felt. We make leaves from fabric (I used green satin ribbon). We begin to glue the blanks with a glue gun. First, I glued two circles to determine the size of the leaves. Then I glued the leaves and continued gluing the prepared circles.

The first layer takes 4 circles. We glue the second and third layers of circles in a checkerboard pattern in relation to the previous row.

In order to glue the first layer, completely coat the felt circle with glue. In order to glue the second layer with glue, we spread an area twice as small. For the third layer, apply glue only to the middle. Then we drop a drop of glue into the middle and press the petals of the third layer against each other.

Fabric flower (sharp petals made of circles)
Master class with step-by-step photographs: How to make a flower from fabric with your own hands.
1. We cut out templates from cardboard - I have a circle with a diameter of 6.5 cm and 5.5 cm. Take a piece of easily draped fabric and cut out 5 circles of each diameter.

2. Take circles of the same diameter and fold one circle in half.

3. Then cut it in half again.

4. Sew small stitches along the open cuts, departing 3 mm from the cut. The thread should be the same color as the fabric.

5. Without breaking the thread, sew the second circle. The folds of all petals in one row should face the same direction.

6. We assemble 5 blanks for one thread in this way. We tighten it.

7. Connect in a circle.

8. We do the same with workpieces of a different diameter.

9. Assemble the flower using glue or a glue gun. I used a button as the center.

10. Cover the wrong side with a circle of felt (glued with a glue gun). I also used a glue gun to glue the elastic band.

This flower can also be used as a brooch by gluing the base for the brooch to the reverse side. With the help of such a flower you can decorate a headband, etc.

Another example of a flower with sharp petals made from circles of fabric:

Fabric flower (round petals made from circles)
Master class with step-by-step photographs: How to make a flower from fabric with your own hands.
1. Cut out a template from cardboard - I have a circle with a diameter of 5.5 cm. Take a piece of easily draped fabric and cut out 5 circles.

2. Fold one circle in half. Sew small stitches along the open edges, departing 3 mm from the edge. The thread should be the same color as the fabric.

3. We tighten it.

4. Without breaking the thread, sew the second circle.

5. We collect 5 blanks for one thread in this way. We tighten it.

6. Connect in a circle.

7. I used a button as the center.

8. Glue the button into the middle (I use a glue gun). Cover the inside with a circle of felt.

The reverse side can be covered with a circle of cardboard covered with fabric. You can also cut a circle from a plastic bottle and cover it with fabric. Using this flower you can make an elastic band, a brooch, or decorate a headband with it.

DIY satin ribbon rose
Take a satin ribbon 5 cm wide and cut it into squares. You can take a tape of a different width. A narrower ribbon will make smaller roses, but it’s better to try for the first time on a 5 cm ribbon.


Cut the required number of squares. I have this rose of 25 petals.

We singe the cuts over the fire to prevent them from crumbling. For scorching, you can use a candle, matches or a lighter. I feel more comfortable with a candle, and if I also take an aromatic one, I feel complete relaxation.

Fold the square diagonally with the right side facing out.

We bend the two side corners towards the central one. There is no need to seal them over a fire - I sealed them to make photographs easier to take.


Cut off the corners (approximately 5 mm).

We seal the cut over the fire. It is easier to do this by holding the cut in tweezers and leaving it sticking out about 1 mm. It is more convenient to use tweezers that are flat and even (not like the one in my photo). I touched my handy tweezers somewhere and had to do it with what I had.

We do this with all the squares.

Take one square and twist it. Secure at the bottom with thread. You can also attach it with glue, but I prefer to sew the first petals together.

We take the next petal and wrap it around our center. We place the tips of the petals opposite each other.

Take the next petal and continue to form the bud. I apply subsequent petals so that the beginning (corner) of the next petal falls in the middle of the previous one.

We continue, trying to place the sections of the petals at the same level.

The bottom of the rose should be almost flat.

Continue to the desired size of the rose.

I make the leaves from satin ribbon 4 cm wide. Cut a piece of green satin ribbon 8 cm long.

Let's fold it like this. Once again we fold along the fold line so as to combine points A-A and B-B.

Fold it so that all the corners on the front side are aligned.

We cut the corner.

We seal the cut over the fire, holding it in tweezers.

View of the leaf from the reverse side.

Front view of the leaf.

Assembling the rose: glue the leaves to the back with glue (I use a glue gun). Carefully decorate the wrong side. There are many different ways - I prefer to cover the back with a circle of felt. Then I glue the rubber band on with a glue gun.

Flower made from bindweed braid (snake, zig-zag)
Master class: Flower made from bindweed braid (snake, zig-zag)


Materials: satin ruffle braid 2.5 cm wide, a piece of felt, a button.
Tools:
I have a ruffle braid made of satin fabric, folded 2 times. I cut 33-35 cm, seal the edges over a candle.

I wrap the braid around my finger, stitching each layer with thread.

View from the inside.

I'm straightening it out. The result is a flower like this. You can leave it like that, or you can decorate the middle with a button or bead.

In order to cover the wrong side, I cut out a circle from felt and glue it with a glue gun. First, I apply glue to the middle of the flower and glue it - the edges of the felt remain unglued. Then I apply glue to the edges of the felt and press the flower against them.

View from the inside. You can glue an elastic band or a base under the brooch. You can use this flower to decorate the headband.


Master class: do-it-yourself ruffle braid flower
Materials: satin ruffle braid 2.5 cm wide, a piece of felt.
Tools: sharp scissors, matches (candle or lighter), tweezers, needle, glue gun (you can use other types of glue).
I have a ruffle braid made of satin fabric, folded 2 times. I cut off 50 cm and seal the edges over a candle.

I twist it around the handle and stitch each layer with thread.

View from the inside.

I cut out a circle from felt and glue it with a glue gun. I start by applying glue to the middle of the flower and gluing it - the edges of the felt remain unglued. Then I apply glue to the edges of the felt and press the flower against them.

You can make leaves from braid and decorate the flower. You can glue an elastic band or a base under the brooch.
Photo: Carnation flower made from ruffle braid

Fabric flowers look great in the interior, and can also become a beneficial highlight of not only an evening, but also an everyday outfit.
Master the secrets of needlework and conquer others with your originality! Making flowers from fabric with your own hands is not just a fascinating activity, it allows you to penetrate into the secrets of the highest harmony. And since it is not at all difficult to make a thing similar to a natural creation, this process will bring you great pleasure. Soon after you learn the technique of processing fabric for petals and collecting them, your home will turn into a blooming garden.
Timeless floral fashion and its types
It is difficult to name a period of history in which artificial flowers were not held in high esteem. There are a huge variety of techniques for making flowers from fabric. People tried a lot, trying to achieve a resemblance to living buds: they used gelatin to give scraps of fabric a stable shape, made petals from bird feathers, wax-impregnated paper, and leather.

About five thousand years have passed since man, inspired by nature, decided to create the first man-made flower. But who exactly takes the lead is still unclear. The ancient Egyptians imitated fresh flowers using papyrus. Greek women wove silk flowers into their hair. The ancient Romans decorated temples with artificial inflorescences during special events.
The tendency of Eastern culture to inherit nature contributed to the widespread use of artificial flowers in Ancient China and Japan. Since ancient times, Japanese women have been decorating their hairstyles with silk flowers.
Sophisticated - Floral hair ornaments, known since Japanese Paleolithic times, became especially popular in the Land of the Rising Sun in the early 18th century. They are individual flowers or complex compositions that are attached to combs or pins. Based on the material and shape of this decoration, it was possible to determine the class to which its owner belonged.

The word kanzashi also refers to a special technique for making flowers from ribbons to decorate hairstyles. There are a huge number of options for folding fabric petals, thanks to which man-made flowers become very similar to real ones.
In Europe, artificial flowers are especially common as an addition to ladies' costumes or headdresses in the 18th and 19th centuries. Exquisite bouquets on hats or dresses near the neckline add additional femininity and sophistication to the look.
Today, many handmade productions of artificial flowers are located in France. The history of some of them goes back more than 1.5 centuries. Such ancient workshops have their own special secrets of making materials, which are carefully protected from prying eyes. Famous fashion houses work closely with outstanding flower artists.
As for the “hot method” of making flowers, which will be discussed further, it appeared not so long ago, because the synthetic fabric necessary for it was invented a little over 100 years ago. This method is based on the ability of synthetic fiber to “curl” and melt at high temperatures.

Secrets of the hot manufacturing method
The “hot method” is the easiest for making flowers from fabric. Petals made of synthetic organza, silk or satin are melted along the edge over a candle flame, then the flower is “assembled” from individual parts that are sewn together.
Such an activity requires a certain perseverance and accuracy, but this is by no means a hobby for a select few - everyone can master the necessary skills.
Some people prefer to improve their skills by copying fresh flowers - if you choose this path, you will definitely have enough inspiration for a long time - there are about 400,000 flowering plants on earth. Others come up with their own flowers. If you have enough imagination and good taste, this option is for you.

Creating flowers from synthetic fabric is not a labor-intensive process - it is more of a relaxation than a job. This activity helps you relax, relieve stress and forget about household chores. And the results of such creativity will delight you and the people close to you for a long time.
What you need for fabric floriculture
Another advantage of the hot method of making flowers is the minimal cost of materials. Before making fabric flowers, you need to prepare:
- synthetic fabrics;
- candlestick with candles;
- scissors;
- cardboard;
- cutting pencil;
- a small piece of thick fabric;
- thread;
- needle;
- beads, beads, buttons for decorating the center of the flower.
How to learn to make flowers: master class
For synthetic flowers, artificial organza, polyester satin (wide satin ribbon) or silk are well suited. A combination of dense and thin fabric of the same color in one flower, or a gradation of shades when the middle of the flower is darker than the edges, or vice versa, looks impressive.

After the fabrics have been selected, you need to decide on the shape - for convenience, you can draw patterns for each of the flower bases. First you need to draw circles (at least 4-5) of different sizes on cardboard, then write the petals into them. After the patterns are cut out, you need to transfer them onto the fabric using a pattern pencil.
You can skip the pattern step if you are confident that you can accurately cut out the desired shape without them. You can avoid making petals at all, but make do with circles - then you will get a flower that resembles a rose. Thin translucent fabrics are best suited for such a flower; satin will look heavy and rough.


When making flowers from synthetics using the hot method, you need to adhere to the rule - the more, the better, regarding the number of bases. You can make 2-3 bases of the same size, or you can make each one different. But in the end there should be at least 8-10 of them.
After the fabric bases are cut out, you can proceed to melting the petals. To do this, you need to light a candle and carefully hold the base between the thumbs and forefingers of both hands and move its edge so that it slightly melts and curls.

There is no need to bring the fabric too close to the fire, as black soot will remain on it. Therefore, for the first test you should not take light-colored fabrics.


Next comes the final stage - you need to assemble the flower from the bases and stitch them right through the center. For the middle, you can use beads, beads, thin ribbon or just thread. You can carefully sew a piece of thick fabric to the finished flower on the back side to hide the stitches from sewing on the middle. If you plan to use your creation as an accessory, you can also sew a brooch pin onto it.


It is more convenient to make some types of flowers by cutting out each petal separately - dense fabrics are better suited for this method.
Beauty and Prosperity
Handmade fabric flowers look great on hair hoops, hats, and summer straw bags. They can be used in the manufacture and decoration of clothing. With such a simple, but at the same time sophisticated accessory, it is easy to emphasize your individuality and make your image more feminine and dreamy.
Now extremely popular. Just a few flowers that match or contrast with the curtain will transform it from an ordinary piece of fabric into a stylish piece of home decor. And tall cylindrical vases filled with fabric buds and petals will add elegance and chic to your living room.


It’s rare that a woman can resist the temptation of flowers - keep this in mind if you are thinking about making hand-made items for sale.
Evergreen bouquets on the tables of a cozy cafe or flower garlands on the summer terrace of a chic restaurant - perhaps you will be the first to take on the role of a good fairy, making the world around you more beautiful with the help of flowers.
The uniqueness of the image does not depend on the cost of the outfit, but on the exquisite little things that make it perfect. Organza flowers purchased or made with your own hands will be an ideal addition not only to wedding or evening dresses, but also to children's dresses.
Can be used as decoration for curtains, decorations for postcards and for many other small things. The use of these cute compositions depends only on your imagination. To make flowers, you need to understand how the fabric will lie in the finished product. First, let's look at the properties of fabric and types of organza.
Organza - fabric description
Organza was previously made from silk, then from viscose. Modern manufacturers use polyester thread - the fabric is transparent and weightless, but at the same time rigid and holds its shape well.

This is ensured by tightly twisting two threads together, and depending on their thickness and color, different types of fabric are obtained:
- matte or shiny,
- gradient or chameleon,
- plain or rainbow
- with spraying of various colors,
- with jacquard pattern or embroidery;
- tape of various widths.
Not every fabric is suitable for making flowers. For example, organza with embroidery is used to sew curtains or dresses. Matte and shiny plain fabrics are the most popular among needlewomen.


Shiny organza is a favorite material for flowers on bows,
hair decorations and brooches
Spectacular flowers for bright outfits are made from coated organza.

Sprayed organza looks festive, and flowers made from this fabric would be appropriate in a bride’s outfit
For romantic looks, fancy flowers made of gradient organza, chameleon or patterned fabrics are suitable.

Gradient organza is great for fantasy looks

Organza chameleon - for complex, iridescent colors

Gradient colored ribbon produces charming flowers that can be used to create bouquets, including embroidered ones.

A cute summer look will be complemented by a patterned organza flower.
It’s easy to create organza flowers with your own hands – the main thing is to know the basic techniques. For this purpose, Krestik has prepared a review of simple master classes.
Basic principles of creating flowers from organza
The creation of any, even the most exquisite, flower or complex composition begins with preparing the parts and connecting them in a certain sequence. Needlewomen have come up with several techniques with the help of which floral masterpieces are born:
- classic with buns,
- with heat treatment,
- kanzashi,
- from ribbons.
It is easier for beginners to master the technique using heat treatment of petals, while experienced craftswomen create their masterpieces using several techniques.
Classic floristry

This technique is called silk floristry or Japanese technique. The ancient art of creating flowers from silk came from Japan. However, it is also applicable to other fabrics: viscose, cambric, organza. To make flowers you will need a soldering iron and a set of special brass tools on a handle. It includes round balls of various diameters - boules, as well as smoothers, knives, heels, hooks, dies and special tools for chrysanthemums, lilies of the valley and fantasy flowers.
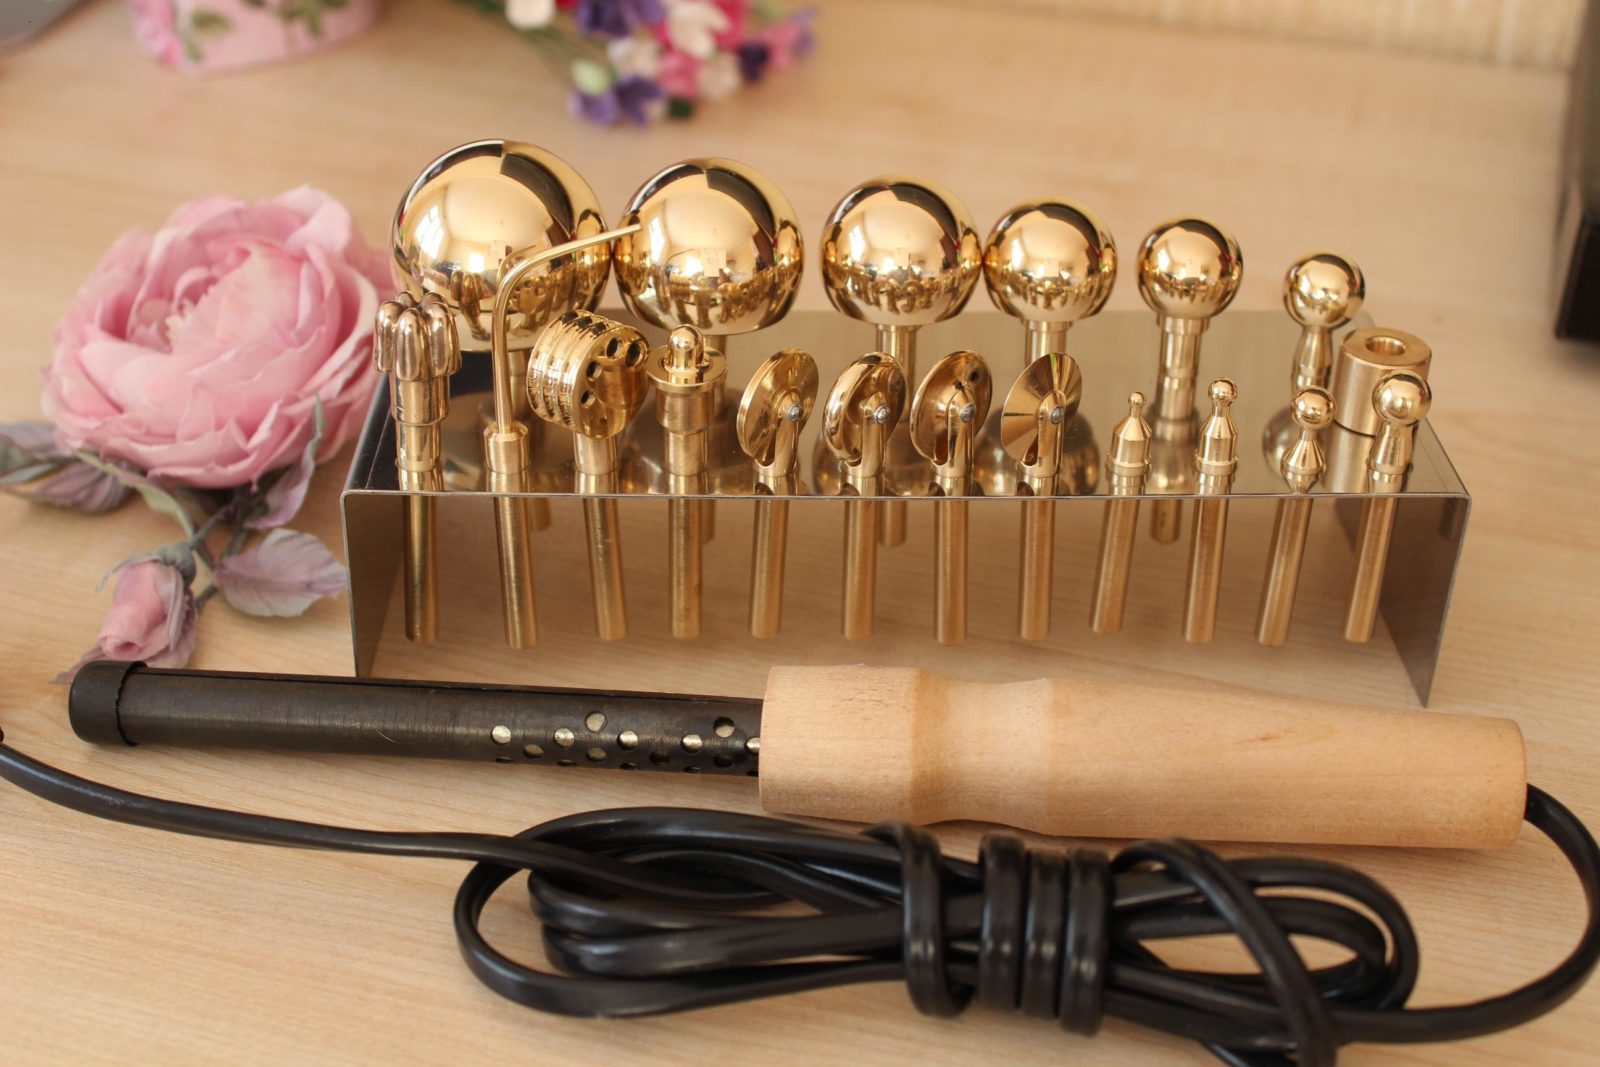
The petals are cut out according to the pattern, starched or kept in gelatin and dried - due to this, the edges will not fray, and the petal will keep its shape.
YOU WILL NEED IT
The archive will be useful when creating them. Free download!
To give natural bends, the blank petal is placed on a special pad and passed over it with a hot tool. Then a flower is assembled from the finished petals on a string.
MK on making flowers using Japanese technique:
Simple flowers with heat-treated edges
Preparing the petals is similar to the classical method: you need to cut the blanks exactly according to the template.

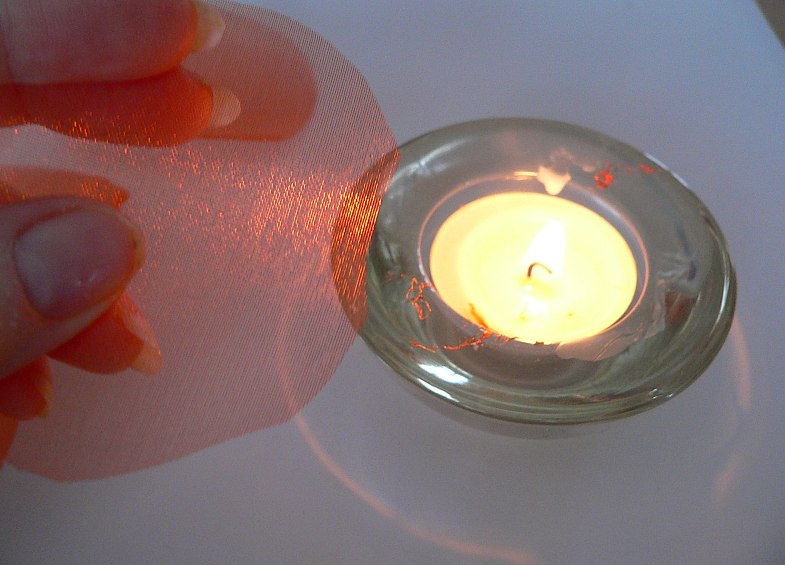
To prevent the edges from fraying and fraying, they must be processed. This will require a candle. Since organza is made of synthetic fabric, it does not burn, but melts. This is simplicity and complexity at the same time: the petal easily takes on the required shape, but it must be melted carefully, otherwise you can ruin the workpiece by melting the excess. The peculiarity of the melted edge of organza is a rounded edge of a darker shade. Thanks to her, the petals look especially charming.
The flower is assembled onto a thread, and the core is decorated with beads, beads, and sequins.
The flower will look more organic if the petals are not connected directly in the middle, but each one is moved a little.

Kanzashi
This technique is universal because it allows you to make flowers both from blanks cut from fabric and to use organza ribbons. The point is that each petal is a fabric folded many times. Individual elements can be fixed with a thread or the edges can be melted over a flame, thus gluing them together.

The technique is most suitable for creating small flowers intended for decoration, photo frames, cards, decorating gift boxes and for implementing countless creative ideas.
Instructions for making organza flowers using the Kanzashi technique:
Ribbon flowers
This technique is the first step in and an excellent option for beginning craftswomen. The organza ribbon has an edge, so the petals look neat, and only the edge needs to be treated with fire. The width and length of the ribbon depends on the intended size of the flower. Creating flowers using this technique is an excellent option for joint creativity with children.
Exquisite organza flowers for special occasions
In the techniques discussed above, the edges of the petals are subjected only to heat treatment. You can add chic with a special finish instead of melting or on top of it. This flower will become an exquisite decoration for a wedding bouquet or a delicate decoration for clothing. Let's learn how to create elegant flowers from organza, and the master class will help us with this.
For making this type of flowers, organza is an ideal option, since it is quite rigid and will withstand the load of glitter or small beads glued to the petals.

To make flowers we will need:
- organza,
- transparent fabric glue,
- white or silver glitter,
- scissors and pins,
- sewing needle and thread to match the fabric.
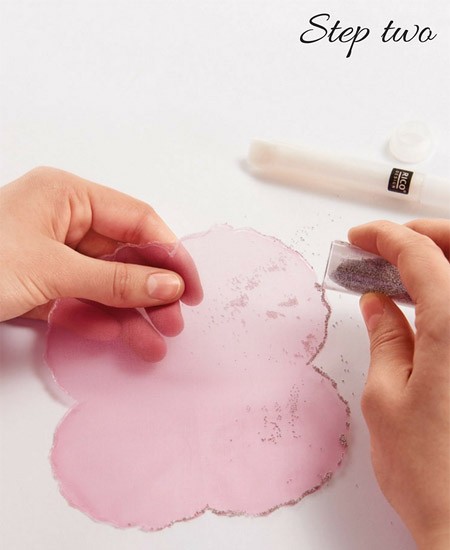
First step. Cut out petals according to the template. The required quantity and size depend on your idea. For a delicate cup stand, two petals are enough.

Second step. Gently coat the edges of the petals with transparent glue, sprinkle them with glitter and dry.
If you are creating a flower to decorate clothes, then it is still better to melt the edges over a candle - this will prevent the threads from fraying, and then decorate with glitter.
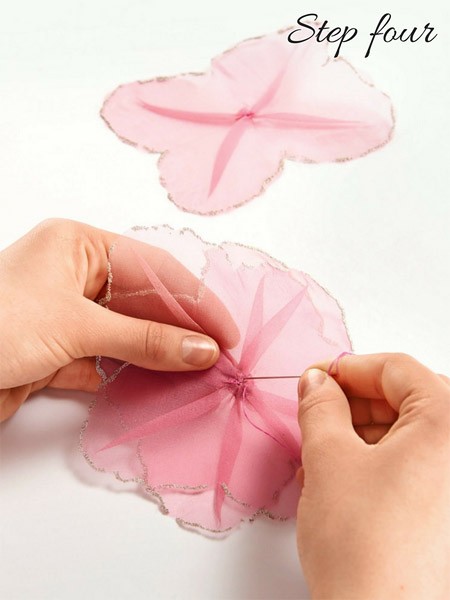
Third step. Using a thread to match the fabric, sew large stitches into the middle of the petal. When pulled together, folds are formed that need to be secured with additional stitches. If you are making a napkin for a cup, you just need to slightly tighten the folds and then straighten them, giving the flower some airiness.
If you are new to flower making, first practice on scraps to choose the appropriate fold size.

Fourth step. Connect the finished petals into a flower with a needle and thread. The middle can also be decorated with glitter or beads. The finished flower head is glued to a wire or a wooden stick, which, if desired, is decorated with floral tape.
Here you will find the original of this master class, from which you can download the part templates!
More sophisticated and interesting flowers are more difficult to make, but carefully following the step-by-step instructions will help you cope with the task!
Master class on creating a dahlia from organza:

Master class on creating organza lilies:
Original examples of using organza flowers
As a rule, fabric flowers serve as decoration for wedding and evening dresses, hats, clutches, romantic or in the form. But mini-compositions have a special charm.
Used to decorate the groom's suit, and individual small flowers make excellent decor or photo frames.

An accordion is assembled from a strip of organza onto a thread and a needle. Then a crown is cut out of felt.

Using transparent glue (or thread), the crown is fastened into a ring and sits in the center of the organza skirt.

The final decor is optional: beads, lace, sparkles, pendants. The crown can be attached either to a hairpin or a clip-on clip. Your little one will be delighted!
Decorating wedding dresses is a limitless field for imagination. You can use large beads and a narrow organza ribbon to crochet a necklace or bracelet.

Organza is a great material for creating delicate, elegant or chic and catchy flowers. A variety of techniques will allow even novice craftswomen to create masterpieces.

Fabric flowers will never go out of style. On the contrary, the popularity of such flowers is growing every year. Young girls wear headbands with flowers or hairpins, and decorate their shoes with flowers. Women pin brooches made of fabric flowers to their outfits and wear hats decorated with flowers. And of course, flowers in the interior look unusually fresh and cheerful, creating coziness and sunny warmth in the house.
Poppies... It is impossible to explain why women all over the planet are so partial to these flowers. And even those who claim that they love roses more than anything else in the world, when they see poppies, become extremely delighted and see nothing else around, and want only poppies, and all at once, even if there are gorgeous roses nearby. What is the reason for the mysterious popularity of poppies? Perhaps everything is simple: their scarlet color attracts the eye, and every woman inside is a fatal “girl in red”, who only needs a scarlet poppy to complete her image? But I don’t think the riddle of poppies is so easy to solve...
Making fabric flowers with your own hands is not easy. But with desire and diligence, you will definitely learn how to make real masterpieces. In this master class we will make poppy seed. You can make a whole bouquet of poppies and put it in a vase, or you can make wonderful poppy shoes or a poppy headband, or maybe a brooch from poppies? It's up to you, my dear fatal beauties.
Master class review
01.
We cut out patterns for the future flower from cardboard.
02.
For one flower, cut out 2 flower corollas from thin satin treated with gelatin (100% silk). We apply the pattern on the bias. We do not cut the petals to the center yet, but simply cut them along the contour of the pattern. When cutting, we carefully ensure that there are no traces of the handle left on the parts. We do not cut out the leaves of the future poppy. For them you need to prepare a piece of gelatin-treated satin measuring 10*10cm.
03.
We prepare a newspaper, a palette, batik paints (green, red, scarlet, yellow), brushes, a jar of water. We dilute 2 shades of red of different saturations, using colors from the palette. Moisten the flower part (the corolla of the poppy) with water from the jar. We begin to paint the petals with a lighter color, moving “from the edge to the center.” Towards the center the color saturation will weaken.
04.
We put accents on the edges of the petals with a more saturated color.
05.
Paint both parts of the flower in this way. Place the parts on dry newspaper to dry a little.
06.
Prepare black paint and a smaller brush. On the slightly damp parts on the front (satin) side in the center of the flower, carefully place 4 black spots with black paint. Do not overdo it, the stains will spread and become larger over time. Place the parts on dry newspaper until completely dry.
07.
We dilute the green color in the desired shades. Moisten a piece of satin 10*10 cm with water. We apply different shades of green in spots, blurring the border.
08.
Place the fabric to dry on dry newspaper.
09.
Cut a strip 0.5 cm wide from a roll of corrugated paper.
10.
Take the wire in your right hand. Place a drop of PVA glue at the end of the wire. Take a strip of paper in your left hand. Attach a strip of paper to the wire at a 45 degree angle.
11.
Start rolling the wire between the thumb and forefinger of your right hand, while holding the paper taut with your left hand and firmly pressing the paper from below to the wire with the index finger of your left hand.
12.
Continue to twist the wire, always making sure that the paper is at a 45 degree angle to the wire and is taut. Gradually move your fingers lower, winding the paper along the entire length of the wire.
13.
When you reach the end of the wire, trim the paper, leaving a small tip.
14.
Place a drop of glue on the tip of the paper.
15.
Secure the tip of the paper to the wire.
16.
Moisten your index finger with PVA glue and coat the entire length of the wire and lay it to dry. Prepare, therefore, 5 wires 30 cm long.
17.
Cut out 2 small and 2 large leaves from green-dyed satin.
18.
Using wire cutters, divide one wire into several parts by eye.
19.
Glue the leaves to the wire from the wrong side using PVA glue. Leave to dry.
20.
Cut the corolla into petals.
21.
Using a 20mm roll on a soft pillow, roll the bases of the petals from the front side.
22.
Using a 5-8mm roll on a soft or medium pillow, curl the edges of the petals, either from the face or from the back, imitating the natural bruises of the petal, and without touching the folds.
23.
Fill the center of the whisk.
24.
Using a double knife from the front side, from the wire to the edge of the petal, draw the central vein.
25.
Using a single knife from the front side, draw additional veins on the petals.
26.
With a 3-5 mm roll, from the wrong side, from the edge to the center, between the veins, fill in small bulges on the petals, giving them volume.
27.
Prepare 2 long wires and a strip of cotton wool. At the end of 2 wires, use thin-nose pliers to bend the end. Start forming a cotton ball at the end of the wire by twisting a strip of cotton wool.
28.
Lubricate the end of the cotton wool with glue and secure it. Squeeze the cotton to form a ball.
29.
Cut a small square of crepe paper.
30.
Carefully pull the paper over the ball and secure with threads under the ball.
31.
Trim off any excess paper.
32.
Wrap the veins on the ball with threads, secure the threads by tying them in a knot under the ball.
33.
The corollas, leaves and box are ready.
34.
Prepare the glue. Semolina or crushed coal. Black or green threads.
35.
Wind the threads around 4 fingers.


