Beautiful kanzashi snowflake: how to make it for a beginner. DIY snowflakes from ribbons using the kanzashi technique (hairpins) Formation of blue petals
08 12.2017
08. 12.2017

Catherine's blog
Bogdanova
My dear readers and friends, are you already preparing for the most desired, fabulous and unique holiday - the New Year? Have you seen how beautiful decorations using the kanzashi technique look on the hair of little girls, especially when it comes to New Year's snowflakes? In winter, everything sparkles, shimmers and looks like a fairy tale. We offer a very interesting fantasy on the theme of New Year's products - these are beautiful Kanzashi snowflakes. Of course, pink snowflakes don’t actually exist, but I really want to try this particular color to create the most romantic accessories.
The relevance of hairpins is beyond doubt - the New Year is coming, which means you definitely need to buy or make something new. The shape and texture of the charming flowers immediately shows that these are snowflakes, and then all sorts of images flash through our thoughts that we can create with such snowy wealth at hand.
For one snowflake we will need the following list of materials:
- 7 pieces each of soft pink, white ribbon with satin texture and silver ribbon in the form of brocade - 5*5 cm;
- 14 pieces of white ribbon - 2.5 * 2.5 cm (half will be used for ray branches, the second part - for a large flower);
- 47 pieces of soft pink ribbon - 2.5 * 2.5 cm, (7 pieces - for the large flower, 12 - for the top small flower, 28 - for the ray branches);
- white half bead - 1.4 cm;
- silver or pearl rhinestone chain;
- white and pink beads - 3 mm in diameter (the quantity can be selected during the work process);
- 3 felt bases of white or pink color: 2.5 cm (for a small flower), 4 cm (for the main (larger) flower), square 3.5 * 3.5 cm (for the middle of a half bead, chain and beads);
- 7 half beads in the form of transparent droplets - 6 mm in diameter.
To create beautiful snowflakes you will need unusual petals. They will be complex, composed of traditional triple sharp petals and double rounded kanzashi patterns. The master class describes step by step how to model fragments of all types and how to put them together. And the main highlight is the unique center, made by hand.
DIY Kanzashi snowflakes
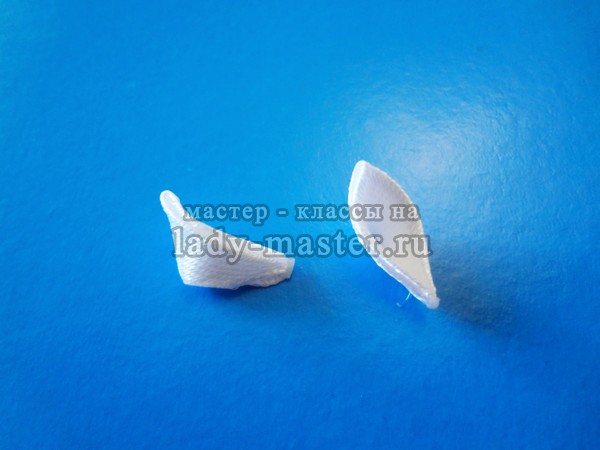
Bend 5 cm squares of soft pink, white and silver diagonally to begin forming unique petals.

Make a puff pastry of triangles of all the indicated varieties. We recommend leaving the silver inside, so the triangle of brocade texture should be on top. Curl the petal in the usual manner and cut off the lower part.

Separately, make small inserts for the middle of each resulting petal. Combine white and pink details. Layer the white triangle over the pink one to form a tent. Then turn the workpiece out so that you get a petal with a fold in the center. Insert small fragments into the holes of large ones.

Make droplets similar to small double centers from pink small squares. Some of them will go to the top flower, some to the ray branches. Take a small 2.5cm felt circle and glue a flower onto it.

Glue large petals onto a 4 cm felt circle.

Glue the 2 indicated layers together.

Glue twigs from four pink and one white rounded petals, decorate each of them with a small transparent drop.

Also make the middle by combining the half bead, chain and beads. Glue all the details onto the felt, and sew the beads around the circumference with thread.

Prepare the main flower with a center and branches.

Glue the branches into the voids so that you get a beautiful and delicate snowflake. Pink is just perfect in this case. We have frosty tenderness in our hands.


Dear readers, look how beautiful a pair of such interesting snowflakes looks. I recommend using a clip as a base, but an elastic band will also work. I hope this master class will help you do something unusual, your daughters, granddaughters, nieces and other young princesses will be the most beautiful at the matinee. Share the information on social networks to tell your friends about it.
Using the amazing kanzashi technique, you can create not only flowers, but also snowflakes that will be just as beautiful, but also fabulous. Such New Year's products can be made in white colors, additionally using sparkling brocade elements, rhinestones, half beads and other decorations. In addition, blue, blue or golden colors are suitable for creating New Year's paraphernalia.
Beautiful snowflakes will sparkle on the New Year tree, if you attach them to the branches, they will decorate the interior before the holiday. Elegant and expressive products can also become the basis for hairpins for girls. Young fashionistas will look like real Snow Maidens if they decorate their hair with such snowy accessories. A master class on making kanzashi snowflakes is given below.
For one snowflake you need to prepare:
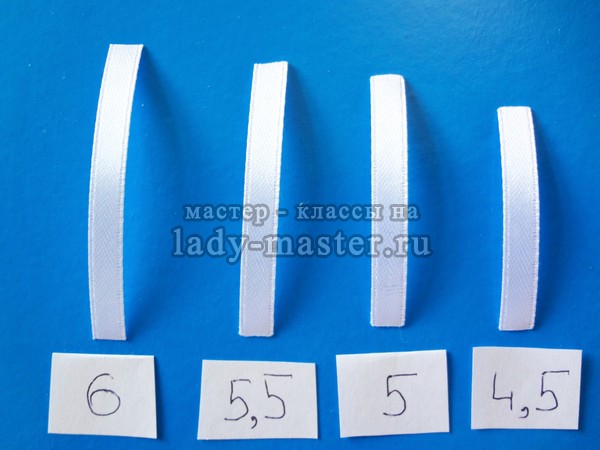
- - 24 petals from a white ribbon 0.5 cm wide (one petal consists of four lengths of 6 cm; 5.5 cm; 5 cm and 4.5 cm);
- — 8 petals made of silver brocade 0.5 cm wide (the length of the silver pieces is 7 cm);
- - 11 sharp kanzashi petals from white ribbon 2.5 cm wide (cut squares with a side of 2.5 cm);
- - 8 diamond-shaped leaves of white tape 2.5 cm wide (they will require 8 pieces of tape 10 cm each and a wood burner);
- - round felt base 4 cm;
- — 1 wide hug and half-bead-stone 0.6 cm;
- — 8 small mother-of-pearl half-beads, 0.4 cm each;
- - glue (transparent and strong).
Snowflakes from ribbons, master class
1. Cut strips of thin white satin ribbon 0.5 cm to create multi-layered droplets. The snowflake will consist of three layers of four-layer petals; in total, the specified parts will require 24 portions of pieces of each length listed in the list of materials - you need to prepare 24 pieces of 6 cm; 5.5 cm; 5 cm and 4.5 cm stripes.
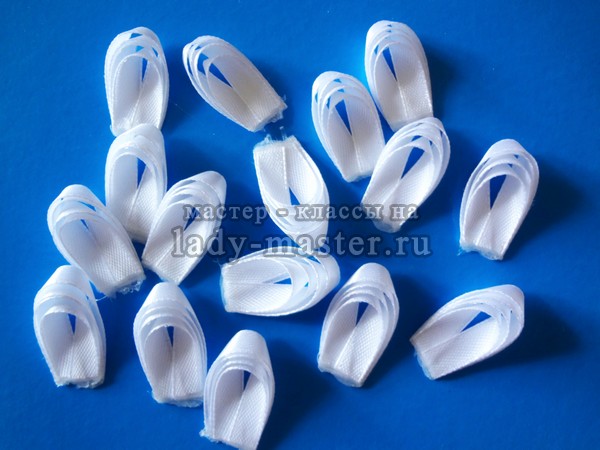
2. Make droplets from the segments, gluing the ends together. This can be done with glue or a lighter flame. The size of the droplet loops will decrease proportionally for segments of different lengths.

3. Glue the droplets in size together to make petals. Connect the parts, overlapping each other, and fix them to the glued base.

4. You need to turn all 24 portions of droplets into layered petals.
5. Divide all the blanks into 3 parts of 8 pieces each. Cut out the felt base 4 cm. Glue onto it the first layer of daisy-shaped petals, consisting of 8 parts. When gluing the droplets, retreat evenly from the edge of the circle - 05-0.6 cm.
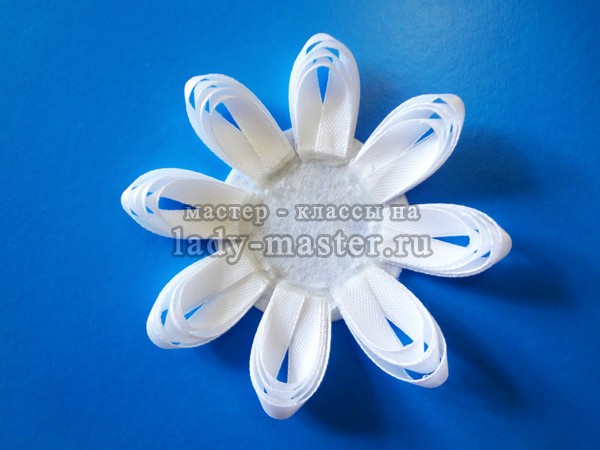
6. Glue the second part of the petals on top in a checkerboard pattern.

7. Add the last row from below for fluffiness (but the loops should be directed upward).

8. Cut 2.5 cm squares from a white piece of satin or ribbon. From these you need to make classic sharp kanzashi petals for the inner flower. And this flower will require 11 parts. Bend the squares diagonally (one).
9. Bend the resulting two-layer triangles in height. Close the resulting four-layer triangular blanks at the base and glue them together.

10. Trim along the bottom line to make the petal flatter.
11. Glue 11 petals into a daisy. Prepare a hugger, a duplicate flower and a half bead.

12. Also make droplets from 8 pieces of silver brocade 0.5 cm by 7 cm.

13. Glue the silver layer to the center of the snowflake.
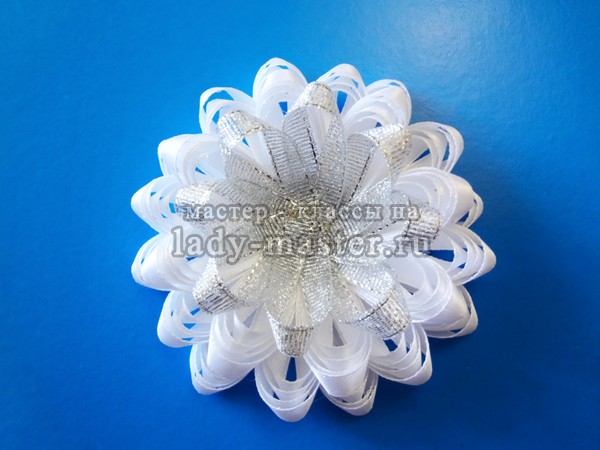
14. Apply glue and insert a daisy inside, then a hug with a pebble to make the snowflake sparkle.

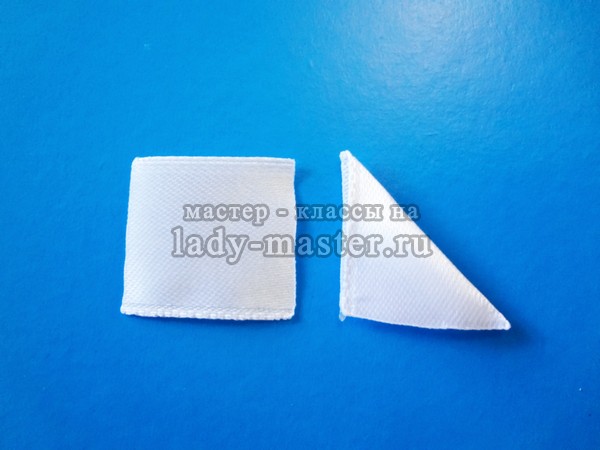
15. To create the bottom layer of white leaves that will resemble the spiky rays of a snowflake, use the last portion of tape: 8 pieces measuring 2.5 cm by 10 cm. Fold each strip in half. Then divide the resulting rectangle in half diagonally with a burner. Unfold the bags. Each rectangle will be divided into 2 portions, then use only those that look like sepals. Glue small mother-of-pearl half-beads to the ends.

16. Glue the leaves on the bottom as the last layer. Place them evenly overlapping around the circumference.

Kanzashi are the most desirable accessories for girls in the New Year. At a matinee with such accessories they will look simply stunning, everyone will notice their beautiful hairstyle. And to achieve such snowy luxury, you need little - purchase the necessary accessories according to the list, stock up on the necessary tools, and follow the simple steps of work described in the lesson.
For one beautiful snow hairpin we will need:
- 8 square pieces of satin ribbon in blue, blue, white colors - 5*5 cm;
- 8 square pieces of satin ribbon in blue, blue colors - 2.5 * 2.5 cm;
- 16 square pieces of white satin ribbon - 2.5 * 2.5 cm;
- 8 rectangular pieces of white satin ribbon - 2.5*5 cm;
- central hug - 1.6 cm;
- beautiful blue half bead - 0.8 cm;
- white felt base - 4 cm in diameter;
- durable clamp - 5.5 or 6 cm.
To make an unusual snowflake, you should combine different types of petals from satin ribbon of three colors - blue, light blue and white. This purely snowy color scheme is ideal for completing the intended accessories. Usually, girls prepare white or blue ball gowns for the New Year holidays, so hairpins made with their own hands will be an excellent continuation of the fairy-tale outfit of the young Snow Maiden. In the master class, triple sharp petals, rounded flat petals and “butterfly wing” petals will be made.
Stages of performing a New Year's hairpin
1. Carefully examine the final copy of the accessory and the prepared fittings. Large squares with a side of 5 cm will be used to create the central flower. Small satin parts with a side of 2.5 cm will be needed for two-color trefoils - additional inserts between the main parts of the central flower. The rectangular white stripes will later become the “butterfly wings”.

2. From a 5 cm ribbon (blue, light blue and white) make a triple pointed petal. Bend the squares diagonally.

3. Fold the triangles in half again. Apply the resulting layers alternately - blue on blue, and white on blue. Pinch, trim and singe the boat petals.

4. Make 8 petals from the prepared squares in three colors.

5. Make a round petal from a 2.5 cm ribbon (blue, light blue and white). Bend the squares diagonally.

6. Close all the corners at one point near the right angle. Round the pieces, moving the sides back, extending the longitudinal fold in the center. Solder the bottom of each prepared part immediately, squeezing the sides with your fingers or a clamp so that the petals are flat.

7. Insert the blue round petals inside the triple sharp petals prepared earlier.

8. Glue the central flower from the prepared complex parts.

9. You should have 8 blue round parts, and 2 times more white round parts. So much was prepared according to the list. Glue the triple structures together by collecting 2 white and 1 blue petals.
10. From a ribbon measuring 2.5*5 cm, make a “butterfly wing” petal. Make tents from rectangles by lowering 2 adjacent corners down to the opposite side.
11. Lift up the sharp corners. Bend the resulting square in half with a gap in the center, moving the side parts back. Squeeze the lower part of the petal and solder it, splitting the upper part.

12. Make 8 white split petals, collect them into the top flower. Prepare the center for the future snowflake.

13. To model a New Year's decoration, you should have the following parts ready: a 4 cm white felt circle, a central flower consisting of eight complex petals, an upper flower of eight “butterfly wing” petals, decorated with a beautiful center, 8 triple white and blue parts.

14. Collect a kanzashi snowflake. Glue the white part to the central one, insert triple parts between the petals of the main part.

15. Glue the entire structure onto felt.

16. If your plans include creating a second snowflake, then repeat all the operations described here again.

17. Glue a bobby pin to the felt circle on the back side.
Now is the time to try on unique kanzash for the New Year and show off in front of the mirror.
Did you like the product and want to order the same from the author? Write to us.
More interesting:
See also:
Sweet gift "Winter House"
Gift made from candies for the New Year "Sweet House" On the eve of a wonderful and bright New Year holiday...
The New Year is coming very soon, and if you are reading this article, it means that you have decided to find interesting ideas for the elegant interior of your apartment or house. Most often, when talking about such decorations, they mean Christmas tree balls, garlands, or toys made from the material that is at hand. Despite the fact that snowflakes are also classic New Year's decorations, we bring to your attention a detailed lesson on creating snowflakes in the kanzashi style. So if you want to your home has been decorated with original products, this article is just for you.
The specificity of snowflakes using the kanzashi technique is that to create them you will need ribbons of satin fabric. Therefore, you will not need to update these crafts annually - they will turn out to be very durable. Making kanzashi snowflakes does not require any special knowledge or skills from you. They can be created quickly and easily.
What materials will we need for the job?
The main material you will need when creating kanzashi snowflakes is satin fabric. It should be light, light and very durable.
In addition, stock up on the following materials:
- ribbons made of satin fabric (can be replaced with organza, silk, satin);
- thick cardboard;
- threads;
- needle;
- small scissors;
- waterproof transparent glue;
- ruler;
- pencil;
- lighter (can be replaced with matches);
- clamp or tweezers;
- beads or beads (snowflake decor).

We advise you to stock up on all the necessary materials in advance, because this work will require great care and attention from you. Therefore, you will not have extra time and the opportunity to select materials while working.
Description of the stages of creating a snowflake using the kanzashi technique
At first, this process may seem quite complicated. But there's really nothing too complicated about it. Strictly following our instructions will help you achieve wonderful results. The creative process itself will take place in several stages.

First stage
We take fabric prepared in advance and need to cut a couple of small squares from it. In this case, everything will depend on what kind of snowflake (large or small) you want to get in the end. The standard dimensions are three by three centimeters. In this article we will focus specifically on the standard form. However, this does not mean that you should follow it exactly without experimenting.

The number of squares directly depends on the desired shape of the future product. In this master class we cut out forty-two blanks.
We will create small petals from the cut out squares. Small squares should be folded diagonally. This should be repeated three times, and as a result you will get a small triangle, which includes several layers.

The 2 corners that are on the outside of the triangle need to be folded towards the center so that your figure takes on a rounded appearance.
Please note that for greater convenience, you should hold the fabric with a special clamp or tweezers.
As soon as our triangle is folded, we should carefully fix the corners. Therefore, the edges of our future petal need to be melted and firmly held together until the material cools. As a result, you will have a finished petal.

This way you will need to do it eleven times (according to the number of squares). The petals that you get as a result of such actions must be placed along the inner edge of the future snowflake.
Regarding the external part, similar parts will also be placed on it.

After you have carried out the procedures described above, you should get another thirty squares, which need to be rolled in the same way, but without going through the stage of giving them a rounded shape. In other words, you need to melt triangles with pointed corners.
Second phase
Here we need to make the central part of our snowflake. To do this, take a needle and thread and thread 6 petals with rounded shapes through it. As a result, you need to secure the thread in such a way that these petals create a rounded flower.

To form the rays of the future product, which emanate from its center, you will need glue. Take 2 pointed triangles and fasten them to each other. If you don’t have glue or you don’t want it to stain the fabric, you can do this procedure with a needle and thread. Using the same principle, you need to connect twelve more triangular petals. Remember that the petals should not be completely fastened, but only one of the corners should be connected.

After the 2nd petals are ready, glue (or sew) the 3rd petal among the 2 neighboring ones. As a result, you will have a part that will consist of 3 petals fastened to each other. Similarly, we attach the petals to twelve more completed elements.

After which you will have twelve finished parts, consisting of 3 petals.
Then you need to start connecting in pairs: attach one part above the other and repeat this combination for the remaining 10 figures. If you want, you can create longer rays or make them of a non-standard shape: in this case, everything will be dictated by your imagination.
Third stage
Now let's move on to creating the base of our product. To do this, you need to take fairly thick cardboard paper and make a small circle out of it using scissors. Its size should be slightly less than the area of the average flower for our snowflake. Then we take the fabric and cut out a circle from it, the diameter of which coincides with the average flower.
Also note that It is not necessary to use exactly these materials. It is possible to choose any other fabric and other dense material to create fastenings, because these parts will be placed at the back of the snowflake.
In addition, carefully consider what the cord on which you will hang your snowflake should be. You should measure the required length to hang the product. Most often, this is done in the form of a loop.

Place the cardboard circle in the middle of the fabric circle, and then gather it with thread so that after tightening, you get a small bag with a solid base. Next, we sew 2 edges of the lace to it to create a kind of pendant for the product.
After which you can proceed to the stage of assembling the kanzashi snowflake: you should fasten its core and the ray blanks with glue.
Please note that the rays must be attached to the wrong side of the product.
As soon as the glue dries, you need to sew either glue a loop pendant on the reverse side.

Thus, you are convinced that the work on creating a kanzashi snowflake is quite simple. Even the little ones will enjoy this activity, so get them involved in the work. Finally, we decorate the snowflake with beads, sparkles or seed beads. A New Year's snowflake in the kanzashi style will give your Christmas tree an irresistible look.
To make an openwork satin snowflake you will need:
white satin 5*5 cm – 6 pcs., 2.5x2.5 cm – 18 pcs., ribbon 0.5x15 cm – 1 pc., circle with a diameter of 3 cm;
blue satin 5*5 cm – 6 pcs., 2.5x2.5 cm – 12 pcs.;
white rhinestone – 1 flower;
Moment crystal glue, scissors, ruler, lighter, thin tweezers.
Preparing parts
Satin ribbons are cut into squares of 5x5 cm and 2.5x2.5 cm in the specified quantity, the edges are melted using a lighter or candle. You can use a soldering iron for cutting, then the edges will already be processed. After preparing the parts, you can begin to form the petals.
The blue and white satin square is folded twice diagonally. Then the blue triangle is overlapped with the white one so that the tip of the white one protrudes slightly. The two pieces are folded in half with the blue ribbon inward to form a petal with a sharp tip. The edge of the petal must be cut off a little and soldered using a lighter. The bottom of the petal is also cut off and melted, but the edges are not glued together; a hole should remain. This is how 6 white and blue petals are prepared.


The same sharp petals are made from parts 2.5 * 2.5, but only one tape is used. For ease of working with small parts, you can use tweezers. The tip is melted without cutting, and the bottom is slightly trimmed. A hole should also form in the small petals - the product will be more openwork.

Now you need to glue the rays of the snowflake: two white petals are glued together, two already connected blue petals are glued into them, then the top is glued - the white petal. And so on for the remaining six rays. Large bicolor petals form into a flower, sticking together in the center.

Assembling a snowflake
A circle cut from ribbon is glued to the bottom of the flower - this is the base of the snowflake. A thin ribbon-loop is also attached to the mug so that the snowflake can be hung on the Christmas tree. Rays are glued between the petals of the flower. The middle of the snowflake is decorated with a suitable rhinestone.


