Large box for do-it-yourself needlework. How to make a cardboard box with your own hands. Options for making boxes
Content
A craft box differs from a regular box in several important nuances. Firstly, it must be of significant size so that all the necessary handicraft supplies can be placed in it. Secondly, it should have several compartments inside in which you can put different materials and tools.
Made from cardboard and fabric
There may be several options.

To make such a box with your own hands, which will consist of five sections, you need to prepare cardboard, fabric, glue, cardboard thread cylinders, scissors and braid. If there are no cardboard cylinders for knitting threads, you can also make them yourself from thick cardboard.
For each cylinder you need to cut out a suitable bottom from cardboard of the required diameter, and then cover them with fabric.

There should be five of these cylinders in total; they will fit most harmoniously in a handicraft box. An additional gasket on the bottom of each cylinder should also be glued with fabric and placed inside.

To seal the structure and cover uneven edges, another strip of fabric must be glued inside the cylinder. It can be in a contrasting color.

If desired, the cylinders can be decorated with braid.

Next you need to make the base and lid. To do this, take a larger cardboard that can accommodate all five cylinders. Two identical circles are cut out of cardboard, which are then connected to each other by a movable rectangle so that they can open. The width of the rectangle should be equal to the height of the cylinders.

The base is also glued with fabric.
For the inside, contrasting fabric is selected, which was used to glue the internal parts of the cylinders. They should be neat and even to hide all the unevenness of the lower layer of fabric.

The next step is to glue all the cylinders to the base. To do this, it is best to use Moment glue, which will reliably connect the fabric and cardboard together.

The box for handicrafts is ready.

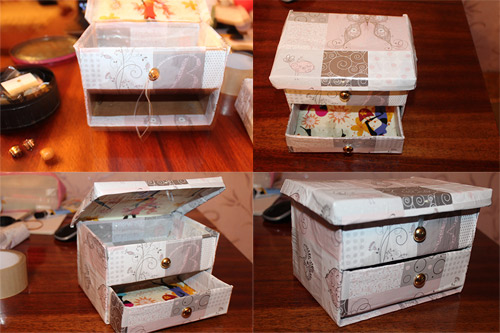
From a shoe box
A box for handicraft supplies, which is based on a ready-made box, is made faster and lasts longer. The main task in this case is to decorate it beautifully and make it functional inside.

In order to make a beautiful box for needlework from a shoe box, you need to prepare: an unnecessary box, glue, scissors, decor for decoration and two cardboard cartons of juice or milk. Boxes are needed to make compartments inside.

Their number and dimensions must match the internal dimensions of the shoe box in order to fit evenly inside. If you don’t have a suitable shoe box, and you don’t want to make such “pockets” from regular cardboard, you can change the measurements of the box by cutting it along the fold lines and then gluing it again to the size you need.
All the squares are inserted inside the box and glued together to form a single solid structure.

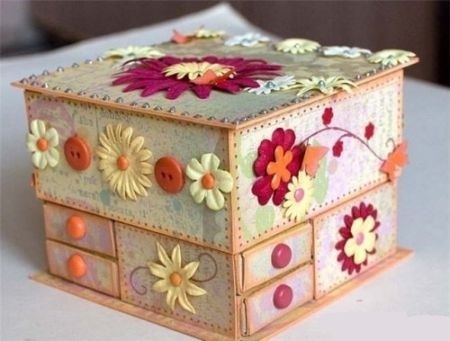
Master class on making a craft box
Razumova Valentina Nikolaevna, teacher at the Shukhobod kindergarten
Description: I present to your attention the process of making a round box from a linoleum tube, decorated with fabric and fittings, as well as a butterfly made using the kanzashi technique. The master class will be useful for creative people, teachers of kindergartens and schools for their own self-realization in creativity. It can also be used in circle activities with older schoolchildren.
Purpose: a box for needlework, a gift for loved ones, a craft for an exhibition or competition.
Target: making a round box for needlework from waste material and fabric.
Tasks:
* introduce the technology of making a round box from a linoleum tube or fabric;
* develop the ability to decorate a product with fittings and butterfly decoration using the kanzashi technique;
* develop your own creative potential.
Any needlewoman, of which I include myself, always has at hand a lot of all sorts of “necessary” things, little things, beautiful trinkets, scraps that are waiting for their “finest hour” when they find their use. Until that hour comes, they often gather dust, and we listen to irritated grumbling: “When will all this end?...and how long will all this disgrace continue?!” And also: “When are you going to throw away all this trash?”
At the same time, every creative teacher knows that toilet paper rolls, buttons, shreds, bottles and bottles and other “trash” are valuable materials for creativity. You just need to find a use for it.
Manufacturing process
Today I suggest using an ordinary linoleum tube to make a beautiful box. Of course, not all of it will be needed. We need to cut off the piece we need to the size we need.

My blank has a height of 11 cm, a diameter of 11 cm. Blanks of a smaller height can also be used for making boxes.
Materials and tools:
* round blank;
* corrugated or any thick cardboard, foil cardboard.;
* scraps of green fabric;
* braid and lace in gold and green shades;
* glue: “Moment” transparent, “Superglue”, “ErichKrause”, “Moment-Montazh”;
* needle, thread, scissors, padding polyester;
* pencil, felt-tip pen;
* for making a butterfly: scraps of fabric in green and yellow shades, a candle, matches, beads, silver cord.


First we need to prepare templates for the bottom and lid of the future box. To do this, place a round base blank on thick cardboard and trace it with a pencil first along the outside - there will be two such templates.

Next, we trace our blank along the inner contour; there will be only one such template.

We get the following blanks:

Cut out the details.

For now, we’ll leave them and start gluing the base of our future box. We coat the workpiece with glue - you can use any glue you have on hand, preferably transparent. We take a long piece of fabric (I have green), bend it in half lengthwise and gradually wrap the box with such tape, covering the uneven edges of the fabric with the previous layer.


We continue to act in the same way, gradually wrapping the entire workpiece.


Gluing the last turn of fabric, we bend the uneven edge of the tape inward. It should turn out something like this: beautiful and aesthetically pleasing both inside and outside:

While the base of the box dries, let's work on the bottom. Take the cut out template and trace it on the fabric, stepping back a little from the edge. Cut it out.

We take a beautiful sheet of foil cardboard that matches the color of the box - this will be the inside of the bottom.

We trace the bottom template on the wrong side of the cardboard and cut it out.

The resulting blanks for making the bottom of the box were: a circle made of thick cardboard, a circle made of foil cardboard, a circle made of green fabric of a suitable color - green.

We cover the cardboard with green fabric like this, coating and folding the edges of the fabric:

We close the top with a beautiful circle of foil cardboard.

The result was a beautiful bottom of the box, covered with cardboard on one side and fabric on the other.

Glue the bottom to the box with any glue. You can arrange it in different ways, I decided to draw it inward.

Inside view:

It is better to put the box under pressure so that it sticks better. For this purpose, we place several books on top.
We are working on the lid of our future box ourselves. We take two templates - one made according to the outer diameter of the base of the box, the other along the inner one. We place the templates on the fabric, trace them with a felt-tip pen, making allowances of about 2 cm. Cut them out.

We sew a larger circle of fabric along the edge with a “forward needle” seam and tighten it slightly.

We stuff it with padding polyester.

Place a circle of cardboard on top and tighten the fabric. We stitch for strength.

This is what happened.

Let's start decorating the lid. Sew gold lace around the edge.

Result (view from the wrong side):

View from above:

You need to close the ugly underside of the lid. For this you will need a second part. The algorithm is the same as for the manufacture of the first part. We sew along the edge of the fabric with a needle-forward seam, pull it together and stitch it. There is no need to stuff it with padding polyester here.


The result was two lid parts covered with fabric, one of them with lace. Front side:

Wrong side.

Coat it with Moment glue (transparent) and glue the two parts of the lid together.

We get the following result.

We cover the top of the lid with a beautiful braid.

We also cover the bottom edge of the box itself with braid, covering the junction of the bottom and the base of the box.


The box is almost ready.


I want to decorate the lid. There can be many options. I decided to make a butterfly.
Making a butterfly using the kanzashi technique

We will need:
* scraps of fabric in green and yellow-gold shades or satin ribbons;
* candle, matches
* tweezers, scissors;
* beads, thin silver cord;
* Moment glue is transparent.

We cut the pieces of fabric into 5 by 5 cm squares. For the butterfly you will need 4 green squares and 4 yellow squares. It is better to use satin ribbons, but if there are no ribbons of suitable shades, then you can use any synthetic fabric, as in my case. We scorch the edges of the squares in a candle flame. You can also use a lighter or burner for this purpose. But a candle is more convenient for me.


Let's start making wing petals. Take the green square of fabric and bend it in half diagonally.

Then fold it diagonally again.

We take the yellow square and follow the same algorithm. Bend in half.

Half again.

We combine the resulting blanks. Place the yellow one on top of the green one.


We connect the corners of the blanks together, forming a petal. We scorch the edges in a candle flame. We use tweezers so as not to burn our fingers.


In the kanzashi technique it is called "double sharp petal". We make four such wing petals.

Cut some fabric from the underside of the petals, aligning them.

Burn the edges of the petals:

Result:

We begin to form a butterfly out of them.

We glue the wing petals together with Moment glue, first in pairs, then among themselves. For strength, I also stitch it with thread.


We form the body of the butterfly from beads, sewing or gluing them, the head of the butterfly is a black bead. We make the antennae from a thin silver cord in this way: we thread a needle and thread into the bead, grab the silver cord, and pull it inside the bead. Apply glue to secure the antennae.
The butterfly is ready.
Every woman has many little things that need a special storage system. These are various decorations, accessories for creativity or handicrafts and many other items. A DIY cardboard box can be an excellent option for storing all the little things you need. Creating a suitable drawer is easy. The main thing is to use your imagination and give it a unique and original look.
A simple box. Preparatory stage
This option is easy to create. The box is a cardboard box. Its capacity and functionality depend on your needs. To make the task easier, it is recommended to use blanks. In this case, it is much easier and simpler to make cardboard boxes with your own hands.
The diagrams must be transferred to paper. Before calculating the dimensions, think about what purposes your box will be used for. If jewelry will be stored in it, then you should not make it bulky. But if the box is intended for needlework, the dimensions of the box should be much larger.
Manufacturing technique
So, let's look at how to make a box with your own hands from cardboard:
- Prepare thick cardboard.
- Using the diagram, mark the contours of the box on it.
- Cut out the resulting blank.
- Fold the fold lines. Carefully glue the places where the box is connected. If you take thick cardboard, it is difficult to work with. But it is precisely this that allows you to create a durable structure. Such a box will be an excellent place to store various things. You can use superglue or PVA. But a more reliable option is tape.
- The resulting box needs a beautiful case. To do this, use wrapping paper. This is a thin material that perfectly decorates the surface of cardboard. Old wallpaper is a good option.
- When gluing the box, be sure to leave allowances for the hem. Wrap them up and glue them to the inside of the box.
- Choose wrapping paper that suits your style for interior decor. Cover the bottom of the box with this material immediately. Then - the inner side parts.
- Now all that's left to do is come up with the decoration. For decoration you can use any ornaments, flowers, beads, beads. It all depends on your imagination.

Round box
Sometimes it seems that making a box of this shape is difficult. Totally wrong! It is quite easy to make a round box from cardboard with your own hands. You will see this for yourself.
Round box manufacturing technology:
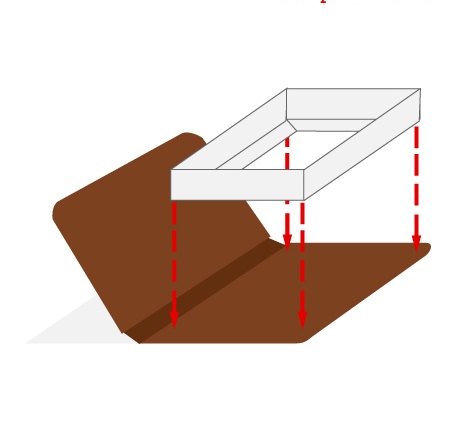
- Mark a circle on thick cardboard. This will be the base of the box.
- Draw a long rectangle. This is the side of the box. Its width is the height of the future box. And the length should correspond to the circumference plus 2-3 cm per connection.
- To assemble such parts together you will need allowances. They can be left on the base of the box. So, as shown in the figure or on a rectangular blank.
- Having carefully calculated the dimensions, cut out the blanks.
- Connect them with glue or tape.
- Make the lid for the box using the same technology. But remember that the base circle should be a little larger. After all, the lid should be easy to put on the box. And its height is less.
- So, you made an excellent cardboard box with your own hands. All that remains is to decorate it. When thinking about an interesting decoration, do not forget about an important point. All hems must be carefully disguised. Therefore, it is recommended to decorate both the external and internal sides.

Scotch tape box
This is a simple but original solution. How to make a jewelry box with your own hands from cardboard and a reel (from tape)?
Let's look at it in detail.
- Trace the bobbin on thick cardboard in an outer circle. You will need two such blanks. One will become the base, and the other will become the lid.
- Connect the bottom to the bobbin. You can use tape for this. Or leave a hem allowance at the base in advance.
- To make the lid, use the technology described in the previous example. Remember that it should be slightly larger than the base.
- You have created a wonderful box with your own hands from cardboard with a lid. Now it's up to your imagination. The original decor will make it a real work of art.
Soft box
Having considered simple options, let's try to diversify the technology a little. For example, if you want to create boxes with your own hands from cardboard and fabric, then you can use the following method. This box will be a great place to store important things. In addition, it is an excellent decorative element.

Let's look at how to make such a box with your own hands from cardboard. The master class will greatly help with this:
- You will need a round box. You can use a ready-made blank (for example, left over from a hat) or make it yourself.
- Apply a thin layer of glue to the outer side surface.
- Glue thin foam rubber to it.
- Choose a nice fabric. Measure a rectangular cut on it. Its width should be equal to twice the height of the box plus 10-15 cm for free folding. The length corresponds to the circumference with the addition of seam allowance. Wrap your box in this fabric.
- Cut a cardboard circle that will easily fit inside the box. Cover it with foam rubber and fabric. It is better to choose a lighter fabric for the bottom.
- If desired, you can decorate such a box in any way. Use ribbons, beads, buboes, beads.
Heart box
This box itself looks quite original. In addition, this box is easy to make with your own hands from cardboard.

The master class allows you to understand the progress of the work:
- Cut out two hearts from construction paper.
- Prepare two rectangles. Decorate one side with “teeth”.
- Glue a rectangle around the perimeter of the heart. Combine the prepared “cloves” with the base. It is best to use Moment glue. This will provide the necessary strength.
- Repeat the procedure for the other rectangle. In this case, be sure to take into account the allowance required to connect both side parts.
- Glue the second heart blank at the bottom. The decor imitating lace looks original.
- Create the lid for your box in the same way.
- Cut out pictures of bears or illustrations in a romantic style will add sophistication and originality. Complete the decor with beads, flowers, butterflies.

Box made of threads
This is another amazing technique that you can use to make a box. Let's look at how to make a box with your own hands from cardboard and thread.
Progress:
- You can choose any shape for the base. It can be a circle, rectangle or heart. Cut out two blanks from thick cardboard.
- One of them, which will become the bottom of the box, needs to be decorated. You can choose any solution for this. As a last resort, cover it with colored paper.
- In this base, mark holes around the perimeter with a needle. The distance between the “holes” is 1 cm. Try not to leave much space from the edge. Screw toothpicks into the marked holes. Each of them must be glued.
- Now you can take up the threads. Place the first row between toothpicks. Pass the thread as follows: in front of the stick, then behind it. The next row is placed in a checkerboard pattern.
- Braid to the middle. Now place a bead on each toothpick. Continue weaving with threads.
- Having finished the box, you need to secure the structure. To do this, put and glue beads onto each toothpick.
- The upper and lower parts of the box can be decorated with an original chain or ribbon.

Now you know how to create a beautiful cardboard box with your own hands.
Conclusion
If you are inspired to create such a masterpiece, then many of the recommendations given in the article will be useful to you. Such a detail will become an amazing decoration of your home and a source of your pride. In addition, a beautiful cardboard box, created with your own hands, can be an excellent gift. After all, every woman needs such things.
Content
The options that we have prepared for you are suitable for decorating a gift for any holiday and for any occasion, and for storing jewelry, cards, and various small items. Stock up on good thick cardboard, sharp scissors, glue and colorful paper.
Options for making boxes
From a candy box
As usual, let's start with the simplest and most affordable option for creating a cardboard box with your own hands, using a ready-made candy box. What you will need additionally:
- PVA glue;
- scissors;
- decorative (gift) paper;
- white acrylic paint.
First, you need to remove the foam insert with the candy slots from the box. Now the box needs to be covered with gift paper and the inside painted with white paint. Instead of paint, you can use white cardboard to decorate the inside of the lid. If you want, you can return the plastic cells to make it convenient to store rings, earrings and chains separately.
From ordinary matchboxes
This is also one of the interesting and affordable options for making a cardboard box with your own hands. The main material will be cardboard matchboxes glued together. What you will need:
- thick cardboard for the base;
- matchboxes - 8-10 pieces;
- PVA glue;
- paper for registration;
- beads, felt, rhinestones, seed beads and other decor.
First, you need to cut out a square from thick and strong cardboard to which you will attach the parts of the future decorative chest of drawers. Connect matchboxes in pairs and glue them to the base. Now you can start decorating. You need to cover the chest of drawers with paper and attach your decor to them.
Use buttons or large beads to make convenient handles for drawers.

Corrugated cardboard
This is a do-it-yourself chest box made of cardboard, which does not have a lid and which can serve as an organizer on the desktop. What do you need:
- several sheets of thick corrugated cardboard or regular thick cardboard;
- stationery knife;
- PVA glue;
- Ruler and pencil;
- pattern.
First you need to make a drawing of a cardboard box with your own hands or use ours:
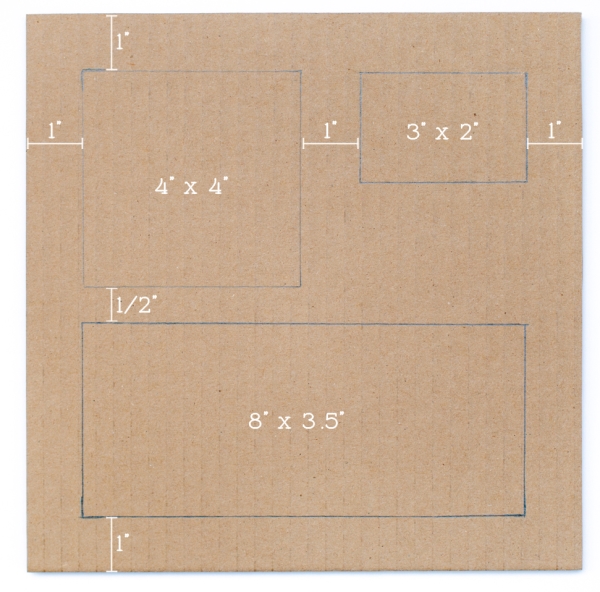
Now, using a sharp utility knife, you need to cut out the holes for the future organizer. You need to prepare 20 such templates. But! Make five layers with only the large hole, another five with all three holes, and 10 patterns with only two holes. You will also need 5 sheets without holes.
Now you need to glue the parts together: first, connect the solid parts, then glue the parts with a large hole, then glue the parts with two holes and the rest of the parts on top. You need to put something heavy on the organizer and leave it overnight. Now you can place a stylish and environmentally friendly box on the table and store your phone, notepads, notes and other necessary things in it.

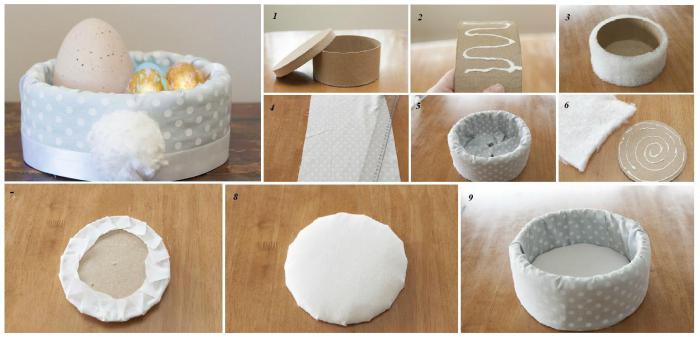
Round
This is a DIY version of a box made of cardboard and fabric. You will also need the following materials and tools:
- padding polyester;
- cardboard;
- dense material with any pattern;
- PVA glue;
- sharp scissors;
- paper tape;
- binders;
- simple pencil;
- ruler.
First you need to cut out a circle of the diameter you want the chest to be. Now you need to cut out a long rectangle for the side. The width will depend on how tall you see the future product. Now connect these two parts using masking tape.
Now you need to cover the blank with the selected fabric, and also cut out the bottom of the box from the fabric. Use binders to secure the material and allow it to stick well. Using the principle of preparing a box, make a lid, glue padding polyester on top so that it is soft and also decorate the lid with fabric. You can use additional decor to decorate the sides and lid.

You can decorate the box not only with fabric, but also with thick gift paper, and also use a heart shape. We offer several interesting options that are suitable for decorating a gift, for example, a watch or jewelry, as well as for storing sewing supplies or jewelry.
In such a soft box it is convenient to store jewelry made of precious metals or use it as an egg stand for Easter.

It is not necessary to additionally decorate a cardboard box with paper or fabric; you can use corrugated cardboard and leave it in its original form or paint it in any color.

In the form of a chest
This chest will be useful for playing pirates, for collecting money at a wedding, or for storing any things. If you use a ready-made pattern, which we will post below, then choose thinner cardboard that bends easily. If you assemble the chest lid in parts, then thick cardboard will do.

Decorate cardboard boxes with your own hands using fabric, paints and satin ribbons.


Made from cardboard with several compartments
You need to stock up on the following materials:
- thick cardboard (an electronics box will do);
- sharp tailor's scissors;
- PVA glue;
- scotch;
- large buttons;
- decor (paper, lace, napkins for decoupage technique, paints, rhinestones).
First, make a drawing of the future box on prepared cardboard.
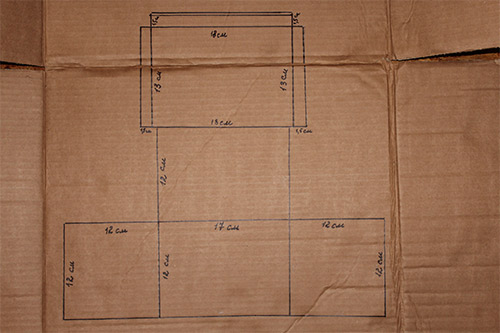
Now you need to carefully cut out the pattern and prepare other parts.

Assemble all the design parts using tape. It will provide the structure with strength and stability.

When the structure is ready, then you can start decorating. Use any material suitable for this: fabric, paper, lace, satin ribbons. Use large buttons as handles.
Box-book
An interesting gift option or option for secret storage of jewelry or money.
What you will need for the craft:
- thick binding (take an old or unnecessary book that you don’t mind using for crafts. Although, of course, book lovers can argue with this);
- scissors;
- pencil;
- ruler;
- corrugated cardboard;
- thin cloth or gauze;
- for decorating the top: vinyl wallpaper or thick fabric, or gift paper and other materials.
First you need to separate the binding of the book. Next, you need to construct a future book-safe box from corrugated cardboard.
Carefully connect the parts and use gauze to seal the walls. Next, all that remains is to decorate the top of the future book, using any material that is at hand.

This is an option for designing a box in the form of a book, although the execution technique shown in the photo is somewhat different. Here a real book is used and its glued sheets with a cut-out hole serve as a container for storing objects.
From a milk or juice box
A fairly simple option to implement, but it turns out very cute and beautiful. At first glance, it is even difficult to understand that the chest is made from an ordinary Tetra Pak box. What you will need:
- empty and clean box of any shape;
- masking tape;
- printed paper or wrapping paper, you can even use wallpaper;
- stationery knife;
- ruler;
- pencil;
- glue;
- all kinds of decor;
- satin ribbon.
To begin with, on the wide side of the box you need to use a pencil and a ruler to outline the future door and carefully cut it out using a knife.
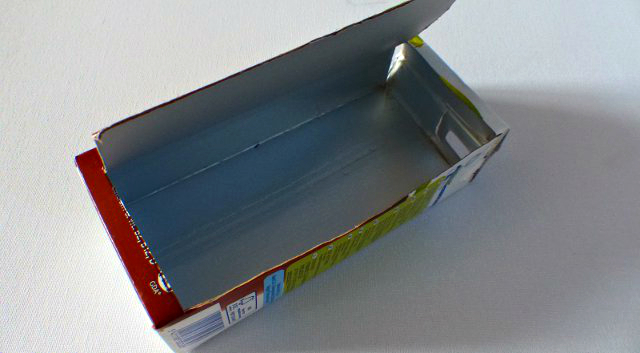
Now you need to cover all sides of the box with tape (you can use masking tape), as shown in the photo:

Next, you can start decorating the box. Use pre-made materials and glue to complete the look. You can also attach a lock or a satin ribbon to your box, tying it in a bow.

To make the inside of the box look like a real box, you need to cover it with velvet, felt or any suitable soft material.

We invite you to look at a few more photos of do-it-yourself cardboard boxes:

When decorating, you can use various interesting techniques, for example, decoupage, craquelure, quilling and others.

An ordinary shoe box makes an excellent jewelry box with compartments for storing jewelry. Thick cardboard is quite easy and convenient to work with, it is durable, amenable to glue and goes well with various decors.
We suggest using one of the mentioned techniques to design a cardboard box with your own hands. A master class is traditionally at the end of each of our articles:
Post Views: 1,171
Chest size 45 x 30 cm; height 38 cm.
The chest turned out to be quite large. I wanted to decorate it, so to speak, “interiorly”, not for storage in a closet, so the color was chosen specifically in combination with the interior of the room.
Next is a master class on making
Master Class
for making a craft chest from a box.
1. Base.
To make such a chest you will need 1 box as a base and another 1-2 boxes for cardboard. In my case, corrugated cardboard boxes used for household appliances.
Fig.1
First you need to completely close the box, sealing it with tape. Mark the lid of the future chest, moving a few centimeters down from the top edge (for me, with a total height of the chest of 38 cm, the lid needed 8 cm). Then, using a cardboard knife, cut off the upper part (Fig. 1).
For structural strength, it is necessary to duplicate the walls, bottom and lid with cardboard (except for the sides of the lid). For this we will need an extra couple of boxes that I mentioned above. Moreover, the cardboards for the back and side walls of the chest should be several centimeters higher than the side, and for the front wall you can leave the size to size (Fig. 2).
Thus, at the preliminary stage we have: a base in the form of a box with a lid and 6 cardboards that duplicate the walls, bottom and “ceiling”.
2. External upholstery.
For the external upholstery we will need: fabric, padding polyester and a hot gun.

Using a hot gun, using broad strokes, glue the padding polyester to the outside of the box. We measure the upholstery fabric with a good allowance at the top and bottom so that it can be firmly glued to the hot gun from the bottom at the bottom and at the top, folded inward. It is more convenient to start from the top edge, securing the fabric with clips. Then, pulling a little, glue it to the bottom
(Fig. 3)

Since I used fabric with a fairly large pattern at the seam, I ended up with a funny combination :), some kind of zebra elephant :), but you can’t guess. Carefully pin and sew with a blind stitch. (Fig. 4)

Figure 4.
Little trick:
The joint is best placed as close to the corner rib on the back of the chest as possible. This will look more aesthetically pleasing.
For the lid we sew a cover in the most primitive way. Cut a fabric rectangle to fit the size of the top of the lid. We sew a wide strip around the perimeter to it. The width of the strip should be twice the height of the edge of the lid. In my case, with a lid height of 8 cm, the width of the strip is 16 cm. In order to fold the fabric inward, the inner side of the edge of the lid was also upholstered. (Fig. 5)
First, we cover the top and edges of the lid with padding polyester, then we put on the upholstery cover and glue it from the inside to the hot gun.

3. Internal upholstery.
For interior upholstery, you can use either fabric or paper. With paper, of course, everything is much simpler, but I used fabric, so I will dwell on this stage in more detail.
We already had cardboards prepared to duplicate the walls of the chest. Now we will need to cover them with fabric. According to the size of each cardboard, we cut out the fabric with a substantial allowance of at least 4 cm on each side. From the back side we tighten the fabric with threads, first from the sides, then from the top and bottom. The stitches can be made in large increments, but sufficient to evenly stretch the fabric. (Fig. 6, Fig. 7

rice. 6
Little trick:
To pre-fix the fabric on the cardboard, it is very convenient to use masking tape. It holds the fabric quite firmly (especially slippery ones, as in my case) and does not leave marks after removal. In addition, it can be used repeatedly

This is what it looks like from the back. Special care is not required here, as it will be out of sight. It is important to grab the fabric away from the edge so that the thread holds firmly and the edge does not crumble (1 - 1.5 cm from the edge).
4. Connect the box with the lid.
I connected the lid to the box using regular furniture hinges. This is perhaps the most special stage. This was my first time using this method, so I miscalculated a little. Or rather, I did everything exactly as I had planned, but now, I think that next time I will try to place the loops inside and not outside. I will try to experiment with this issue in the future, but now let’s return to our lid.
The lid was connected to the box using two hinges. Since the box is basically cardboard, I simply sewed on these loops. first to the lid and then to the box. (Fig. 8, Fig. 9)

5. Decorate the chest.
To decorate the chest, the following materials were needed: jute twine, wooden beads, bamboo sticks (skewers), a hot gun.
In several rows, quite tightly, I wrapped the box with twine at the top and bottom, retreating 2-3 cm from the edge. (Fig. 10)

Then I inserted bamboo sticks, imitating weaving (Fig. 11). Subsequently, the excess part of the stick (sharp edge) was removed and trimmed to size.

4 sticks on the left and right on the long side, and 3 sticks on the short side. It was possible, of course, to thread the sticks evenly around the entire perimeter, but somehow I didn’t want to drive the animals into the cage :).
I glued tape to the top and bottom of the hot gun.
Along the perimeter of the lid, I also glued a wide decorative braid with wooden beads to the hot gun.
I will dwell on the braid in more detail.
6. Braid.
To keep the decor in the same style, I made all the braid myself, from the same jute twine.
To finish the bottom of the chest, I crocheted the braid. Quite primitive - for a chain of chain stitches one row of single crochets (Fig. 12)


