Crochet booties for a 3 month old baby. Beautiful crochet booties for newborns: diagrams and description. Booties size by month
Booties - crocheting and knitting
Booties are very easy to knit, especially, in my opinion, crocheted. And they are decorated in more different ways: lace, pleats, straps, and ribbons are crocheted. Now there is a huge opportunity to use satin ribbons (the shiny surface of the satin harmonizes perfectly with the yarn), pearl beads, and rhinestones.On this page below there are examples of such decoration, taken from the vast expanses of the Internet. The design fantasies of modern knitters have led to the creation of booties - shoes, booties - sandals, sneakers. The simplicity and speed of knitting booties, the abundance of various materials for knitting make it possible to equip a little person’s wardrobe with booties, so to speak, for every romper.
How to crochet booties
Unlike the various options for knitting booties with knitting needles, when crocheting, two parts clearly stand out in the product - the sole and the top. And knitting begins from the sole.
The beginning of knitting is shown in the diagram with a red arrow - 15 air loops plus one for lifting the row. The length of the chain is approximately from the base of the fingers to the middle of the child’s heel.
Next are half stitches (very tight knitting, ideal for soles), single crochets and single crochets. Single crochet stitches, drawn as a fan in the diagram - these are two stitches knitted from one loop. The last row of the sole is tied with a row of half-columns (60 half-columns).
The sole can also be knitted with single crochets. In the diagram, in the places where the sole is rounded, 7 double crochets are knitted from one air loop (see explanations below).
Knitting the top of the booties is the most fun part of the job. Here are several options for the design of the top (photo from the Internet, free translation by the author):
You can link it like this:
Here in the pattern, the top of the booties is knitted from the top, from the ankle to the sole, and then sewn (or tied) to it; start - red arrow. Single crochets. In the middle part of the top there is an increase to widen the toe, from one column - two on both sides of the center front. The knitting ends with the same 60 stitches, which is equal to the perimeter of the blue sole in Fig. above.
The booties are tied with a border of single crochet stitches and air loops (light blue in the diagram).
In practice, they usually knit from the sole upwards: without tearing off the thread, on 60 loops of the sole, knitting the top in a circle begins: 6 rows of 60 stitches, 10 rows with a decrease in the central part of the top on both sides of the middle, two loops together. Next, 2 rows with single crochets, 1 row - three tbsp. double crochet, 1 chain (this is a row with holes for pulling the lace), 2 rows with single crochets, the last row is a border.
You can knit the following shoes:
Knit from the sole in the round (in the diagram - double-sided knitting, front and back. In this case, the back is then sewn together. The pattern is taken from a French magazine, but for some reason in the West they don’t like to knit in the round). Decrements on the toe are made evenly along the entire front according to the pattern (out of two single crochets - one).
To add height to the back of the shoe, several additional rows are knitted. The strap is a side chain of air loops and 1-2 rows of single crochets.
Tie the shoes with contrasting thread
Let's look at the principle of knitting another booties:
The diagram above shows the front part of the booties. The red arrow and air loops are the beginning of knitting, located at the instep of the leg.
There are generally 3 ways of knitting:
Knit the parts according to the pattern, all separately, then sew (tie, knit);
Knit according to the pattern, but at the end of each row, decrease a column and pick up the corresponding column of the sole. Thus, the toe of the shoe will be immediately tied;
Finish the last row of the sole in the middle of the front plus three columns. Turn the knitting and knit 6 stitches. Turn the knitting, air loop to lift the row, knit two stitches from one stitch, then 5 more stitches to the end of the row - a total of 7 stitches in the row. When knitting the last stitch, pick up the fourth loop of the sole from the center. Turn knitting. Again 1 column for lifting, 2 columns from one, etc.
As a result, when you knit until the leg is raised, you should get 20 loops. We break the thread.
The back of the shoe is knitted with a set of stitches around the perimeter of the sole - bottom pattern. The upper part of the heel is reduced by 4 posts for a better fit to the heel.
Some useful tips on crochet techniques:
How to knit 7 double crochets from an air loop to round the sole
How to knit two double crochets from one
How to knit one single crochet out of three (can be used to tighten the tops of shoes, traces in the center of the front part)
One double crochet out of five
Knitting the top of the bootie sock will look something like this:
The first row of the side of the booties is knitted in columns, inserting the hook not under both “braids” of the previous row, but only under the “back” (the face of the work is looking at you). The remaining part of the braid will be needed when finishing.
If you want the sidewall to be at an angle of 90 degrees to the sole, then the hook is inserted under the very column of the last row of the sole.
Now that we have figured out the principles of crocheting booties, I hope you will not be scared by this “Chinese letter”:
Do you recognize the oval below in the diagram? This is the sole. On the top left is the front of the shoes, on the right is the back, the strap goes to the top.
The main thing here is to combine the letter designations: we have tied the sole and to point D we continue knitting according to the pattern of the toe of the shoe (point C is the middle of the front). The back is knitted in single crochets from the point opposite D to point A.
But these are knitted from four squares:
The squares are knitted separately, then sewn together, or, as when knitting shawls, they are picked up together when knitting the last row of the square.
At the bottom of the diagram is the binding of the upper part of the booties - a place for pulling the lace. The booties are tied after the final assembly of the squares.
Please note that the dimensions of the sole are indicated: 4.5 - a chain of air loops, 1.5 - heel, toes - 2 units. The length of the sole corresponds to the length of 2.5 squares. When increasing the size of the booties, it is necessary to increase the squares.
Another model:
From top to bottom: sole, heel. Bottom left is a strap.
And finally, the most interesting part is the sock. It begins with a set of air loops (there are 14 of them in the diagram). Knitting with single crochets.
1 row (number 1 at the very bottom of the picture) - 14 columns, 1 v/p for raising the row. We turn the knitting over.
2nd row - 12 stitches, on the thirteenth we knit two from one, 1 stitch, 1 v/p for lifting the row.
3rd row - 1 tbsp., from one tbsp. two, 2 stitches, attached with a half-column to the fifth loop of the second row, 1 ch, turn the knitting over.
4th row - one half-column, 2 columns, two from one column, 1 column, 1 v/p for lifting.
In the diagram, black circles are half-columns, white circles are air loops.
Row 11 - we knit fifteen stitches until connected to the first row (as if we were collecting all the shortened rows 3-10), 5 chain stitches for pulling the strap, 2 stitches.
Rows 12-20 - 22 columns each. In the 20th row, don’t forget to make 5 chain stitches for the second hole for the strap.
Rows 21-28 - shortened rows with a decrease in the number of columns.
21 rows - 1 columns, 1 half-column. We turn the knitting over.
22nd row - 1 single stitch, 1 half-column, 3 double stitches, 2 double stitches together, 1 double stitch.
We turn the knitting over, etc. according to the scheme.
Row 29 - 1 single stitch, 1 stitch, 2 stitches together, 12 stitches. Turn the knitting over.
Row 30 - 14 columns.
The toe of the bootie is finished, we sew it to the sole.
The back of the booties - we collect stitches along the rest of the sole and knit, like the blue booties on this page above.
A few more options for crocheting booties:
The booties are crocheted with double crochets and decreases on the toe according to the pattern
We knit sandals:
Now the Internet is full of all sorts of unusual ideas for knitting booties!
Knitting pattern for crosshairs on booties-sandals from three straps. The thread does not break from the beginning to the end of knitting the straps.
A few more knitting options:
When knitting these booties, the sole was first tied with lace from a contrasting thread, then the top of the booties was continued to be knitted with a thread of the main color (2-3 rows, depending on the double crochet or single crochet you knit, along the entire perimeter of the sole without decreasing or adding, then 3 rows with decreases on both sides of the front part - two loops in each row). The top of the sock should be located at an angle of 90 degrees to the sides of the booties, so it is knitted, making one out of 5 or 7 stitches in front, then try it on so as not to fall apart. You can knit it separately and sew on an oval rosette. The number of columns used under the toe is approximately 1/3 of the sidewall. Finally, from the stitches of the back of the bootie and the sock, a bootleg is knitted in the round and decorated with knitted lace. The last thing is sewing on beads, satin flowers, and ribbons.
Pink booties:
For the top, a round rosette in the shape of a flower is knitted (you can pick it up on the page about knitting shawls) with a diameter slightly larger than the width of the sole. This circle is tied (or sewn) with a slight shirring to the front of the sole, then the back of the bootie is knitted. If desired, you can tie the shin higher. It turns out to be an openwork bootie with a round toe, which is comfortable for the baby’s foot. And beautiful.
Knitting
There are a great many ways of knitting with knitting needles: on five knitting needles, on two, in the round, without seams, knitted on top, bottom, stitched along the sole, etc. My attempt to collect all the options was clearly not crowned with success. Therefore, as original methods are “discovered” and letters are received from readers with photos and descriptions of “their” knitting booties, this section will be updated.
(according to N. Svezhentseva, “Peasant Woman” magazine, 6/1988)
Materials: thin wool yarn - 25-30 g, any colors or combinations thereof will do.
Description of work:
The model consists of two parts: a shoe and a sole. Let's start with the shoe. Cast on 72 stitches (including 2 edge stitches), knit 6 rows in garter stitch (knit and purl - knit stitches) and 8 rows in stocking stitch (knit stitch - knit stitches, purl stitches). - purl loops). Now distribute all the loops into three parts: two side panels (28 loops each) and a central one (14 loops). We continue stocking knitting: in the front row, knit 28 loops of the right side and 13 loops of the central part, knit the last 14 loop together with the first loop of the left side.
Turn the work wrong side out. Now: in the purl row, purl 13 stitches, and purl the 14th and 15th stitches together; in the front row - 13 loops are knitted, and the 14th and 15th loops are knitted together. Continue this descent until you have knitted half of the sidewalls - there should be 14 loops left in the work. The number of loops in the central part remains unchanged.
Work 8 rows in stockinette stitch. In the front row you need to make an openwork pattern for the lace (ribbon), which you will thread into the holes of the openwork - these will be the ties. To do this, alternate 2 stitches together along the entire row, knitting and yarn over. In the purl row, purl all the loops and yarn overs. After 10-14 rows, repeat the openwork row. Knit the last 6 rows in stockinette stitch, cast off the stitches.
We knit the sole in stocking stitch. Cast on 5 stitches and knit the first row. At the end of each of the next four rows we add 2 loops, making 13 loops in the work. We knit 20 rows evenly, then add one loop at the beginning and end of the front row. We repeat the increase through the front row and knit 6 rows exactly, there are 17 loops in the work. We start decreasing at the beginning of each row: 2 times one loop and 2 times two loops. We close the last 5 loops in a row.
Assembly: Iron the parts, sew the shoe, connect it to the sole, crocheting it along the front side with a crochet hook. We thread a lace or ribbon or braid into the holes of the openwork row.
“Sports”: clothes for legs
Cast on 40 stitches on needles size 2.5 with purple thread and knit 6 rows. main pattern, 1 r. purl loops (fold line) and 6 r. main pattern. Continue working in stripes (alternately 4 rows of lilac and white). Having knitted 6 p. with the main pattern using lilac thread, perform 1 openwork row (* knit 2 stitches, knit 2 stitches together, 1 yarn over, repeat from *) and 2 r. with the main pattern using purple thread, then leave 14 stitches on each side.
On medium 12 sts, knit 14 r. purple thread. From the edge loops of the middle part, cast on 7 sts and continue working together with the remaining loops (= 54 sts), with the 1st r. knit with purl loops. Knit in stripes (alternately 4 rows of lilac and white). Then knit 2 rows for the sole. Using garter stitch purple thread, bind off all stitches loosely.
Make seams. Turn the folds over and sew them on. Twist the cord (approx. 45 cm) and thread it through the holes in the openwork row.
An interesting option - “Suns”: (description and photo sent by site reader, needlewoman Varvara from Chelyabinsk.)
You will need approximately 25-30 grams of “Children’s” or “Moskvichka” type yarn, a 1.2 m thin satin ribbon, 2.5 mm knitting needles.
I made this work on 2 knitting needles, but you can do it on 4 knitting needles.
Cast on 40-42 loops, knit 4 rows purl, 4 knit and 4 more purl.
12 rows - elastic band 1*1.
In the center of the knitting we select 10 loops and knit 14 rows in garter stitch in front of the booties. We collect 7 loops from the edges of the knitted square, and from one to three on the corners of the sock (k1, n, k1).
We repeat knitting the top, 4 rows - purl, 4 rows - knit, 4 - purl.
Again we continue knitting in the center, highlighting 10 loops, knitting approximately 32 rows in garter stitch (all rows of knits or all rows). At the beginning of each row we close off the side loops.
We make the remaining loops (5-6 on each side) into the heel and sew the back seam.
We stretch the satin ribbon through every third loop (if you knit a lace, you should make holes at the end of the elastic). Sew on bombs.
Dimensionless - description and photo sent by site reader, needlewoman Varvara from Chelyabinsk.
They are good because they are knitted on 2 needles and do not have a specific size, that is, they can stretch as the child’s legs grow. You can knit with different finishes on the top, the main thing is that the lower part is knitted with English or semi-English elastic. Upper part and trace: knit on 1.5-2 mm knitting needles, semi-English rib on 2.5 mm knitting needles
Main part. Cast on 41-45 stitches, knit 3-5 cm with 1x1 rib. In the middle part, select 9-11 stitches and knit a rectangle with garter stitch, approximately 2x3cm (16 rows)
On the sides of the rectangle, continue knitting from the edge loops. In the corners of the front part, for the required volume, knit 3 loops from one. We knit 1-2 rows with an elastic band 1*1, switch to 2.5 cm knitting needles and knit 3 cm (-14 rows) with a semi-ant line and an elastic band (1 row - 1 l, 1 yarn over, 1 slip without knitting, 2 row - 1 purl, knit 1 l together with the yarn over).
We knit the last 6-7 rows with a 1x1 elastic band, moving from the 3rd - 4th row to thin knitting needles. We collect open loops, starting from the middle of the knitting thread, alternating one on the right and on the left. We tighten it approximately halfway and sew the back seam. Insert a ribbon (for a thin satin ribbon it is not necessary to knit holes).
Finishing 1. Pink lace: Already on knitted booties, pick up loops along the top of the knitting and knit lace (1 row - 1 l, 1 yarn over, 2 row - back and forth, repeat 2 times and close with knit stitches)
Finishing 2. We start knitting turquoise booties with finishing: We knit the teeth 4 rows - in stockinette stitch, 5th row - 1k, 2 knits together, 1 yarn over, 6th row - purl, 4 rows - in stockinette stitch. For the pattern - 1 row of purl, 7 rows of stockinette stitch with white thread, 2 rows of purl.
On a white stripe, the design is embroidered with colored thread, imitating knitting loops.
A simple option - knitting from the sole:
Size: 13-14.
Threads: Tenderness (100 gr. 300 m), 50% wool, 50% goat down.
Knitting needles: No. 2.
Cast on 15 loops. Knit 10 rows in stocking stitch, in the 10th row decrease one loop at the beginning of the row and at the end. Knit 24 rows. This will be the sole. Leave these 13 loops on one knitting needle. On the other three sides of the rectangle, cast on 3 more needles 24 sts on one side, 15 sts on the toe, 24 sts for the other side of the bootie (Fig. 1). Continue knitting on 5 needles: purl one row, knit the second, alternating white and blue threads in every 3rd row.
Having knitted the bootie to the desired height (12-15 rows), we will continue to knit only 15 sock loops - this will be the top of the front part of the bootie. We knit on two needles in stockinette stitch, knitting the first and last loop of the row together with the loop from the adjacent needle (Fig. 2). Knit until there are 14 loops left on the side knitting needles, that is, there are 3 knitting needles with 14 loops each and one knitting needle with 15 loops. On 5 knitting needles we continue to knit the bootie cuffs.
First, we knit 2 rows with yarn overs to form holes for the lace: 1st row - two knit stitches together, yarn over. 2nd row - elastic band (1 front, 1 purl). Knit a 9 cm elastic band. Bind off the loops using the Italian method. Insert laces or an elastic band into the resulting holes.
Here is another very interesting model - (from http://forum.forumok.ru/)
Size: 62-68
Materials: yarn (75% sheep wool, 25% polyamide, 125 m/50 g) - 50 g lilac melange yarn. 5 knitting needles No. 4; hook No. 4; 2 buttons
Basic pattern, needles No. 4: garter stitch = knit. and out. rows - persons. loops; when knitting in circles - alternately 1 r. persons, 1 rub. purl loops.
Elastic band, knitting needles No. 4: knit alternately knit 1, purl 1.
Left bootie: start with the sole. Cast on 32 stitches, distribute the stitches onto 4 needles and knit in garter stitch. The transition from one row to another is located on the back line of the middle. In the 3rd row, after the 1st stitch of the 1st and 3rd knitting needles and before the last loop of the 2nd and 4th knitting needles, add 1 knit each from the broach. crossed loop. Repeat these increases 3 more times in every 2nd row, while increasing for the 1st and 3rd knitting needles after and for the 2nd and 4th knitting needles before the last added loop = 48 sts.
Knit 6 cm with an elastic band.
Continue working with garter stitch again, and in the 1st row. On the loops of the 2nd and 3rd knitting needles, knit 2 stitches together. = 36 p. In addition, in the 3rd p. decrease the loops as follows: for the 2nd knitting needle, remove the last 3rd stitch as a knit stitch, knit 1 stitch and pull the removed loop through it. Repeat these decreases 2 more times in every 2nd r. = 30 p.
Then knit the first 8 sts of the 1st knitting needle, close the next 14 sts and knit the last 8 sts of the 4-1 knitting needles. On these loops, knit in the forward and reverse direction another 2 cm in garter stitch, while at the end of the 1st purl. row for the fastener, cast on new 14 sts = 30 sts.
Assembly: sew the sole seam. Tie the upper edge of the bootie and the edge of the fastener with 1 p. Art. b/n, at the same time at the end of the fastener from 4 ch. make a buttonhole. Sew a button.
When a wonderful miracle appears in the house, the lives of mothers and grandmothers are turned upside down. The baby needs to be dressed beautifully and according to the season, put on shoes, watered and fed with healthy treats. Of course, we are not able to help in choosing a menu for a child, but we are quite capable of crocheting comfortable and beautiful booties for him. A simple pattern and a woman's love will turn the ball into incredibly cute and light boots for babies.
There is no alternative to booties. It’s too early for babies to wear shoes, so knitted shoes will take on mom’s responsibility for keeping her tiny feet warm. They are worn over tights and socks, which means the booties are always visible. Miniature booties for newborns, decorated with ribbons and appliques, are admired not only by parents, but also by the people around them. After all, in the first booties, babies are discharged from maternity hospitals, baptismal ceremonies are performed and first birthdays are celebrated! This is a special thing that a mother or grandmother will keep among children's things.

Are you ready to knit booties for your beloved child? Then let's not put the process off for a long time. Watch a step-by-step master class for beginners in photos and videos on crocheting booties for newborns.
The sole size of the knitted booties is 9 cm.
For knitting, we need two colors of yarn Pekhorka “Children's novelty” (composition: 100% acrylic, 50g/200 m) and a hook No. 2.5.
Knitting pattern for bootie soles:

We knit a chain of 15 chain stitches.

1st row: insert the hook into the 4th loop of the chain from the hook (3 chain loops correspond to 1 double crochet) and knit 2 double crochets,


in the last loop we knit 6 double crochets, the knitting is turned,

symmetrically knit in the next 10 loops 1 double crochet,

in the very first loop in which we knitted 2 double crochets, we knit 3 more double crochets

and close the row with a connecting post into a 3rd lifting air loop.

2nd row: we knit 3 lifting air loops and in the same base loop we knit a double crochet,

in the next 2 loops we knit 2 double crochets,

in the next 10 loops we knit 1 double crochet,

in the next 6 turning loops we knit 2 double crochets,

in the next 10 loops we knit 1 double crochet,

in the remaining 3 loops of the row we knit 2 double crochets in each loop,

We close the row with a connecting post into a 3rd lifting air loop.

3rd row: we knit 3 lifting chain stitches and in the same base loop we knit a double crochet,

in the next loop we knit 1 double crochet,

in the next loop we knit 2 double crochets, in the next loop 1 double crochet, in the next loop 2 double crochets, in the next 1 double crochet,

in the next 10 loops we knit 1 double crochet,

*in the next loop we knit 2 double crochets, in the next loop 1 double crochet*,

repeat from * 5 more times,

in the next 10 loops we knit 1 double crochet,

then repeat from * 3 more times, i.e. in the next loop we knit 2 double crochets, in the next 1 double crochet, in the next loop we knit 2 double crochets, in the next 1 double crochet, in the next loop we knit 2 double crochets, in the next 1 double crochet.

The sole size was 9 cm.

We close this row with a connecting column in the 3rd air lifting loop with a turquoise thread.

4th row: we knit 1 air lifting loop and in the same base loop we knit a single crochet, then in each loop behind the back wall of the loop we knit single crochets, 1 double crochet in each loop, in this row there should be 56 stitches.

We close the row with a connecting stitch into the first single crochet of this row using a white thread.

We will knit all subsequent rows without lifting loops.
5 row: Insert a hook into the same base loop, pull out the thread and knit the first single crochet, then knit 1 single crochet into each loop. There should be 56 columns in this row.

We close the row with a connecting stitch in the first single crochet of this row.

6th row: Insert a hook into the same loop of the base, pull out the thread and knit a single crochet, we knit only 2 loops on the hook with a turquoise thread,


In the next loop we knit a single crochet, we knit only 2 loops on the hook with white thread,


In the next loop we knit a single crochet in the same way, tying 2 loops on the hook with turquoise thread,


Thus, alternating the color of the thread, we knit single crochets to the end of the row.


7th row: We knit with a white thread 1 single crochet in each loop (56 stitches).

We close the row with a turquoise thread in the first single crochet of this row.

8th row: We knit with a turquoise thread 1 single crochet in each loop.

We close the row with a connecting stitch into the first single crochet using a white thread.

Row 9: insert the hook into the same base loop and knit the first single crochet, then knit another 17 single crochets,


then we knit 2 double crochets with a common top 10 times, * those. in the next loop we knit a double crochet without tying it to the end, in the next loop we also knit a double crochet without tying it to the end, then we knit 3 loops on the hook together at one time.*


Repeat from * 9 more times. Out of 20 loops I got 10.

in the next loop we knit a double crochet, in the next loop we knit a half double crochet,


10th row: we start knitting in the same way as the previous one, knitting 18 single crochets,


above the half double crochet of the previous row we knit a half double crochet, above the double crochet we knit a double crochet,


in the next loop above the double crochet of the previous row we knit a double crochet, in the next loop above the half double crochet we knit a half double crochet,


11th row: knit 18 single crochets,


in the next loop we knit a half double crochet, in the next loop we knit a double crochet,

Next we knit 5 double crochets with a common top, i.e. we knit 5 unknitted double crochets, there should be 6 loops on the hook, we knit these 6 loops at a time, then we knit a double crochet in the next loop, and we knit a half double crochet in the next loop

and we knit 14 single crochets to the end of the row. We close the row with a connecting stitch into the first single crochet.

We knit the next 12th row in a circle, knitting 1 single crochet in each loop. There should be a total of 37 single crochets in this row. We close the row with a connecting stitch into the first single crochet.

Thus, like the 12th row, we knit another 8 rows with single crochets.

After this, we turn the knitting over and knit a row with single crochets, inserting the hook behind the back wall of the loop. In order to make the number of loops in this row even, we knit 2 single crochets into any loop. This row should make 38 single crochets.

We close the row with a connecting stitch into the first single crochet with a turquoise thread and then knit the pattern that we knitted at the very beginning, repeating rows 4 to 8.


We knit the second bootie in exactly the same way.


If you have any questions, you can watch a video on crocheting these booties.
If you want to receive the latest articles, lessons and master classes from the site to your mailbox, then enter your name and e-mail in the form below. As soon as a new post is added to the site, you will be the first to know about it!
The most sincere emotions can only be felt towards a loved one. And especially to the little person - your baby, who so needs care and tenderness. Lullabies until late at night, carefully washed onesies, feedings by the hour... A young mother needs to know so much and so many things to learn! I present to your attention a knitting master class crochet booties for beginners. Let your child’s first shoes be not only warm, but also beautiful and very soft!
Small, neat booties, knitted with your own hands, will be another contribution you make to caring for your baby. And if you don't know at all, how to crochet booties, no need to run to the store to get them - in this master class I will explain everything step by step with photographs and descriptions of knitting! And all you have to do is choose the desired color of thread - and delicate booties, knitted by the caring hand of your mother, will warm your baby in his first months of life.
These knit up pretty quickly! Let's start knitting!
For the work, I used Pekhorka “Children’s Novelty” yarn (100% acrylic, 50g/200m) in two colors blue and white and a hook No. 2.5.
We dial 12 v.p. + 3 v.p. (total 15 ch), insert the hook into the 4th loop of the chain from the hook and knit 3 rows according to this pattern.
You can watch a detailed master class on knitting such an oval
We finish the 3rd row with a connecting post using a white thread.
4th row: with a white thread we knit st. b/n, inserting the hook behind the back wall of the loop.
we finish the row of connections. Art.
5th row: in each loop we knit st. b/n,
We close the row of connections. Art. blue thread.
Row 6: knit a “bump” from 2 vp.
*skip 1 ch. and knit a “bump” from 3 unfinished stitches. s/n
(you can watch a lesson on crocheting “bumps”)
Repeat from * to the end of the row. We close the row of connections. st., inserting the hook into the top of the “bump”
7th row: knit the same as the 6th row
“a lump of 3 tbsp. s/n” we knit at the top of the “bump” before. row
We close the row of connections. Art. and break the thread.
We make the initial loop with a white thread.
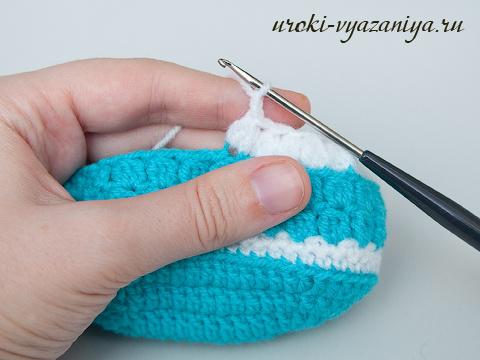
I knitted my booties for a 10 cm leg, marking the middle I started knitting the toe
insert the hook behind the back wall of the top of the “bump” and pull out the initial loop,
to the next top of the “bump” before. row we knit a “bump” from 3 unfinished stitches. s/n
We knit to the middle of the bootie, I got 14 “bumps”
turn the knitting over and knit a “bump” from 2 unfinished stitches. s/n and 2 v.p.p.
*skip 1 loop and knit a “bump” from 3 unfinished stitches. s/n*
repeat from * to the end of the row (in this row we have 7 “bumps”)
knitting connection st., connecting the tops of the “bumps”, like this
knit 1 ch. and a “bump” of 3 unfinished tbsp. s/n (we insert the hook into the leg of the outer column of the “bump”),
knit 1 ch again and a “bump” (we insert the hook into the leg of the outermost stitch of the next “bump”),
knit 1 ch, and a “bump” at the top of the “bump” of the 7th row,
We close the row of connections. st., inserting the hook into the top of the “bump”
Similarly to the 7th row, we knit 2 more rows.
We close the row of connections. Art. blue thread.
We knit st. b/n in each loop and 3 ch. between them
We close the row of connections. st, carefully hide the ends of the threads. And our bootie is almost ready. All that remains is to tie a cord from VP. (I got 120 vp).
We will knit the second bootie in the same way! Now your baby's feet will be warm!
You can crochet a lot of beautiful things for kids. The simplest thing is booties for newborns. Ideas that can be gleaned from the article and on the Internet will help you make a model of baby booties exclusive and fashionable. Boring socks are a thing of yesterday. Today, booties are full-fledged shoes for babies (sneakers, sandals, openwork shoes, sandals).
How to choose a model and materials
The model is selected based on the season. For summer, these can be light openwork booties made of cotton yarn in the form of sandals or sandals for girls and sneakers for boys. For winter, you can make warm sneakers or classic booties using dense knitting.
The highest quality threads are selected for needlework. Ideally, it is better to buy special children's yarn, of which there is a wide variety today. Since baby booties don’t require a lot of thread, you can use what’s left over from yarn that was purchased for larger crafts. The main thing is to make sure that the thread is soft and does not prick. This is important, since, for example, summer models are worn on the baby’s bare feet.
Hooks are selected depending on the thickness of the thread. We must remember that the thicker the thread, the larger the tool number.
To decorate the booties, you can use buttons, knitted decorative elements, embroidery, beads, ribbons and lace. Of course, for boys the decor is more restrained. If booties are knitted for girls, then you can give free rein to your imagination and make the decoration more colorful.
How to knit baby booties “Sneakers”
Such fashionable and beautiful “sneakers” will be a real decoration for a little champion.
Materials and tools
- Cotton or wool yarn - 50 g. Cotton boots will be thinner, wool boots will be warmer. Yarn should be taken in two colors - white and a contrasting shade (blue, red, green, hot pink, etc. are suitable).
- Hook No. 3.5.
Description
The description is very detailed with step-by-step photos, so even novice needlewomen will not have problems with knitting.
1. Outsole
The sole is knitted with white threads using regular stitches. according to the scheme:

2. Rise
After the sole is ready, you need to knit two more rows with stitches in white. and break the thread.

The workpiece looks like this

Using a thread of a contrasting shade, you need to embroider a strip between two rows of rise
3. Toe
The first row of the toe consists of 30 stitches and is performed in st. without nac. The next row is already st. with nak. and is performed in three tbsp. at a time. As a result, there will be 10 loops. The third row is the final one. All 10 stitches of the previous row are knitted at once in one step.
Then, you need to move the thread to the edge of the toe and knit st. without nac. two rows - this is the shoe tongue blank. After which the thread is carefully secured and broken.

First row of toe

Second row of toe


Beginning of the tongue
4. Main part
A stripe is embroidered between the first two rows of the toe using a contrasting thread. Next, the main part of the sneakers will be knitted with the same thread. The front rows are knitted st. without nac., purl – st. with nak.
You will need to make holes in the purl rows for lacing. They are made in this way: two air lifting loops, a column with a nak. in the next loop, chain stitch, skip 1 stitch from the previous row and two sts. with nak. knit together. As a result, one loop is shortened and a hole is obtained.

Holes for lacing should be made at the beginning and at the end of each purl row.

You need to knit seven rows of the main part, break the thread and carefully fasten
The beginning of the tongue is already there, you just need to knit seven more rows with contrasting threads and three with white ones. The final row of the tongue (the 4th row is done with white thread) should be done like this - two tbsp. without nac. together, one without nak., two half-columns with nak., three tbsp. with nak., two half-columns with nak., one tbsp. without inc., two without inc. together.
There is no need to break the thread; you can immediately tie it. After tying, the thread can be cut.


The tying is done using regular stitches. without crochet
6. Finish
Now you need to make the logo of a sports company on the white upper part of the tongue so that the sneakers look like real ones. All that remains is to insert a crocheted or purchased ready-made cord into the holes for the laces.
One bootie is ready, the second one is knitted in the same way. The sneakers are ready!
How to crochet summer booties for girls
Summer booties in the form of shoes are ideal for both home and walking, and they can be made in just one evening.

This beautiful, delicate model for the summer will be an excellent solution for little princesses.
Materials for work
- Cotton yarn – 1 skein.
- Crochet hook 2.75.
- Two buttons for fastening.
Note: This model of booties is designed for an eight-month-old baby.
To make the product larger or smaller, at the very beginning (a set of loops for knitting the sole) you need to change the number of loops in the chain.
Description
1. Outsole
For the soles of booties, the following scheme is used:


The finished insole is 10-11 cm, depending on the thickness of the threads and the size of the hook. For newborns, the sole size should be about 8 cm
2. Main part
The first row of the main part of the product is performed in a circle with ordinary double crochets.

Each time the hook is inserted into the base of the column of the outermost row of the tied foot so that the side braid is visible

First row of booties base

Main part of the bootie (1 row)
3. Toe
The second row is knitted taking into account the decreases to form the toe - three air. p. on the rise, eight double crochets, 2 double crochets together (decrease), 2 double crochets, 2 double crochets together, 2 double crochets, 2 double crochets together, 1 double crochet, 2 double crochets together, 1 double crochet, 2 with a double crochet together, 2 with a double crochet, 2 with a double crochet. Next, until the end of the row, simply knit a st. double crochet

As a result, such a toe is formed
4. Heel and strap
The heel is made of 22 double crochets and ends with a row of 21 double crochets. strap loops. The strap is also made from st. double crochet At the end of the strap you need to knit a hole that will serve as a buttonhole. The loop is knitted this way: 3 tbsp. with a double crochet, one air. loop, skip one loop, st. with a crochet until the end of the strap. The thread breaks.

Heel
5. Completing the toe
To finish the bootie, you need to shape the toe. The thread is attached to the place where the shoe strap begins and the toe is knitted - nine single crochets, two single crochets together, one single crochet, two single crochets together, three single crochets, two single crochets together, one single crochet, two single crochets together. Next, single crochets are knitted to the heel, and the thread breaks.
The thread must be secured by retreating 4-5 loops from the strap to the toe. Then knit 11 tbsp. with two yarn overs through one loop. Then knit them together.

The resulting workpiece must be tied with thread

The toe is ready
All that remains is to sew on the fastener buttons. The baby's shoes are ready! These crocheted booties will be a great addition to a little fashionista’s outfit.
How to crochet openwork booties for a baby
For needlework you will need:
- Cotton or acrylic yarn – 50g.
- Two hooks (No. 1 and No. 5).
- Thin satin ribbon – 80 cm.
- Beads for decoration.

A universal model for babies of any gender. Depending on the color of the yarn, you can make booties for a boy or a girl.
Description
1. Outsole
The sole is made according to the scheme:


For children aged 3 to 9 months, the initial row of air. loops should be made equal to 25 + 3 p.raising

The result is a foot like this, according to the diagram
2. Main part
The first row of the main part is knitted with purl stitches. without a crochet.

The hook must be placed under the base of the posts
When the first row is ready, you can start drawing - air loops st. double crochet, chain stitch, st. with a double crochet in the same loop of the previous row, 2 loops are skipped. So until the end of the first row. The next two rows are knitted in the same way.

The drawing looks like this (1 row)

Figure 2 and 3 rows

If the baby is older than 6 months, then you will also need a 4th row
3. Toe
In the middle of the side of the bootie you need to make one connecting post and 3 lifting loops.

This knitting continues until the middle of the side of the bootie on the other side
The knitting is turned over and the work comes from the inside of the bootie. You need to make 3 lifting loops and knit two stitches. double crochet and then knit them together. And so continue until the end of the toe row.
The knitting turns over again. Two lifting loops, yarn over. Next, you need to insert the hook under the loops of the previous row, make a yarn over, pull out a loop and make another yarn over.

Thus, you need to knit to the end of the toe row
A ribbon will be inserted into this row
Then you need to turn the work and continue knitting from the inside. The next row goes two sts. with a double crochet, and between them one air loop.

The top of the bootie should look like this
Now you can start tying the top with peaks. To do this, a st. is knitted in an arc. without a crochet, and in the next arc three st. single crochet, peak of three chain stitches and three tbsp. double crochet This is how the entire upper part of the booties is tied.

Tying (step 1)

Tying (step 2)

Almost finished bootie
The lower part of the bootie can be tied with peaks, or it can be left without finishing. All that remains is to insert the ribbon and sew on the beads.
Note: The beads must be sewn firmly so that the baby cannot tear off the decor and choke! If there are concerns, then it is better to limit yourself to just ribbons.
On the Internet you can find many models of baby booties, knitted or crocheted. Such handmade things not only look beautiful and fashionable, but also carry a huge charge of love and warmth.
Knitting and weaving
Crochet booties for beginners

Present to your attention master class on crocheting booties for beginners. Let your child’s first shoes be not only warm, but beautiful and very soft!And even if you don’t know at all how to crochet booties, you shouldn’t run to the store to buy them - in this master class you will see everything step by step, with photographs and descriptions of knitting! And all you have to do is choose the desired color of thread - and delicate booties, knitted by the caring hand of your mother, will warm your baby in his first months of life.
1:1426 1:1433
2:4
These crochet booties are pretty quick to crochet! Let's start knitting!
2:146 2:149For the work I used Pekhorka “Children's Novelty” yarn(100% acrylic, 50g/200m) in two colors blue and white and hook No. 2.5.
2:374We dial 12 v.p. + 3 v.p. (total 15 ch), insert the hook into the 4th loop of the chain from the hook and knit 3 rows according to this pattern.
2:578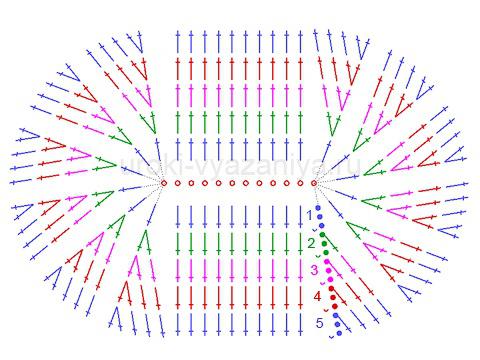
Crochet pattern for booties
3:1154
4:4
We finish the 3rd row with a connecting post using a white thread.
4:146 4:151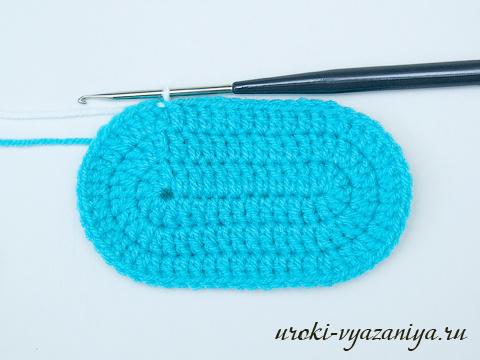
4th row: with a white thread we knit st. b/n, inserting the hook behind the back wall of the loop.
5:830 5:835
we finish the row of connections. Art.
6:1396 6:1401
7:4

5th row: in each loop we knit st. b/n,
8:581 8:586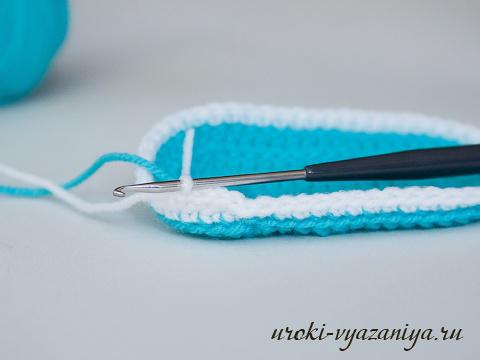
We close the row of connections. Art. blue thread.
9:1183 9:1188
6th row: knit a “bump” from 2 v.p.p.
10:65 10:70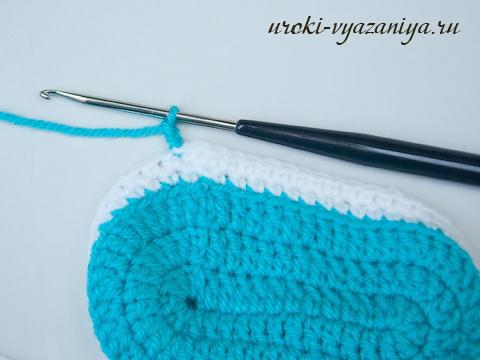
and 2 unfinished art. s/n,
11:633 11:638,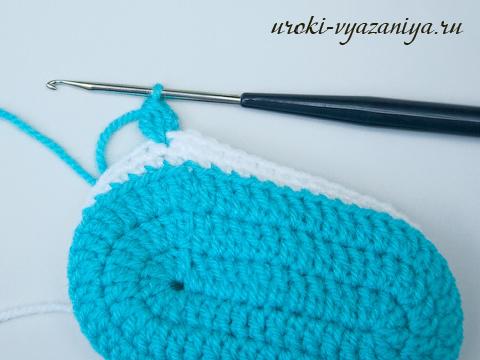

13:4
13:117 13:122
skip 1 ch and knit a “bump” from 3 unfinished stitches. s/n
14:746 14:751
(you can watch a lesson on crocheting “bumps”)
15:1379 15:1384

Repeat from * to the end of the row. We close the row of connections. st., inserting the hook into the top of the “bump”
17:714 17:719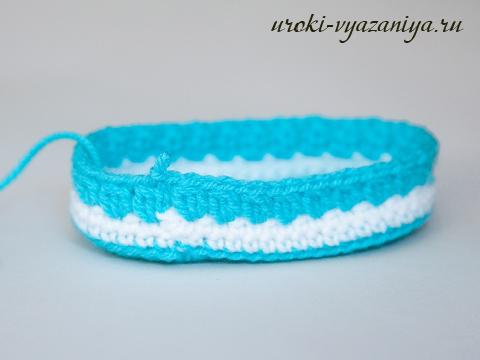
7th row: knit the same as the 6th row
18:1289 18:1294
19:4
“a lump of 3 tbsp. s/n” we knit at the top of the “bump” before. row
19:113 19:118
We close the row of connections. Art. and break the thread.
20:703 20:708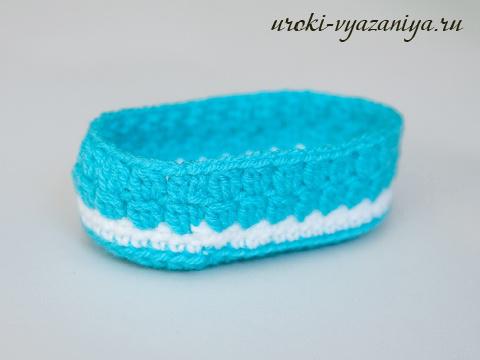
We make the initial loop with a white thread.
21:1304 21:1309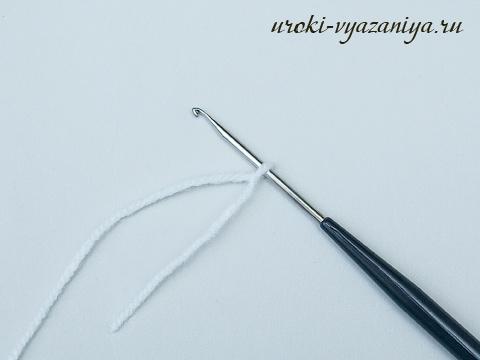
I knitted my booties for a 10 cm leg, marking the middle I started knitting the toe
22:162 22:167
insert the hook behind the back wall of the top of the “bump” and pull out the initial loop,
23:830 23:835

25:4
to the next top of the “bump” before. row we knit a “bump” from 3 unfinished stitches. s/n
25:159 25:164
We knit to the middle of the bootie, I got 14 “bumps”
26:785 26:790
turn the knitting over and knit a “bump” from 2 unfinished stitches. s/n and 2 v.p.p.
28:148 28:153
*skip 1 loop and knit a “bump” from 3 unfinished stitches. s/n*
29:785 29:790
repeat from * to the end of the row (in this row we have 7 “bumps”)
30:1412 30:1417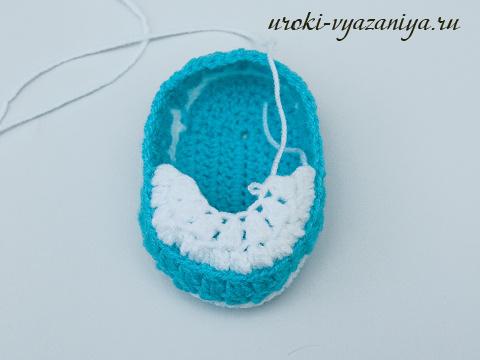
31:4
knitting connection st., connecting the tops of the “bumps”, like this
31:102 31:107

knit 1 v.p. and a “bump” of 3 unfinished tbsp. s/n (we insert the hook into the leg of the outer column of the “bump”)
33:1427 33:1432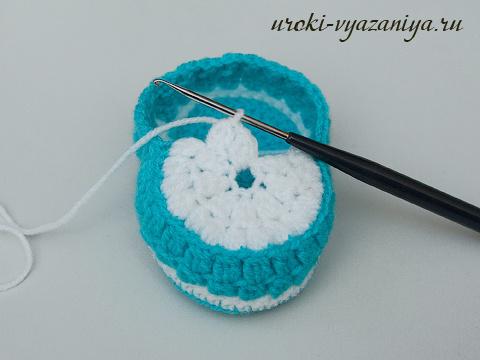
knit 1 ch again and “bump” (we insert the hook into the leg of the outermost stitch of the next “bump”)
34:164 34:169
knit 1 ch, and a “bump” at the top of the “bump” of the 7th row
35:775 35:780

37:4
Similarly to the 7th row we knit 2 more rows
37:74 37:79
We close the row of connections. Art. blue thread
38:669 38:674We knit st. b/n in each loop and 3 ch. between them
38:760 38:765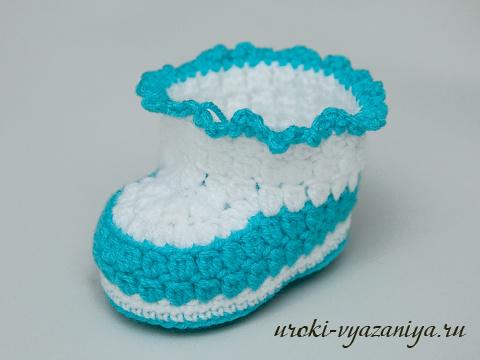
We close the row of connections. st, carefully hide the ends of the threads. And our bootie is almost ready. All that remains is to tie a cord from VP. (I got 120 vp)
39:1530


