DIY chain. Weaving chains. DIY jewelry: how to make a chain? Stages of chain formation
Or a body icon.
This is the first piece of jewelry in history that a person put on himself. Gold chains and pectorals were kept in family treasuries, and in Ancient Rome they were evidence of a special social status. There was no talk of any special equipment: each product was created exclusively by human hands. First, the metal was melted, then pulled into long wires, from which links were created. They were then soldered and polished by hand.
Stylish gold chain
Over the years, jewelers have developed dozens of types of weaving, so today there is a huge selection of chains in stores for every taste. Both for graceful women's necks and for stately men. For all kinds of clothing styles and for any occasion. What path does the nugget take before it turns into a series of ingenious interweavings that complete the image, and how much effort must be put into the shapeless mass to obtain a masterpiece?
Manufacturing technologies
Today, chains are created by hand, by machine knitting and stamping. A separate method is hollow products.The most popular method is machine knitting. This is how both the most elegant chains with thin links and massive jewelry are created.

Beautiful gold chains
Stages of chain formation
1. First, pure gold in the form of granules or ingots is melted and combined with ligature. These are base metals that give gold its desired purity, color and hardness. For example, copper gives a red tint, and brass gives fusibility.2. Long wires are made from a mixture of gold and alloy using rollers.
3. In mechanical weaving, the threads are passed through machines that connect metal threads into chains of different types of weaving: “bismarck”, “shell” and “anchor”. The first are considered the strongest, the third are the most popular.

Golden rods
4. The jeweler cuts the finished chains into pieces (chains) and solders locks to the products.
5. At the final stage of work, the chain is polished and, if necessary, diamond edges are applied. This specific cut is called “ diamond».
6. White gold chains are placed in galvanic baths, where the process of applying liquid precious metal - rhodium - occurs. It gives the product an additional beautiful shine, and also prevents allergic reactions to the composition of the ligature: silver, copper or tin.

Massive chain
Most appreciated hand braidedno. Such chains are considered to be as strong as possible. For example, varietiesBismarck. Everything depends directly on the skill of the jeweler. He makes links from finished wires of the required thickness. Using different methods of soldering each link, he creates different weaves. The easiest way is to create a chain with anchor weaving, but a complex bismarck requires a lot of effort.
Stamping. The sheet of metal is first passed through a press several times. Then the pieces of sheet are cut, and the jeweler continues to work, making links and threading them into each other without soldering. Stamping is a simple method, but such jewelry is easily torn and deformed.
A separate type of chains - hollowse. To make them, they use base metal wire, which is removed from the body of the jewelry after a series of chemical processes. A void is formed inside, so earrings, rings and chains turn out to be massive, but quite light. When choosing a pendant for such a chain, you must take into account its weight so that the product does not deform.
Creating chains- painstaking and labor-intensive work. Before the accessory ends up on the owner’s neck, it travels a long way. And the buyer is left with the most pleasant thing - finding a stylish pendant or cross for the chain on the website. Choose high-quality jewelry that will make your image harmonious and will delight you for a long time.

Chains with different types of weaving
Fashion trends
Today they are especially popular fantasy chains, which do not require additions in the form of pendants, crosses or body icons. The chains themselves turn out to be bright, full-fledged jewelry.Accessories made from a combination of two or three types of gold are also trendy: white, red and lemon. These chains look creative and fresh, but you need to be able to harmoniously and carefully combine them with other accessories to avoid a tacky look.
Wearing culture and care
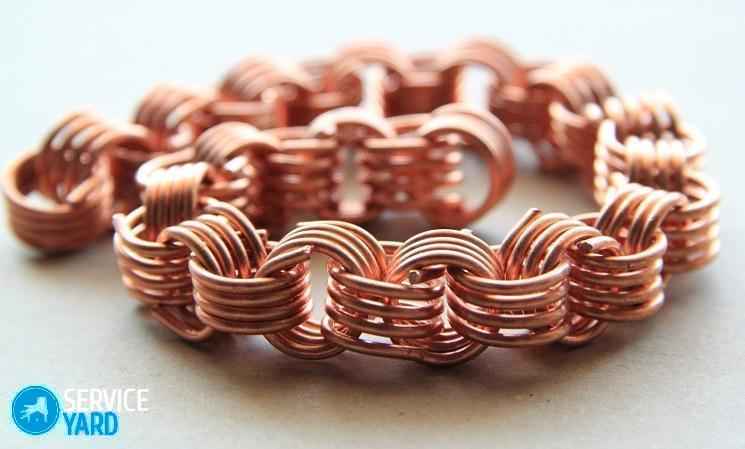
Many people are sure that gold is an eternal metal. This is true, but even he cannot withstand unnecessary stress and neglect. Gold chains last a long time only with proper care and use. For example, snake chains are practically impossible to restore due to the peculiarities of knitting. Maintain the correct weight ratio between chain and pendant and remove jewelry before going to bed or doing housework.For work I needed:
Silver 17 grams (the finished product turned out to be 13 grams), plus a finished lock;
Soldering kit: torch, refractory board, solder, flux (I used liquid Fluoron), bleach;
Rollers, a vice, large pliers for broaching, flanges (pliers - 2 pcs., they are convenient for manipulating rings), a knitting needle with a diameter of 3 mm, a special tool for winding rings, brass wire, a wooden board, a file, sandpaper.
It took two school days (approximately 9 hours) to make the bracelet.
So let's get started!
For this task, I received a ready-made square section made of 925 sterling silver, this one weighed 17 grams, 4*4mm.
According to the instructions, it is necessary to make rolled products with a cross section of 1.6 * 1.6 mm. This is done in rollers. During rolling, the metal becomes hard (hardened), so it must be periodically annealed (heated until red with a burner).


Now you need to make a round one from a square section. The wire should be 1.3 mm thick. This is done in dies.

In order to be able to stretch the wire into these holes, you need to grind off the metal onto a cone at the end of the workpiece.


And we pull...

And we pull, not forgetting to periodically anneal the wire.

The resulting wire must be wound on a steel blank (knitting needle) with a diameter of 3 mm.

At school we use this fun tool to wind wire evenly.

The finished bracelet should be approximately 19 cm long. For this you will need 63 rings, and a few more in reserve.

Now you need to saw the wound wire to make separate rings (goodbye to the pads of your thumb and index finger).

Then I divided the rings in half, one half will need to be soldered, the other left as is.

Then from the “threes” make “7” in the same way, then “15”, “31” and finally “63”.

Up to this point, all the actions were simple and did not require much effort or skill and took me about 4 hours, given that I was in no hurry. At school, no one is in a hurry, everything is done slowly and carefully, because if you mess it up, then firstly, you have to do it all over again, and secondly, make it out of brass, not silver :)
Now comes the hard part - scrolling.
It is necessary to secure the soldered chain in the rollers using rolled brass (probably another metal is also possible, but at school we use brass).

You also need to thread a piece of rolled brass through the other end of the chain. It is important to straighten all the rings so that all seams (sea joints in the rings) are in the same direction and inside.

And now I started using pliers to twist the chain clockwise. The chain must be taut. You need to twist until it becomes smooth and flat.

As the silver is deformed, it hardens; do not forget to anneal it. Also, during tension and torsion, the rings can break. They need to be soldered carefully, without overdoing it with solder. I’ve had them tear 6 times, but I did it for the first time, so that’s goodbye; the pros, of course, won’t tear anything :)

This event (twisting) took me 4 hours. Again, this twisting took so long because at first, nothing worked for me, the rings tore, the pincers pulled out, and I got frustrated, gave up and did something else.
You need to stop twisting the chain when it becomes flat, and when it hangs freely, it will not twist. Now you can send the chain to the bleach.

After the chain is straightened, it needs to be pulled onto a board, then with a file and sandpaper to remove excess metal (to make such platforms) on both sides and give the chain a finished look.

Then I attached the locks, polished them, handed them over to the teacher, received a grade and... two days of work were spent on melting down :)

Thank you for watching:)
Report to moderator
At all times, not excluding modern times, one of the most popular items among jewelry was the chain. Almost every person has it and more than one copy. Jewelry is made in various ways, both manually and on a machine. In this article we will look at how to weave a chain with your own hands and what types are feasible for a novice craftsman.
Types of weaving
The difference from the women's one is the nature of the interlacing of the links of this decoration. Style, originality, ease of execution, and weight also play a role.
Chain weaving is divided into several groups, depending on the method of layout and linking of links. The main weaving techniques are: shell and anchor, as well as certain types, such as bismarck and perlina.
Diamond shape
The armored type of weaving has polished links located in the same plane. Interlocking loops have a rhombic shape and can be connected with one, two or even three links at a time. There are various combinations of armor weave. For example, small links are woven into large ones or sequentially alternate with each other. The first species is called "Nonna", the second - "Figaro". Another weaving method, which can have a square, oval or round cross-section, is called “Snake” or “Cobra”. Indeed, the cord in appearance resembles a snake’s shell and is slightly curved. Rope also refers to the armored species. When connecting the links, the chain rotates slightly in a certain direction, resembling a rope in appearance.

sea anchor
With the anchor method, the connected links interlock with each other at an angle of 90 0. The loops of a classic chain are oval shaped. This is the simplest weaving method that you can use to make a chain with your own hands. If there is a crossbar between the links, then the weaving is called “Sea Anchor”. There is a coupling of not only narrow, but also wide rings - rollo or chopard. Venetian weaving differs from classical weaving by links that can take the shape of a square or rectangle. One block can contain several elements.
Weaving method "link to link"
To make a chain with your own hands using this method, you need to prepare links of the desired shape. The main parameter for any weaving is the correspondence of the diameters of the rings and the wire. The thinner the material and the wider the link, the more unreliable the chain becomes. The opposite option creates difficulties in weaving. The rings are made by wrapping wire around the bolt, so it shouldn't be too small either.
The loops threaded alternately into each other should have the same direction. You can solder the ends of the loops both during weaving and after it. When heated, the melting metal should fill the gap at the bite site. In this way, a possible chain break will be eliminated and the rings will be continuous.

Weaving a double diamond chain
This type of clutch has flat loops shaped like a diamond or an elongated square. Weaving is considered quite durable and popular. The links can be connected alternately, as well as in groups of two or three pieces together. Women's chains, as a rule, have a flat shape. Men, in turn, prefer massive products with double or triple weave.
The prepared links are stretched, bent and compressed to achieve the required shape. Then weave a chain by inserting the next loop into the previous one. There is a hitch option in which the third link is threaded into the first and passed through the second, then the fourth is threaded into the second and pulled through the third, and so on. After soldering the loops, the finished chain is flattened using rollers. At the end of the work, the hand-woven chain must be polished.

Bismarck chain weaving technology
The main tools for making jewelry are various crossbars, vices, pliers, files and additional materials. At home, knitting needles or any other needles, for example from an umbrella or a bicycle wheel, can be used as crossbars to weave a chain around the neck. A wire is wound around it, forming a spiral. One end needs to be bent in two places, forming a handle, and a cut must be made on the other to secure the wire.
Next, the spiral must be cut into links so that each loop contains two turns. Then the second is screwed into one element using pliers until a characteristic click is heard. In this way, the product is extended to the required length. When weaving a chain, two turns of each link must be compressed to secure it.
To solder the loops you need solder. It is an alloy of various metals in the form of thin plates or wire. Before soldering, you need to take a small piece of solder and melt it with a burner flame. Then move the ball with a soldering iron to the joint of the link, which also needs to be heated, and let it spread. Repeat the procedure with the remaining loops. In the final step, the chain is aligned by pulling it through the rollers.

Weaving chains with your own hands
A product woven using the Viking Knit method is made of soft wire and does not require soldering. When weaving a chain around the neck, the material used is increased.
Before work, you need to prepare a pencil that will serve as a support, thin copper wire, scissors and a ruler. Weaving begins with preparing the base for the chain. Cut about 40 cm of copper thread and wrap it around the ruler, making 6 turns. Remove the resulting loops from the tool and secure them by wrapping them with the short end of the wire. Move the petals in different directions and place them on the blunt side of the pencil, bending them along the support. Start weaving with a new piece of copper thread 80 cm long. Make a loop by threading the wire through one of the warp petals. Then, turning the pencil, insert the upper end of the thread inside the next petal, bringing it out on the left side. In this way, tie loops around the entire base.
The new row begins with the girth of the loop of the previous circle. Then weaving continues in the same way until the working wire runs out. Twist the tip of the new piece of thread with the previous remainder and continue weaving to the required length. Subsequently, this tip will be hidden in the work. Please note that at the end of the work the chain must be stretched. Its length will almost double.

Using the methods discussed above, both men's and women's chains can be woven. By learning to make jewelry, you will gain good experience with metal and learn basic jewelry making skills.
Viking knit is an ancient way of weaving a chain that does not require soldering of the links. The chain in this technique is woven from a long piece of wire, which is extended as needed.
The name can be translated into Russian roughly as “Viking knots” or “Viking weaving”. The technique received this name due to the fact that the first decoration of this type was found in a Viking burial. But then there were other, more ancient finds, and now it is believed that the technique originally came from the city of Trichipoli in India. I use this chain for antique style jewelry.
In order to weave a chain with your own hands, you need to stock up on:
- thin wire (I use copper)
- pencil
- scissors
- ruler

Weaving a chain with your own hands
First we need to prepare a base on which the very beginning of weaving will lie. To do this, cut a piece of wire about 40 cm and wrap it around the ruler 6 times.

Remove from the ruler, fix the loops by wrapping the free end of the wire around them.

Open the loops into a flower pattern, carefully so as not to wrinkle them.

We bend this “flower” around the pencil. We cut another piece of wire, about 70 cm long, and begin weaving. Leave a small free end and make a loop around one of the “petals”.

We make a second loop, stepping back one “petal” to the right. In the same way, we continue from top to bottom.

We make 4 more loops, and return again to the first “petal”. Now we need to move to the next row, for this we make the next loop, catching on the first loop of the previous row.

We continue to “loop”, each time clinging to the loops in the previous row, until a tip about 10–12 cm long remains.

Now you need to extend the end of the wire so that you can weave further. We cut off another piece and place it under one of the vertical rows of loops.

When we reach this place by weaving, we grab the new wire along with the loop of the previous row, this way it will be fixed. We walk another circle and again get to the place where the new wire sticks out. The most crucial moment: the new wire must be brought up to the left of the loop, and the old wire must be hooked to the right of the loop and taken down.

Take a close look at the photo, it's not that complicated. This is what it looks like when tightened.

In the next few circles we grab the old wire together with the loop of the previous row to fix it, and then cut it off.

Thus we continue weaving. When it seems enough, remove it from the pencil.

And now - focus! Gently, grasping the ends with your fingers, stretch the weave, and it is transformed.

To calculate the length of the finished chain, you just need to remember that it stretches approximately twice.
That's all, the chain is ready. You can detach it from the auxiliary loops and use it at your discretion.
If you want to wear an exclusive and original version of jewelry, then you don’t have to buy it. It is quite possible to create such decorations with your own hands. So, if you set out to make a chain yourself, then you will have to apply some skill and use some skills to create a beautiful and original thing. In this article we will look at how to make a chain of wire with your own hands.
Viking knit technique
Viking knit is an ancient method of weaving a chain that does not require soldering of the links. In this case, the chain is made from a long piece of gimp, which can always be extended as needed.
Important! This name is translated into Russian as “Viking knots” or “Viking weaving”. This weaving technique got its name because the first piece of jewelry of this type was found in archaeological burials, which belonged to the ancient Vikings. After this discovery there were others that turned out to be even more ancient. However, it is now believed that this weaving technique was originally mastered in the city of Trichipoli, which is located in India.
Such a chain can be made as an antique-style decoration. In this case, to create an antique decoration, you need to prepare the following items:
- thin wire, as a rule, it is best to use copper;
- pencil;
- scissors;
- ruler.
How to make a chain at home using the Viking knit technique:
- First of all, it is necessary to prepare a base on which the very beginning of weaving the chain will be applied. To do this, you need to cut a piece of copper wire about 40 cm long and wrap it around a ruler 5-6 times.
- After this, you need to remove the skein from the ruler, fix the loops, while wrapping the free end of the gimp around them.
- Next, open the fixed loops into a “flower”. This procedure must be carried out very carefully so as not to accidentally crush our loops.
- Then such a “flower” needs to be bent around a pencil.
- Cut another piece of wire with a length of about 65-70 cm, and you can begin the weaving process. To do this, you need to leave a small free end of the wire and make a loop around one of the “petals”.
- Then you need to make a second loop, stepping back one “petal” to the right. We continue in exactly the same way from top to bottom.
- Next you need to make 4 more loops and return again to the first “petal”.
- Now let's move on to the next row. In this case, you need to make the next loop, catching on the first loop of the previous row.
- We continue to knit, each time clinging to the loops of the previous row. We carry out this process until the remaining tip of the wire is about 10-15 cm.
- Now you need to complete the procedure of increasing the gimp so that you can knit further. To do this, you need to cut off another piece and place it under a vertical row of loops.
Important! When, during the knitting process, we reach the area where the wire is built up, we need to grab the new wire along with the loop of the previous row for tight fixation.
- We knit another circle and again approach the area with new wire. Now you need to carry out the correct procedure: to do this, a new piece of wire must be brought up from the left side of the loop, and hooked with the old working wire on the right side of the loop and taken to the bottom direction.
- We knit the old copper thread on several knitting circles together with the loop of the previous row for fixation, after that we cut it off and continue weaving the wire chain with our own hands.
- We continue to knit according to this principle. When, in your opinion, the thread seems to be of sufficient length, the knitted product should be removed from the pencil.
Important! To determine the length of the finished jewelry, you must remember that a knitted product can stretch approximately twice as much.
- And now the most crucial moment: you need to grab the ends with your fingers, stretch the weave and see how it changes.
Knitting is completed, the decoration is ready! We disconnect it from the auxiliary loops and you can use it at your discretion.
If you purchase an ordinary metal crochet hook and soft wire, then with certain skills and dexterity, you can knit a decent chain of the required length. It is important that the thickness of the hook matches the thickness of the gimp.
The technique for knitting a wire chain is very simple:
- When the first loop is made, the next one needs to be picked up with a hook and pulled through the previous loop.
- Pull the threaded loop to the required length.
- We repeat this procedure of pulling a loop out of a loop so many times until the product is the desired length.
Important! The thickness of the hook must correspond to the thickness of the wire. Otherwise:
- If the hook turns out to be much thicker than the wire used, you will get huge holes.
- If the hook is thinner than the wire used, the knitting process becomes more complicated, since the hook will not be able to properly grip the loops.
How to make a chain with your own hands? If you want to make a chain from brass, steel or copper, then the wire must first be annealed so that the metal becomes soft and pliable. For this:
- Make a template in advance and use a wooden plank with four nails driven into it, with the points facing outward.
- The nails, which are arranged in a diamond shape, determine the shape of the chain links.
- When using the template, you need to bend the S-shaped links in a sequential order, since the tips of the loops should have an elongated shape.
- The links of the chain are connected both directly to each other and using rings, which are made like winding the wire of a pencil, and each turn must be bitten off with wire cutters.
Important! Before connecting the chain links, they should be sanded and filed for safe use, as the burrs can scratch the skin or leave puffs on clothing.
You can also make your own chain from silver wire. The manufacturing technique is exactly the same as when creating jewelry from ordinary wire.
Weaving from individual rings
How to make a chain from wire:
- First you need to cut the prepared wire into several small pieces that are about 5 cm long.
- Then bend the ends and press them firmly with the flat part of the pliers. You should end up with a piece of wire whose round ends are bent.
- Then we take the resulting piece of gimp with pliers at the middle point, bend it in half, while pressing one loop to the other.
Important! The pliers must be exactly in the center, otherwise the two loops will not be able to meet. The result is uneven links and the chain looks ugly.
- After the two loops came together and the flat part of the pliers was pressed, one link was ready.
- After this, you need to thread a piece of wire into the loops of the first link and repeat this procedure.
Important! The number of links determines the length of the finished product. Therefore, it is necessary to calculate the length in advance and thus decide how many links you need for this decoration.
Video material
If at first you don’t succeed, then you can practice and you will succeed. And then you will begin to master more complex weaving techniques, creating more and more perfect and exquisite jewelry that will definitely attract attention to you, because there will simply be no analogues. And everything that looks interesting evokes genuine admiration.


