Paracord bracelet size. How to find out what length to weave a bracelet? Weaving from paracord: patterns for weaving bracelets with your own hands with photos Paracord survival bracelet methods
Usually, when going on a hike or trip, fashionistas leave all these things at home because they are not needed. But there is one accessory that can be very useful in extreme conditions or just in nature, it is called a paracord bracelet.
What it is?
The word “paracord” comes from the English parachute cord - this was the original name for the lightweight nylon rope that was used in parachute lines. Then they began to make bracelets from this material that were used in military affairs - each soldier had on his hand a bracelet made of a strong cord, which, if necessary, unraveled and was used as a cable.
Over time, the scope of its application has expanded; at the moment, the “survival bracelet,” as it is more often called, is an indispensable thing for people who love outdoor activities.


What is it needed for?
This thing will serve well, primarily for tourists - if you need, for example, to pull up an awning, secure a fishing net, or apply a tourniquet. Paracord is also used to make jewelry: keychains, phone cases, wallets, watch straps, even animal collars. This is an exciting activity that is accessible to everyone, because the price of the material is low. Thus, you can make a fashionable and useful accessory with your own hands.


Types and models
There are many types of paracord bracelets, which differ in the type and color of the material, the method of weaving and other parameters. It can be thin or wide, with the addition of beads, anchors, and nuts into the weave.


Depending on the main function, a paracord bracelet can be:
- Simple - consisting only of paracord and a fastener.


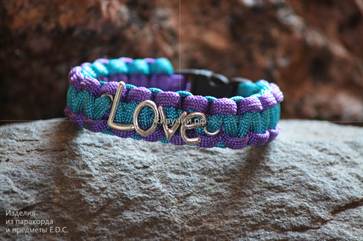
- Symbolic - if the combination of colors or woven elements carries additional meaning (for example, a bracelet with the colors of the emblem of your favorite hockey team or with the icon of your favorite musical group).


- With additional elements – contains functionally useful elements for survival in the wild (for example, a bracelet with a compass, whistle, cable saw, flint).


Bracelets can also be divided into men's and women's, but this division is quite arbitrary and depends on the color of the cord and the elements woven into it (girls are more likely to buy or weave a bracelet with multi-colored beads than with nuts).
The main model for women is considered to be a “snake” bracelet, or simply a snake, since it is the thinnest and does not weigh down a woman’s hand. However, this does not in any way affect its functionality - each “kite” includes, in addition to the cord itself, a flint, a whistle, a jute rope (used to ignite a fire from a spark) and a blade. This combination of elegant form and useful content will undoubtedly please active representatives of the fair sex.


Color
The color of the bracelet depends on the color of the threads used in weaving - it can be one-color, two-color or three-color. Often the chosen colors have a symbolic meaning for the owner, thus others can learn about his interests, tastes, and views (for example, the colors of the Russian flag reflect love for the homeland, a black and white bracelet with a yin-yang icon indicates a passion for Chinese philosophy, and a white blue will be appreciated by fans of the Zenit football club).


Clasp options
The clasp is one of the key elements in the design of a paracord bracelet. The most popular are fastex, which are also simple plastic fasteners, and staples, which are metal fasteners.
A more interesting option is a clasp consisting of a button at one end of the bracelet, threaded through a loop at the other end. The clasp is not only a fastener, but also a multifunctional part of the bracelet. It may contain, for example, an integrated whistle, a built-in compass and even a hidden handcuff key. Recently, new models have appeared - without fastex, perhaps for some they will be the most convenient.


Brands
A paracord bracelet is not just a fashion accessory, it is also a functional product. Since today people love the combination of beauty and utility, paracord accessories are increasingly becoming fashionable, so competitive manufacturing companies have appeared, some brands are already known throughout the world.


Today the following models are leading the market.
The Friendly Swede
This bracelet is a simple model that does not have any additional functions. However, this model will be useful even without many tools - the cord can withstand loads of up to 250 kilograms, and it can be used in a variety of ways. Thanks to the high-quality clasp, the accessory will never get lost. Therefore, for people who want a basic bracelet without unnecessary bells and whistles, this model is perfect.


Bomber & Company
This model will appeal to those who love a combination of style and quality. It already has an interesting feature: the ability to be used as a means for ignition. It is also waterproof, mold will never appear on it, so you don’t have to be afraid of bacteria, which often find a beneficial environment for themselves in microcracks. A high-quality, always fashionable and versatile accessory, the design of which is ideal for everyday life and will be appropriate not only in the forest, but also on the streets of a big city.


WRAPS
The most necessary tools of this bracelet - a ignition element, the jagged starter of which acts as a saw, and a compass - will be appreciated by lovers of outdoor recreation and short trips. With its help, you can build a fire, set a trap, and determine the location. Nothing extra, suitable for beginner trippers.


A2S
This bracelet has a wider range of tools that are built into the buckle: a compass, a scraper, a knife, an iron rod and, very usefully, an emergency suit. Paracord can withstand up to 250 kilograms, and the volume of the whistle is comparable to the sound of thunder, the sounds of an orchestra, a train car, or a working chainsaw, so even getting lost in the forest will not be scary. Thanks to this functionality, the accessory will become an indispensable assistant during a long hike.


Core Survival
This is an offer for real extreme sports enthusiasts. A three-meter cord that can withstand 300 kilograms, a flint, a whistle, a scraper built into the buckle, a compass as a locking mechanism, what more could you ask for? Unless he gets lost along the way. Functionality worthy of professionals.


How to choose?
Paracord bracelets are becoming more and more popular, so the market offers a variety of models, and everyone can find something that suits them - in price, quality, and equipment.


Below are the main parameters that you should pay attention to when choosing.
Type
There are three main types of bracelet, which differ in functionality, or so-called NAZ (wearable emergency supply) - “Turnable”, “Second Chance” and “Extreme”.
- “Tenacious” is suitable for people with thin hands and will look good mainly on women and children. In addition to paracord of an average length of 5 meters, such a bracelet includes fishing line (6 meters) and hooks (5 pieces), hermetically sealed matches (2 pieces) and striker. It is comfortable for daily wear.


- “Second Chance” is a bracelet with a standard set of tools, to which, in addition to those found in the first, a whistle, a lighter and a mini-blade are added. Can be made in a variety of colors.


- "Extreme" - ideal for travelers who love long hikes in remote areas. It includes, in addition to Second Chance, a compass with flammable liquid and a means to start a fire from a spark. This is indeed a real “survival bracelet” that will provide invaluable assistance in extreme conditions, but wearing it every day is not very convenient.


Each bracelet may also include potassium permanganate (a means for washing wounds, disinfecting water, eliminating the effects of poisoning).
Paracord is a lightweight and very durable nylon cord. It was previously used in the manufacture of parachutes, but today it is successfully used for other purposes. Paracord is used to make bracelets, keychains and belts. Sometimes they are purely decorative, and sometimes they are practical.
We invite you to get to know this material a little closer, and also master paracord weaving. In this article you will find diagrams, practical tips and other useful materials.
What is paracord?
Paracord is a cord made of several nylon fibers securely connected to each other. That is why the most durable types can withstand weights of more than 300 kg. However, finding such material is not easy. In the departments for creativity, its analogues are presented, which, of course, are also durable, but may not withstand the weight of a person.
If you want to make a bracelet or keychain out of paracord for practical purposes (to take with you on a hike, for example), look into the extreme equipment departments or hardware stores. Nylon cords are more reliable there. They may not be as bright, but they perform their main function with a bang.

Why is it better than twine?
Let's note 4 main advantages:
- Paracord is lighter than standard twine. If you are planning to go on a hike or expedition, this point is important. The equipment of military personnel also meant that every gram was taken into account, so paracord has a clear advantage here.
- It's stronger. Well, this is all clear.
- The weather has no control over him. If the twine rots in dampness, the paracord will dry quickly. Even mold does not attack it, so paracord bracelets can be left on even while swimming.
- It is easy to weave and unravel. Over time, a knot made of twine will become impossible to untie. Paracord is easy to untangle, but this does not make the knots any less secure.
Why do Boy Scouts need paracord?
Paracord is familiar to every Boy Scout. Participants in the movement are taught to weave “survival bracelets.” Young men wear them on their hands or as key rings on their backpacks. It is understood that in extreme conditions the bracelet will be unraveled back into a three-meter nylon cord. After use, Boy Scouts can re-weave the bracelet and place it on their arm again. This useful skill helps save space in your backpack and ensures the safety of the nylon thread.
Fun fact: in the movie Mad Max, the main character wears a paracord bracelet on his arm. After this, it became very popular among men as an everyday accessory.

Hikers and fishermen also borrowed this idea from scouts.
Paracord in creativity
Today, paracord bracelets have become popular jewelry for men and women. All thanks to the availability, practicality and beauty of nylon cords. Many interesting paracord weaving patterns have emerged that use a combination of different colors.
Whatever you decide to use your paracord bracelet or keychain for, it can be made into a truly beautiful modern accessory.
Weaving
For one bracelet we will need 2-3 meters of paracord. It is most convenient to weave using a clamp. You can secure the cord with a paper staple.
Weaving patterns for paracord accessories are borrowed from technology. Let's talk about the most popular of them.
The pattern that the Boy Scouts use is as follows.

The result is a simple, cute and very reliable bracelet, which, if desired, can easily be turned back into a paracord cord. If necessary, make it long - you will get a belt.

A simple type of weaving that can be completed with a fastening or a knot.
If you don’t quite understand how to weave a paracord bracelet, you can watch this visual video master class.
As you can see, weaving is really very simple. A little practice and everything will work out.
Another good way is to braid a thread of one color with a long cord of a different color. This is perhaps the simplest paracord bracelet design.

The central cord matches the length of the bracelet. The second is approximately 2-3 meters. Take a look at the photo to understand how to correctly braid the central part with the second cord.

The result is not only reliable and practical, but also a beautiful bracelet. With a successful combination of colors, it looks advantageous. It’s also not too bulky, so it’s also suitable for girls.
To make a 4-color paracord bracelet, you will have to fuse together several cords of different colors. To do this, simply heat and tightly connect the edges of the nylon rope. Just keep in mind that you shouldn’t use the entire cord while traveling – the fastening may not be reliable. This is more of a decorative move.
The weaving pattern in this case is as follows.

With a successful combination of colors, you get a beautiful and very original accessory.
There is another popular option for weaving paracord bracelets - a snake. This master class shows how to make an accessory correctly. In addition, in the video you will learn how to complete a paracord bracelet with a fastener.
If you want to make a paracord keychain, you don't need to complete it. Simply tie each loose end into a knot and leave it dangling freely. When making a complete bracelet without a clasp, the last row is simply woven into the first. You can also weave bracelets from paracord using floss patterns (check out our material on this topic). Choose the appropriate method and color of nylon cord. We hope that these reliable accessories will become your faithful assistants and complement your look!
Views: 6,395
The word “bracelet” has one association: with a feminine, elegant accessory that adorns the wrist. But paracord bracelets do not resemble women's jewelry in any way. This accessory is worn by extreme travelers, fans of hiking and survivalists. You don’t have to be an extreme sports enthusiast to wear this universal bracelet; it is suitable for both women and men who prefer to dress in grunge, country, casual, military, safari styles; if the bracelet is made of cords of bright colors, it can also be an ethno style.
From the article you will learn everything about paracord bracelets and learn how to make them yourself using simple illustrated diagrams.
What is Paracord and what properties does it have?
Paracord is a synthetic cord made from nylon. It was from such cords that paratroopers' lines were previously made. The cord is smooth, elastic and durable. For these properties it was appreciated by the military and civilians.
Paracord consists of many intertwined threads and a core, which is also woven from threads. Due to its strength, the lace can be used for serious purposes: fastening equipment, shoe laces, repairing clothes and in extreme situations.
Extreme lovers have figured out how to turn a paracord cord into a compact and convenient thing that will always be at hand. They learned to weave bracelets from it that can be easily tied, untied and unraveled to use the rope for its intended purpose. This is how survival bracelets were born.
How can you tell if this is an original cord or a cheap fake?
Real bracelets are made from original paracord - they have all its basic properties. To understand whether the bracelet you have is original or not, you can test it:
Touch - the cord feels soft and elastic to the touch;
Set the edge on fire - smoky smoke and the smell of burnt insulation appear;
Take a closer look at the cut - the core burns slower than the shell, they do not fuse together.
All these properties are important if you are choosing a bracelet specifically for practical use. And if it is used only as a decoration, the properties of the original can be neglected.
What kind of bracelets are made from paracord?
Paracord bracelets vary depending on the weave used. Weave types:
1. “Snake;
2. "Cobra";
3. “Fishtail”;
4. “Ladder”;
5. "Chain mail";
6. “Shark’s tooth”;
7. "Centipede".
Patterns for weaving paracord bracelets
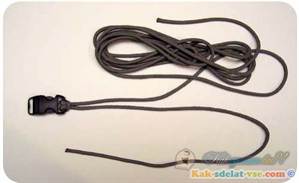
To weave a bracelet yourself according to any of the patterns listed below, we will need:
A piece of paracord about 80-100 cm long;
Scissors;
Lighter;
Fastener (such as a plastic clip).
Advice. If you do weaving all the time, it is better to purchase a special machine, which makes working much easier.
Scheme No. 1 - “snake” paracord bracelet
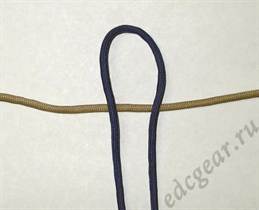
The paracord needs to be folded in half and pulled through the hole in the fastener so that a loop is eventually formed.The free ends of the cord are pulled through the resulting loop and tightened tightly. This results in the first node. Then you need to put on the second clasp (so that it is convenient to fasten it later) and measure the required size of cord according to the size of your wrist.
Then you can start making the main knots that form the pattern. To do this, you need to select a working thread and alternately draw it around the reinforced sections of the cord, while winding the thread from the bottom up on one and pulling it from top to bottom on the other.
Then you need to continue weaving according to the same pattern until the very end, until you get a full-fledged bracelet. Then the remaining ends of the cord need to be pulled through the holes of the fastener and scorched with a lighter so that they do not unravel.
The result is a bracelet like this:
Scheme 2 - “cobra” paracord bracelet
A piece of paracord needs to be folded in half, forming a loop and making a knot around the chosen fastener. Then you need to measure the required length of the cord and circle its ends around the second fastener. Then the weaving itself begins.
The left rope should be placed on top of the base cord and both ends of the rope should be turned so that a loop is formed on the right. Then you need to go around the left one at the top with the right turn of the rope, and pass the end of the left turn into the loop from the bottom up. Now all that remains is to pull the two ends of the cord and form a knot.
Now you need to place the right turn on top, and throw the left one over it, passing the running end into the loop from the bottom up. You will get a second weaving knot. All others are performed in the same sequence until the very end.
Then you need to turn the bracelet with the other side towards you, and weave over the first layer. It is better not to do more than two layers, as the bracelet turns out to be uncomfortable.
The remaining ends of the threads need to be cut and burned with a lighter.

Scheme 3 - fishtail paracord bracelet
You need to take 2 cords: pull one into a straight line, and form a loop from the second and place it under the second cord. Then pull the ends of the cord into the loop, wrapping around the first straight cord and tightening the knot.
The ends of the 2 cords need to be separated and separated on two sides. One of the cords needs to be pulled out so that a small loop is formed.
Next, you need to pass the left cord under the right cord, as shown in the picture - black, then put the right cord of a different color on it. The exact same operation is performed on the right side.
These steps are repeated until the desired length of the bracelet is reached. The finished product must be tightened, giving the weaving pattern its shape.
After everything is finished, you need to form a diamond knot from the ends of the cord and thread it into the loop on the other side - you will get a small clasp.

Diagram 4: “ladder” paracord bracelet
You need to thread the cord through the hole in the fastener so that a loop is formed. Then thread the opposite ends of the cord through the other fastener.
To the main cord you need to add a second one in a contrasting color, and stretch one end over the two lower threads of the first cord, and the second under them. As a result, the second lace should completely cover the two lower threads.
You need to thread the top left (blue) thread into the resulting large loop, and then the right one. The resulting knot must be carefully tightened, straightening the threads.
The sequence of actions is repeated until the bracelet is ready. The complete weave looks like this.
Diagram 5: chainmail paracord bracelet
You will need 3 laces of different colors. Two of them are bent in such a way that loops are formed: the loop of one cord is threaded into the loop of the other. Then you need to thread the ends of the threads of one lace into two loops at once and pull through - the first knot is formed.
A third thread of a different color is added: one end of it is threaded between the two loops on the left, and the second - between the two loops on the right and pulled through. The knot is straightened and tightened - the first stage is over.
Second stage: the outermost (white) threads are woven over the remaining threads, and then each of the lower threads is pulled into the resulting loop (see picture). It turns out that all the threads are woven around two crossed white threads. This forms a neat, strong knot.
The sequence of actions is repeated until the bracelet is completed. White threads remain the main threads all the time. The result is a beautiful pattern, especially on the reverse side, which we do not see at first.
Then you need to form a clasp from the remaining ends of the lace, and the bracelet is ready. At the other end there is a loop into which you can insert the resulting fastener.
Diagram 6: “shark tooth” paracord bracelet
Quite an unusual, but simple weaving. You will need one cord (or two different colors soldered into one) and two fasteners. Traditionally, a loop is formed from the cord and threaded through the clasp and tightened. The cords are then pulled through the clasp on the opposite side.
The weaving itself begins: the right cord is pulled between the two middle ones and laid in the form of a loop. The left cord is also pulled between the two middle ones and threaded into the loop of the right lace from the bottom up, as if diving under it. The knot is tightened.
All actions in the same sequence are repeated until the end, until the bracelet is ready. Just remember: the leading cord is always the one with which you started (in this case, yellow), each new weave begins with it.
The finished product looks like this:
Diagram 7: “centipede” paracord bracelet
This type of weaving is also called quick-unraveling, since, if necessary, it can be quickly “disassembled” and turned into a long, durable cord that is useful in different situations.
It starts with 2 cords being pulled through the clasp. You can even do it twice so that the weaving does not dangle, but sits tightly in the clasp.
Then the right outer thread (white) is laid in the form of a loop on top of the two middle ones, wrapped around them and tightened with a knot. The same thing needs to be done with the right thread: throw it on top, circle it and pass it through the loop, forming a knot..
Now you need to take the right thread and circle the two middle ones from below, pass it through the loop and make a knot. Same thing with the left. This must be repeated until the end, alternating between throwing threads from top to top, and then from bottom to bottom.
Special fittings are used as clasps for such bracelets:
For urban bracelets worn as decoration, more original fittings are suitable. For example, beads of different shapes or anchors.
Is it easy to make paracord bracelets?
The hardest part about weaving these bracelets is getting started. You need to get used to making the first knot, then the sequence is constantly repeated and finishing the weaving becomes easy. If you fill your hand (2-3 bracelets are enough for this), you can finish the product in 10-15 minutes.
For those who are just learning to weave such jewelry, it is better to start with the simplest patterns: snake, cobra. It’s not worth switching to products with several layers yet, as you can make a lot of mistakes or over-tighten the weave and the pattern will not look like the one in the picture.
Our online store website has everything you need to weave bracelets:
. ;
. .
The latest fashion trend is various hobbies related to weaving - this can be beads, floss, elastic bands, wire, and such a not very well-known thing as paracord. However, it is worth noting that the term “paracord” is not familiar only to the average person, but fans of extreme sports such as mountaineering, rock climbing, or those who simply go on frequent hikes are not only familiar with this concept, but have also worked with it. Paracord is a strong nylon rope that can support a lot of weight and be used for other practical purposes. Today we will tell you about paracord weaving; you can see the diagrams in our videos.
Bracelet weaving pattern
If this is your first time encountering paracord, then you may have a natural question: if it is part of the equipment, then why weave bracelets from it. The thing is that on a hike it is very important to pack all the equipment as competently as possible, and so that it takes up as little space as possible, and during the Second World War, soldiers came up with the idea that they could put this cable not in a backpack, but make a bracelet or something out of it -something that you can put on yourself, and, if necessary, quickly dismantle and use for its intended purpose. For a paracord bracelet, the weaving pattern becomes most clear after watching the video:
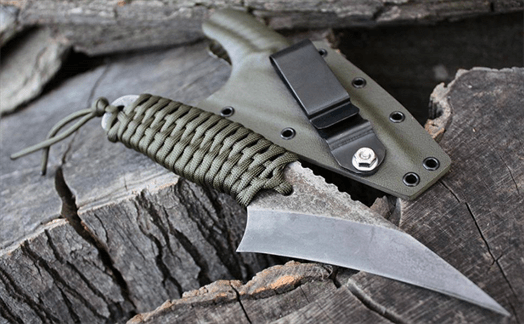
Weaving lanyards
A lanyard is a cord that is attached to the handles of camp knives, daggers, or combat knives during military operations. This is necessary so that you can put it on your hand and it won’t get lost. In peacetime, they are simply a decorative decoration for the handle. Weaving lanyards from paracord, diagrams that you can see on the Internet will tell you how to decorate your favorite camping knife:
Node diagrams
The fundamental principle in weaving from paracord is to master the main types of knots; after you have studied them, you can start weaving diagrams of knots from paracord:
conclusions
Weaving from paracord can captivate you so much that from the usual means of packing a cable, it will become your hobby, and you will be able to make beautiful gifts for the holidays to men you know; they will be especially happy with such a pleasant and useful gift if hiking, hunting or fishing are among their activities favorite activities.
A thin nylon cord is called parkord. You can make excellent crafts from it for real men. For those who want to learn how to weave a paracord bracelet, weaving patterns will come in handy. The varieties of weaving from this wonderful material will be discussed in this article.
Male occupation
It’s not for nothing that weaving paracord bracelets is called a man’s activity. This is due to the history of the origin of the weaving material. Initially, thin nylon cords were used as parachute lines. US Army soldiers began weaving combat bracelets for their comrades using material they had on hand. They came to be called survival bracelets. Before each combat operation, a soldier wore a bracelet woven by his comrade. Carbines were woven into such bracelets as clasps, and blades and soldier's dog tags were placed inside. If you unravel it, you can get a small survival kit consisting of 5-6 meters of strong rope and other useful little things. Such bracelets were removed only after returning to base.
Hunters also used this technique, making braids for knives from parkcord. After all, rope is the most important element that will help you survive in a critical situation. You can use it to make snares for hunting small animals, use it as a tourniquet when wounded, pull it to organize a shelter, and get out of any trouble.
However, not only men wear such jewelry. Women who prefer military style decorate themselves with paracord products. These are all kinds of bracelets, belts, lanyard-shaped key rings and watch straps made of braided cord.
Learning to choose
To make a quality product, you need to choose the right material. For these purposes, use a number of useful tips:
- The cord should be soft to the touch.
- High-quality paracord should burn with a smoky flame with black acrid smoke that smells like plastic.
- The cord consists of an inner fiber and a braid. The braid always burns faster, shrinking and exposing the core of the cord.
- Be sure to ask for a certificate of conformity when choosing a material, this will allow you to make a real survival kit. Indeed, often instead of nylon, which has very high strength, you may be offered polyester cords.

Weaving device

Some craftsmen prefer to work on a special weaving machine. The advantages of such a device are that the product is firmly attached to it and does not try to slip away from you. A big plus is the built-in ruler, which will allow you to weave a product of the required size. Of course, you can buy it at the store, but it’s worth trying to make it yourself using available materials. This video will help you with this.
Survival decoration
Since we're on the topic of survival, we suggest you make a traditional survival bracelet with your own hands. Present it to your friend, he will definitely appreciate such a gift. The weaving technique is quite simple and fast, because soldiers have no time to hesitate on the battlefield. To make a bracelet, take:
- Paracord at the rate of 2 m for every 10 cm of bracelet;
- Clasp or carabiner;
- Scissors;
- Matches.
First, solder the ends of the cord by burning them with a lighter. Make loose loops on the clasp. Next, weaving is done according to the pattern.

The manufacturing process is clearly shown in the photo.

The bracelet is ready!
Its advantage is that the weave can be unraveled in literally 30 seconds, you just need to untie the knot. This weaving pattern is called “cobra”.
Watch strap
You can style your wristwatch as a survival bracelet. This master class will tell you how to weave such a thing.
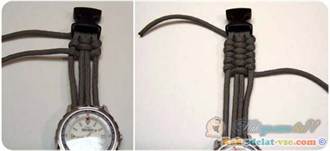
Take a measurement from your wrist and attach the cord to the clip so that there is a length of 50 cm on one side and 1.5 m on the other.
Pass the ends of the cable through the back wall of the watch and secure it to the second part of the clamp with two turns. The length of the future strap is slightly larger than the size of your wrist. It should look like this.

The short tail is not involved in the work; weaving is done with the long end. Pull the working thread under the central sections and circle around the left one, going from above. The cable will be at the bottom. Now you need to pass it over the middle sections and circle the right cord from bottom to top. The principle of weaving is clearly visible in the photo instructions.
When you reach the watch itself, insert the cord directly through its fastenings and continue to weave the second part of the strap according to the pattern.

Having reached the fastening, the working thread must be pulled through the outermost loop of the clamp and hidden inside the weave. After cutting, do not forget to melt it with a lighter so that it does not unravel.

A real man's watch is ready. At any moment they can turn back into a rope.

Another way
Try weaving a bracelet with a snake pattern. This is quite easy to do. Take two pieces of paracord, each 1 meter long. Fold the pieces as follows and form a loop.

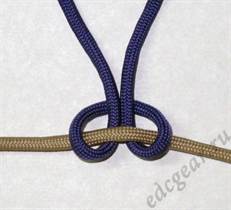
Turn the weave over and lift the top.
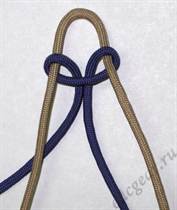
Weaving is carried out only with the left end of the rope. Pull it under the first lace and then repeat on the right side. Tighten.


