Baubles made of floss with oblique weaving. How to weave baubles from floss threads: starting from scratch. Methods of weaving baubles
Hand made jewelry is a constant trend that has been decorating the collections of famous designers for several seasons now. Handmade rings, earrings, and bracelets are always exclusive; they contain the warmth of the master’s hands, a piece of his soul. Agree, this is a powerful motivation to start crafting immediately. Baubles are the friendliest decoration; such accessories are original, distinctive and enchantingly beautiful. To learn how to weave designer accessories, you need to master the ABCs of making and learn to read the patterns of baubles with oblique weaving. As you know, there are only two methods for making baubles: straight and oblique. Beginner fenkoweavers are advised to master the art by starting with the oblique method.
There are many ways to decorate an image. Designer accessories will help reveal individuality, translate ideas into elegant reality, attract attention, emphasizing excellent taste. Making baubles with oblique weaving is the easiest way to realize your creative plans.
Stylish bauble with oblique weaveLooking at multi-colored bracelets, many find it difficult to believe in themselves. The pattern has been found, the threads have been purchased, where to start? A few practical tips will help you understand how to weave baubles with oblique weaving:
- Let's prepare the material. Standard oblique weaving of baubles is considered the easiest way to make a fashion accessory. The thread should be strong, of sufficient length, evenly colored in one tone.
 It is very important to choose high-quality materials for weaving
Advice:
When measuring threads for a bracelet, you need to follow the 1:4 algorithm; the length of the components should be 4 times longer than the finished product.
- Learning to tie knots. The aesthetics of the finished decoration depends on the ability to correctly tie one or another element. The knots should be the same, tightly tied, weaving into a beautiful combination, which is illustrated by the chosen pattern of the bauble.
- Learning to read a drawing. For weaving baubles, patterns are an aid not only for beginners, but also for experienced craftsmen. At first, a ready-made bauble pattern can be used, but over time, any master will have a desire to create his own unique designs.
Basic knots for weaving baubles
By following basic advice, many questions will disappear by themselves, leaving space for limitless imagination and the creative process of weaving.
 A little practice and an incredible stylish accessory is ready
Legend
For any method, schematic images are the basis for weaving a bauble. There are several common symbols that appear in each figure:
- Letters. The order of the threads is indicated by Latin characters or Cyrillic, and each element is indicated by its own letter.
- Numbers. They are located vertically in the figure, indicating the serial number of the row.
- Mugs. This is how the nodules are designated. The color of the circle corresponds to the thread that is leading in tying the element.
- Straight arrows. Symbols indicate direction. They will tell you in which direction this thread needs to be thrown.
- Angular arrows. The upper part will determine the left-right direction. We look at the segment, determine the direction, and then tie a knot in the same way.
 Using the previous scheme, you can create a real masterpiece
 These bracelets will be an excellent addition to your look.
As you can see, reading the diagram is not a matter of incomprehensible complexity. Go for it, because in any business, mastery comes with experience.
A selection of master classes
Mastery in the art of weaving baubles is determined by the ability to work with a large number of components. Experienced craftsmen know how to weave threads into patterns using up to 10 threads at a time.

For beginners, it is better to start with a smaller amount, for example, using 6 threads. Even a beginner can weave a beautiful bauble using the oblique method.
 An example of a simpler bauble for beginners
 A little imagination and a stylish accessory is ready
For the work you will need beautiful threads; colors are chosen according to the taste of the needlewoman. We start the process by securing the threads on the work surface, it can be a pillow, a tablet, a board with a stationery pin.
We weave a zigzag
This master class will help you create an unusual decoration with a zigzag textured pattern.
 ZIGZAG pattern
  Wide bauble with a zigzag pattern
Weaving algorithm:
- We select 5 colored threads. Each length is at least 1 meter. We collect it in a bun, tie it at the end with a knot, and secure it to the work surface.
- We lay out the individual components and make sure that the order in the first strand strictly corresponds to the order in the second strand.
- We begin to knit a combination of elements. First we connect the two threads on the far right. Then with the next component we make two knots to the right.
- We are already knitting three knots in the same direction. Let's gradually connect all the components. This results in nine multi-colored stripes.
- In a similar way, we alternately connect all the threads with knots, but moving in the opposite direction.
We repeat the entire algorithm until the end of weaving, obtaining a bright zigzag pattern.
Classic pattern
The combination of black, white, red in a laconic design is an unchanging classic of style. If desired, you can use any other colors, but the weaving algorithm remains unchanged:
 Bauble braid in contrasting colors
 A simple version of the bauble braid
- Take 6 threads, 2 of each color. The length of the components is at least 1 meter.
The classic braid is the basis of oblique weaving. It is with this that it is recommended to begin your acquaintance with the art of creating baubles from threads.
- We tie all the threads into a knot, braiding it. Next, we knit a knot, connecting the outer threads of the same color. We make two knots on each thread.
- Without letting go of the outer thread, we tie knots, connecting it and each other component in turn.
- Let's take the next thread, but of a different color, doing the same work.
- We complete the combination by tying knots with a thread of the third color.
We continue the entire weaving cycle, at the end we tie all the strands again with a classic braid. Once you get the hang of knitting knots one color at a time, you can add a few more colors.
Elegant bracelet
Handmade jewelry is always beautiful, original and exclusive.
We offer a master class on creating an elegant floss bauble for special occasions. The algorithm is as follows:
- We select 6 threads of three different shades. Each length is at least 2 meters. Fold them in half, tie them at the end and secure. We arrange it in such a way that 4 threads of each color follow each other in order.
- We alternately tie the outermost thread on the right with the rest from the same color scheme. We repeat the maneuver, but with those components that are located on the left.
- We will tie the two central parts with a simple double knot, and then we will connect the remaining two with the adjacent ones.
- Let's tie the two central parts into a knot again. And on the right and left we will repeat the maneuver, connecting each other alternately.
- Separately, we intertwine the two central threads with adjacent strands so as to form an English letter V.
By repeating the combinations until the end of the product, we will end up with an unusually delicate and elegant pattern.
Lace bauble
Once you have mastered the technique of recognizing bias weaving patterns, you can get creative by creating your own beautiful pattern patterns.
 A bright bracelet will not go unnoticed
Starting with the simplest examples for beginners, you can create entire original collections as gifts for yourself, family and friends.
 Weaving bracelets is a fun activity
 Fenichka is always a wonderful gift
Tartan is a pattern that always comes back into fashion. It can have hundreds of options and dozens of colors: noble and extravagant, bright and delicate, strict and playful. But the basis is always the same - contrasting threads intersect, drawing multi-colored cells on the fabric. How to weave such a tartan yourself?
The easiest way to weave such baubles is with oblique weaving. It is called oblique because the rows in it are not located strictly under each other, but as if offset by half a knot. The node of the bottom row is placed between the two nodes of the top - and this is how the entire pattern is built. Another difference from direct weaving is that here you do not need to weave additional threads into the pattern if you want to add another color. Threads of all colors are woven from the very beginning and go to the very end.
To master oblique weaving of baubles and learn to understand patterns, let’s take this simple example.
Beginning of work
For this bauble, we will need four meters of thread of each color - this is only half a skein of floss (as a rule, there are eight or ten meters for one skein). To begin, tie three blue, three gray and three white meter threads together and secure the knot to a clip or pin. We arrange them by color.

Now we tie the first row of knots. We tie two pairs of blue threads together, and then we make four more white knots from pairs of gray and white threads. To make the knot white, you need to bring the white thread to the top, and then tie two knots on the gray thread, one on top of the other. The white threads will go to the right, and the gray threads will go to the left.

In the next row, the leftmost (blue) and rightmost (white) threads will remain loose. We tie the second blue thread from the left with the neighboring one, from the second pair, and then make 4 more gray knots in the same way. To make the knot gray, you need to bring the gray thread to the top and weave two knots on the white thread. The weaving method will be mirrored in relation to the first row.

Now let's go back to straight weaving and make three blue and three white knots, as shown in the diagram. In this row, all the threads will again be braided into knots.
We continue to make the pattern

We continue to weave according to the pattern, not forgetting to pay attention to the arrows - they show us in which direction the knot should be tied. In even rows (second, fourth, sixth, and so on), the outer threads, regardless of color, will remain free; in odd rows (first, third, fifth, etc.) - all threads will be knitted in pairs.

There is nothing complicated about how to weave baubles with oblique weaving. Just follow the pattern and watch your drawing grow before your eyes. If the pattern suddenly breaks and you don’t understand what to do next, just look carefully at how the stripes move on the pattern. On our bauble, for example, rows of four identical knots in every second row are shifted by one knot. Just look in which direction the row is moving, and what colors should follow - to the right and to the left. Continue this movement until the drawing “meets” the diagram again.


Ready!
This cute bracelet was made using our little design. Since now you know how to weave baubles with oblique weaving, you can take on a more complex pattern - then the bauble will be wider and more colorful. There are a huge number of options. The main thing is don’t be afraid to practice and take on new patterns, dare and come up with new bold combinations!

Text and photo (c)
According to the scheme. It is thanks to the patterns that you can create real masterpieces: bracelets with names and many other interesting things. But how to work with them? How to read? And how not to get confused in the notations?
What needs to be taken into account when training?
The main thing you should pay attention to is the choice of material with which you subsequently plan to work. For example, it can be beads, floss threads, twine, satin ribbons, colored rubber bands, etc. Accordingly, each type of material has its own subtleties and weaving features, as well as patterns. Therefore, before you start learning this or that, choose the material.
What do you need to know when weaving baubles from threads?
Let's say you chose What Next? And how to weave baubles from colored threads correctly? Next, you need to study what kind of knots there are in weaving, since the creation is based precisely on them.
Main knots in floss: knot No. 1
Node No. 1 looks like a cross with an arrow and a downward pointer in the diagram. It stands for this: you have two working threads of different colors (for example, yellow and orange); you take the thread that is located to your left and bend it towards the other, holding the resulting triangle with your finger; insert the end of the bent thread under the straight thread and tie a knot. Then repeat the same procedure a second time.

If you know the decoding of symbols and actions associated with them, you will easily figure out how to weave baubles according to the pattern.
We weave the main knot No. 2 from threads
Node No. 2 can be schematically depicted as a cross, inside of which there is a circle with an arrow indicating the direction - down to the left. This designation is deciphered as follows: in front of you are again two colored working threads; this time you take the one that is on the right side, put it on the other; thread the end into a makeshift ring and tie a knot. The second node is performed using a similar system.
Let's understand the diagrams: main node No. 3
Node No. 3 in the diagrams is depicted as a cross with a circle, inside of which there is an arrow (it shows the direction to the right and down). Before weaving baubles with such a knot correctly, pay attention to the position of the arrow in the center of the circle. Look where she points.
This knot works according to the following principle: you take the thread that lies on the right and pass it under the other; tie a knot; repeat all the same steps again.
How to weave baubles according to the pattern: knot No. 4
The fourth node is usually schematically depicted in the form of a cross and a circle with an arrow pointing to the left and down. This pattern is deciphered as follows: the working thread to your left is laid on top of the other remaining thread; the end of the thread is pulled into a ring and a knot is tied. The second time you put the same working thread under the other one and tie it into a knot in the same way.
weaving baubles?
Before weaving baubles step by step and according to the pattern, you need to know one interesting nuance. As it turned out, bracelets can be made either in a full or incomplete cycle. So, if the diagram assumes an image of a complete cycle, then all the colors of such a bauble are arranged sequentially on both sides of the product.
If the pattern provides for an incomplete weaving cycle, then in the photo you will see a complete mismatch in the color of the threads on the left and right.

Weaving with paired and unpaired thread counts
Do you want to learn how to weave beautiful bracelets? Don’t know how to weave baubles according to the pattern? Read our useful tips - and everything will become clear to you right away. So, in the diagrams you can often see that when weaving, paired and unpaired numbers of threads or ribbons are used. For example, you may have 5 gray and 5 black threads or ribbons, 4 white and 4 red. This weaving will be in pairs. In an unpaired thread, the number of working threads may not match. For example, you might have 5 red and 7 white threads.
How to weave bracelets with inscriptions correctly?
Many craftswomen and craftsmen try to make jewelry with a name or inscription as one of their first works. Is it difficult to do? In general, no. However, the creation of such bracelets involves working with a large number of threads, which are easy for beginners to get confused in.

Before weaving baubles with inscriptions, it is worth finding a suitable pattern and counting the exact number of threads needed to create the product. To do this, you need to count the number of cells in the first vertical column in the diagram. For example, there were 8 of them. This means that for weaving you will need exactly 8 threads.
In addition, it is worth considering the fact that the design or inscription on the bracelet involves the use of two types of threads or ribbons: one of them is used to create the base-background, and the second is used for the inscription or design. In this case, the length of the secondary thread or ribbon should not be large (50 cm is enough), and the length of the background thread should be 2-3 times greater than the expected length of the product. Please note that to create the background you will need a large number of threads. Therefore, it is better to take a whole skein. The result should be one leading thread and 6-8 background threads. What else do you need to know before weaving baubles with inscriptions?
What else needs to be done before weaving baubles with an inscription?
Before you begin the work itself, you need to make some simple mathematical calculations. This must be done not only so that the bracelet ultimately fits on your hand, but also in order to correctly place the inscription on the product.
To make your task easier, you should write your intended name or inscription on a sheet of squared paper. Next, pay attention to how many cells it occupies. For example, you got 30 cells, which equates to 30 rows. The approximate weaving density of your product will be 5 rows per 1 cm of bracelet. Therefore, 30 rows have a density of 6 cm (30/5).
Then we measure the volume of the wrist. Let's say it corresponds to 15 cm. This means that with a length of 15 cm for a bauble with a text length of 6 cm (15 - 6 = 9), it is necessary to make the main background 9 cm. If we divide this number by two, we get 4.5 cm on each side. Next, multiply the resulting value by 5 and get the number of rows for the background (4.5 x 5 = 22.5 cm). And only if these conditions are met, the inscription will appear in the middle of the decoration. We will talk further about how to weave simple baubles.
How to make simple baubles?
It is always better to start with simple products, which in the future will allow you to master more complex weaving techniques much faster. So, if you want to make a simple bracelet, then your best bet is to take an even number of threads or ribbons and divide them in pairs by color. For example, in the middle there will be two blue threads or ribbons, followed by two orange ones (one on one side, the other on the other side), the next two green ones, then two purple ones, two orange ones and two red ones.

Take the first and second strands and using the knot technique, tie both strands. Repeat the same movement again with the same threads, and then with the last two (this time the movement with the knots will be in a mirror image). After this, repeat the same procedure with the remaining threads or ribbons. If you work with the diagram correctly, you should end up with a herringbone pattern.
How can you make round baubles?
If you don’t yet know how to weave round baubles, we will tell you. Straight and round weaving is considered the most difficult, requiring some experience. For example, to make a product using rope weaving (round), you need to select a pattern and prepare the threads (their length should be three times longer than that allocated for the bauble itself).
Moreover, the simplest version of this weaving is based on working with four threads; for example, it could be two red and two white or multi-colored. This weaving is done strictly according to the pattern: unfold the threads to the sides and tie the two outer ones; then we put the first one on the second one and tie it; the second to the third, the next to the fourth and then repeat in a circle.

In a word, understanding the schemes is not so difficult. The main thing is to know general concepts and notations!
If someone wants to learn how to weave baubles from floss, then first for beginners it is worth mastering the technique of creating “masterpieces” from 2, 3, 4, 6 threads. At the same time, you need to learn to “read” ready-made diagrams of various thread decorations and, of course, practice in this matter.
First, secure the threads in any of 4 ways:
- Use a wide clip on cardboard, book or notebook.
- Using a regular pin, tying knots on it, and then attaching it to a pillow or any fabric.
- Tape it to a table or other hard surface.
- Using a special tablet with a clip (sold in stores).
It should be remembered that when fastening, the threads must be positioned according to the color scheme of the weave. When the floss is securely fixed, we begin to study the main knots.
Technique for performing the main components
When weaving baubles, only four basic knots are used:
Baubles are very easy to make if you follow the weaving technique.
Bauble made of 2 threads
The simplest bracelet can be woven from two threads.
To make it easier to navigate and not confuse the sequence of steps, use 2 colors of floss thread, for example red and blue:

After you have learned how to weave floss baubles with two threads, you can move on to more complicated patterns. For beginners, it is worth mastering how to make a braided bauble from different numbers of threads.
Braid of 4 strands or other even number
Weaving baubles with a braid from an even number and an odd number has slight differences.
First, it is important to disassemble the 4-strand braid pattern:

For a 6-strand braid, the knitting sequence is the same as for 4:

The principle of weaving a product from an even number of fibers is as follows: the leftmost fibers of the floss are placed to the right, first above the next fiber, and then under the next one. And the rightmost fiber is the opposite - first it is shifted to the left under the next fiber, and only then over the other. This weaving is used in the manufacture of wicker baskets.
Braid of 3 strands or other odd number
The easiest way to make a bauble is to weave a braid of 3 strands.
To do this, take 3 threads (can be of different colors):

Weaving jewelry from 7 threads:

The principle of weaving baubles with a braid from an odd number of fibers is that the left and right outer threads are always first shifted in the opposite direction over the first nearest fiber, and then under the next two fibers.
Straight weaving instructions
One of the popular ways to make baubles is direct weaving. With its help, interesting drawings, patterns, names and paintings are obtained. Straight weaving is a little more complicated than oblique weaving. However, this technique will more fully reveal the topic of how to weave baubles from floss for beginners. Some threads are selected for the background and others for a specific pattern.
At the beginning of the work, all other threads are tied in one direction and the other with the outer leading thread. It looks like zigzags. This is the background color.
When knitting a pattern, its thread ties the leading thread and goes in a different direction, while the leading thread is free.
It's best to start with a simple two-color design:

The technique of oblique weaving floss baubles uses the same basic left and right knots.
Oblique weaving instructions
Oblique weaving is considered classic. It most simply reveals the question of how to weave baubles from floss for beginners. There are 2 options for making oblique weaving.
First option
This weave includes only one basic knot - the main left or the main right. This knot is repeated on all rows until the end of the product. For clarity, it is worth considering oblique weaving with the main left knot. Take 2 threads, for example pink and blue, 100 cm long. 
Weaving:

Second option
The bauble is an arrow or “on the corner”, also known as “braid”. In this version of oblique weaving, both main knots are used - left and right. The result is an arrow-shaped pattern. 
Weaving:
- Fasten the tied ends of six threads of 3 colors to the book with a paper clip. The colors are arranged in the following sequence: at the edges there are 2 blue, then 2 red and 2 yellow floss threads.
- The left extreme thread (blue) is braided with the left main knot in succession with the red and yellow threads on the left. The rightmost (blue) knot is tied with the right main knot, the right red and yellow threads. Knit two blue threads together using a left or right main knot. Now the blue fibers have become central, and the red fibers are outermost.
- Repeat all steps as in point B, only with the outermost leading fibers of red color. After this step, the red fibers become central.
- With the left extreme yellow thread, two threads on the left, blue and red, are knitted with the left main knot. The right extreme yellow thread is used to tie two threads on the right, blue and red. The yellow threads in the center are woven together using a left or right main knot.
This is how the bauble is sequentially knitted to the required length. At the end, tie a regular knot and remove it from the base. Connect the ends of the baubles together, and carefully trim off the excess material. The bauble has a pattern in the form of an arrow.
Two-color weave
Take an even number of meter threads of floss, 4 blue and 4 pink:

This version of two-color weaving from floss is very easy to do, because there is no need to count the number of knots. The bauble turns out dense. It can be used as a watch strap.
How to weave baubles with names
Before you start weaving a bauble with a name, make a diagram. To do this, all the letters of the required name from the proposed letter schemes on the Internet are entered in a box on the sheet. 
A cell corresponds to one node.
Weaving:

Bracelet with a pattern
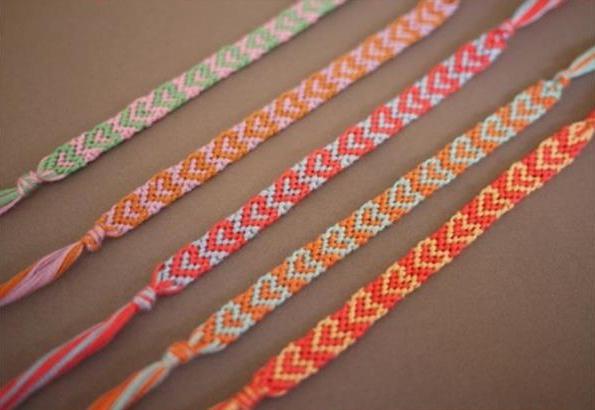
When you have gained some skills in how to weave baubles from floss for beginners, you can begin to work on more complex weaving patterns.
First, you can make a bracelet with a simple pattern, for example, a two-color one with hearts: 
- Study the weaving pattern.
- Take 4 threads of red and black, 1 meter long. Step back 8 cm from the end and tie a knot.
- Fasten the short part with a wide clamp on a flat surface. Arrange the fibers by color as shown in the diagram.
- Weaving is done in pairs. In the first row, the left half knot is made with the first black and second red threads. The black thread is placed with the left corner above the red thread, brought inside the corner and tightened the knot. Then the black thread is placed with the right corner over the red thread, brought inside the corner and tightened the knot. The pair are set aside.
- The second pair, black and red threads, are woven with a left knot (as indicated in the diagram). Set the pair aside.
- The third pair of red and black threads is woven according to the pattern with a right knot and also set aside.
- The fourth pair of red and black threads according to the pattern is made with a right half knot.
- Row 2. The black outer threads on the left and right are removed to the side. They are not woven, as in subsequent even rows of baubles. Red threads 2 and 3 are knitted with a left knot and set aside.
- Black fibers 4 and 5 are knitted with a left knot and set aside.
- Red fibers 6 and 7 are knitted with a right knot and set aside.
- Row 3. They also begin to knit from left to right. The first black and second red threads are knitted with a right knot and set aside.
- Red 3 and black 4 are knitted with a left knot and left.
- Black 5 and red 6 are tied with a right knot and set aside.
- Red 7 and black 8 are woven with a left knot and set aside.
Weaving methods with rhinestones and beads
Any bauble will look more impressive if you decorate it with additional beads or rhinestones. The easiest way is to sew beads or rhinestones with matching threads to the finished bauble, as your imagination allows.  The second method is to weave beads into the process of making a bauble using a flat knot. As a warp, take 2 threads of the same color as the 2 leading threads.
Weaving:
- The first 3-4 cm of the bauble is woven with a flat knot without beads. Next, add 1 piece to each node. beads on each side of the base.
- The last 3-4 cm of baubles are made without beads.
- Fastenings are made with two simple braids.
What to do if the thread runs out
When weaving embroidery floss, one of the threads may break, or it may run out, and the work must continue.
In this case:
- Bring the finished thread to the wrong side.
- Take a thread of the same color and put it in place of the previous one.
- The upper end of the new thread is tucked into the wrong side and tied with two knots of the leading thread.
- On the wrong side, the old and new threads are tied in a knot.
- Continue weaving on the front side of the bauble according to the chosen pattern.
How to make a clasp
There are several options for fastening baubles.
Option 1 - braided fastener:

Option 2 - tying the two ends of the braids with a separate thread:

Option 3 - Velcro, button, button:

Once the necessary basics have been mastered, it will not be difficult for beginners to weave simple baubles from floss, and you can also draw your own patterns of designs yourself. On the Internet you can find complex designs of baubles on various topics: emoticons, New Year, sweets, plants, Halloween, flags, etc.
Video: how to weave baubles from floss
How to weave baubles from floss, watch in the video:
Find out how to weave an arrow bauble from floss in the video:
It became very discussed. Not everyone understands everything completely and questions sometimes arise. In this master class we will try to analyze everything in as much detail as possible.
So first, let's look at the diagrams. They can be with a full weaving cycle, or not. This is a full cycle scheme. This can be understood by the placement of threads at the beginning and end of the pattern. Here, and there, and there the sequence of colors is the same - black, purple, black, purple, purple, black, purple, black. This means that after we have woven the part shown in the diagram, we begin to weave it again and all the threads match in color.
 And this scheme is with an incomplete cycle. Here at the top and bottom the sequence of threads is different. At the top - pink, yellow, blue, green, white, orange, red, purple. And below - blue, pink, white, yellow, red, green, purple, orange. In such patterns, you need to look at the weaving sequence. Here we weave knots in the same way in a cycle, only our threads will not match in color. This is sometimes given if the principle of weaving is clear from a short part. The full cycle of this scheme is possible.
There are also patterns with a paired number of threads and an unpaired one. We will weave a bauble according to this pattern. It has a double number of threads - four black and four purple.
 This means that we can take 2 black, 2 purple threads and fold them in half. The length needs to be doubled. As for choosing the length of the threads, this is a constant question. Here you need to look at the diagram itself and how many knots need to be made with a specific thread. This comes with experience. In most cases, one and a half meters of thread is enough.
 After we have folded the threads, we tie them, leaving a loop. We fasten the bauble so that it is convenient to weave it. We used a paper clip; you can secure the bauble with a pin to the sofa or pillow.
 You need to weave the bauble in rows. The numbers on the sides of the diagram show the row numbers. You can weave from left to right, or vice versa. There is no difference, the main thing is that you do not get confused. We will weave constantly from left to right. Let's start weaving the bauble with this knot.
The arrow shows which knot needs to be woven. The base of the arrow shows which thread we use to make the knots (the circle is painted in the same color), the tip of the arrow shows where this thread will move after the knot. Each node consists of two nodes. We start the first knot like this, bend the black thread over the blue one (we took blue instead of purple) in the shape of a four. Next, we pass the black thread inside and tighten the knot by pulling it firmly up. We've done half of the first knot.

We do the second half like this. We bend the black thread in the shape of a four in a mirror image, thread the black thread inside and tighten it. We have completed the first node. After it, the black thread will be on the left, and the blue thread on the right - this can be seen from the diagram. Now you know how to weave a knot in the shape of such a curved arrow.

 Let's move on to the second node. This is a node with an arrow from left to right. Like the previous one, like all subsequent ones, it consists of two nodes.
Since the base of the arrow is at the black thread, we will braid it with it. If the arrow is from left to right, then we put the black thread in the shape of a regular four. We thread and tighten.

We also make the second knot of this knot in the form of a regular four and tighten it. Now we have completed the second node.

 Let's move on to the third node, this is an arrow from right to left.
The base of the arrow is located at the black thread, we begin to braid it. The arrow from right to left is two knots with a mirrored four. Making the first knot.

And the second knot is the same. The third node has been completed.

 Let's move on to the fourth knot of the bauble. This is a curved arrow from right to left and right. If you haven’t understood the trend yet, then let’s pay attention to how to weave baubles without peeking at the master class. We mentally divide the arrow that we are weaving into two parts. Each part is one knot. If the part is directed from left to right, then we braid it with a regular four, if from right to left, we braid it with a mirror four. This is true for both straight and curved arrows.
So this knot is the first part in the form of a mirror four.

The second part is in the form of a regular four. Remember this, and you won’t have to look at the cheat sheet :-).

 Now we have finished the first row, and in addition we have sorted out all the nodes that can be found in any bauble patterns. We begin to weave the second row of baubles. In this row, the outer black threads are not used; we put them aside. We need to tie three knots.
The first knot from left to right on blue threads.


Second from left to right on black threads.


And the third from right to left on blue threads.


 Now the second row is ready. As you can see, the nodes are the same and everything is simple. The third row uses all the threads. We braid black threads with blue threads. See the nodes by the arrows.
 We wove the third row, put the outer blue threads on the sides. In the fourth row, as we see, they are not used.
 The fourth row is ready.
 The fifth row is woven, we put the outer black threads to the sides; in the sixth row they are not used.
 The sixth row is ready.


