DIY hair ties - step-by-step instructions for making. How to make a hair tie with your own hands? Master classes with photos How to make a beautiful elastic band with your own hands
Have an unimaginable amount of rags, beads, ribbons and other trinkets dear to your heart accumulated at home?
Don’t rush to move them from one dusty box to another, make something useful out of them, for example elastic bands for hair. In principle, there are never too many hair accessories, and these ones also have a nasty habit of getting lost.
Three master classes from craftswomen from different countries will help you make original elastic bands from scrap materials.
More interesting ur  ok on this topic: ok on this topic:   |
DIY hair ties
The first photo lesson is dedicated to making funny hair ties “with ears”; they will undoubtedly cheer up the girl who wears them. In the photo you see the author of this master class, craftswoman Ann. The idea to make these came to her on the eve of Easter, she saw these cute “bunny” ears for eight dollars apiece and immediately decided to make herself some for “almost free.”

To work you will need the following tools and materials:
- any fabrics,
- underwear elastic,
- scissors,
- pins,
- needle, thread,
- sewing machine (optional),
- ruler, pencil,
- iron.

Step No. 1. Cut out a strip of fabric measuring 46cm * 8cm. 
Step No. 2. Fold the strip of fabric in half lengthwise, right side inward, and secure with pins. 
Step No. 3. Cut out another strip of fabric 30cm * 13cm and fold it crosswise in half, wrong side out. 
Step #4: Fold the fabric in half again, this time lengthwise. See the photo, in the end the strip should be folded four times with the front side inward. 
Step #5. Draw 1/2 of the ear according to your taste. The author likes pointed ones. 
Step #6. Cut off excess fabric and unfold the product. 
Step #7. Fold the pieces in half lengthwise and secure with pins. 
Step #8. Using a sewing machine, sew along the edges of the pieces, leaving a hole on the ear piece. 
Step #9. Turn the elastic band and ears blank right side out. 
Step #10. Iron the details. 
Step No. 11. Measure 23 cm of elastic band. 
Step No. 12. Insert it using a safety pin into the strip of fabric prepared earlier. Tie the ends of the elastic into a knot. 
Step No. 13. Sew the ends of the ribbon as shown in the photo. 
Step No. 14. Sew on the “ears” the area left for turning the workpiece inside out. 
Step No. 15. Thread the ears through the elastic band. 
Step No. 16. Tie the ears with an elastic band and wear them with pleasure! 
These hair accessories can be made from different types of fabrics. They are equally good in both cotton and silk.  Source: http://www.lifeannstyle.com/diy-bunny-ears-scrunchies/#
From the second photo of the lesson you will learn how to make an original elastic band with a bow. This hair tie was made by the already familiar craftswoman Emi, a Japanese writer living in London. In her blog, she writes that she is obsessed with bows, which is why she decorated her next work with this particular decoration. 
To work you will need:
- strip of fabric for wrapping elastic 8 x 50cm,
- strip of fabric to create a bow 8 x 10 cm,
- fabric for attaching the bow to the elastic band 6 x 8 cm,
- elastic cord or elastic band 15 cm,
- scissors.
You can see how to cover elastic with fabric in the video below or watch it in the first master class. In this lesson we will directly look at making a bow and decorating it with beads.

Step #1. So, take a piece of fabric 8cm10cm, fold it in half lengthwise with the right side inward and pin it with pins.
Step #2. We sew it along the red lines shown in the photo, leaving one centimeter from the edge. In the center we leave 4 cm of fabric unstitched for further turning of the product.

Step #3. Turn the workpiece right side out and hand-sew the left free section of fabric. Pull the bow in the center as shown in the photo. 
Step No. 4. Take the 6*8 cm fabric prepared for making the bow mount and fold it in half lengthwise. Sew it on both sides as shown in the photo.
Step No. 5. Turn it right side out.

Step #6. Sew a bow to the elastic band and wrap it with fabric in the center. Secure this fastening by sewing it manually, see photo. 
This is what you should get, in my opinion it’s already quite good. 
The most interesting part remains - decorating the bow. In the photo you can see what beads the craftswoman needed to realize her idea. 
Step #7. Cut a circle from felt or other non-flowing material and sew (glue) a rhinestone to the center of it 
Step #8. String beads onto the thread until there are enough beads to cover the central element.
Step #9. Then carefully sew the resulting thread with beads around the rhinestone.

Step #10. In the same way, attach a thread with larger beads. 
Step #11. Sew the resulting element into the center of the bow. 
Voila, you're done!
The author writes that she thinks this hair tie is so cute that she is ready to eat it! 
How to make a hair tie? Girls with long hair often ask themselves this question. A variety of elastic bands can change your hairstyle; they can be chosen both for everyday wear and for an evening out. There are options for little girls and schoolgirls, and there are original products for adult ladies.
Our article is about DIY hair. As the basis for any product, they take a purchased simple elastic band without any decorations and decorate it depending on the wishes, chosen color and style. You can wrap the elastic completely in fabric, or you can just add a central decorative element made of fabric, ribbons or lace. Often a bright brooch or button, beads or rhinestones are sewn into the middle. Let's look at some interesting ideas on how to make a hair tie in different ways.
Felt elastic band
This option is suitable for beginner craftsmen, since making such a craft is quite simple. Take a small circle cut from felt as a base. In this case, we see that the color yellow was used in the sample in the photo below. To decorate the elastic band, you need to prepare many identical pieces of pink ribbon, a package of small decorative lace flowers, beads to decorate the middle and a fluffy white pompom.
Decorating the product begins with attaching pieces of tape bent with loops. First, the edges of the tape must be melted with a candle or lighter so that the threads at the edges do not fray later. You can attach the loops with stitches to the felt base or glue them with a glue gun. The next step is to place the flowers close to each other along the inner circumference so that the ends of the ribbon are not visible. All that remains is to glue the half-beads at an equal distance or sew on round beads (you can use rhinestones or stones, beads or other decorative material) and place the fluffy ball in the very middle. When everything is ready, sew the craft onto the elastic band on the back side.
Contrast bow
Before you make your own hair tie, think about what color ribbons you will need so that the product matches your clothes and accessories. To make such a beautiful bow as in the photo below, you need to buy a wide and narrow ribbon of light chocolate color and white organza. To connect all the layers of the craft, a beige button is used, onto which you can glue a bright crown with rhinestones.

Start working on the wide ribbon. Do not cut off the segment right away, so as not to make a mistake. It is better to first fold a bow consisting of several turns, leaving small beveled edges at the beginning of the work and at the end. Melt them immediately so that the cut sides look neat and the threads do not fray when using an elastic band. At the central point, use matching threads to make several stitches, thereby securing the bow.
The next step is to gather a wide strip of organza folded in half. To do this, stepping back a little from the edge, stitch the entire length of the fabric, tighten the thread and sew it to the bottom tape. Lastly, a thin ribbon bent into loops is attached, and all layers are connected with a decorated button.
Three-layer bows with beads
Before you make a beautiful hair tie as in the photo below, choose wide and thin ribbons of white color and medium width with a contrasting pattern. A bright red heart is chosen as the central holder of all layers.
The long ends are left only on a thin ribbon located on top of two bows. On each hanging edge, string 3 beads, selected in the same color scheme as the ribbons. The edges are tied with tight knots so that the beads do not fall off when moving.
Flowers using the kanzashi technique
How to make small hair ties to make them look impressive? The kanzashi technique will help. This is making beautiful floral elements from simple satin ribbons. The flowers consist of 5 identical petals (two white and three red) and two leaves made of green ribbon. Let's see how to make such elements.

To create a petal, you need to cut squares of white and red colors. Then each is folded in half diagonally. Next, make a couple of folds on each side, gathering the edges in the center. It is most convenient to use tweezers to hold the tissue together. Then the bottom edge is trimmed with scissors and melted with a lighter, pressing all layers with tweezers. One petal is ready! Make all the other parts in the same way and glue them to each other with a glue gun, attaching a small pebble in the center for beauty.
How to make leaves
After making the main flower for the girl's gum, start working on the leaves. To do this, you need to fold a green ribbon 10 cm long in half. We leave the folded edge untouched, but draw a straight line from one of its corners to the opposite one on the other side and cut it with scissors along the intended line. You will get a triangle. Again, melt the cut edges and press them together with tweezers or your fingers. Hold it a little and they stick together securely without glue.
All that remains is to turn the workpiece over to the other side and attach the leaves under the previously made flower. Here you can use a glue gun to join the pieces together and attach the decoration to the elastic itself.
Kanzashi petal bow
Now let's look at how to make a bow-shaped hair tie from a ribbon. You will need a base to place the finished petals. It is most convenient to cut it from a sheet of felt, matched to the color of the satin ribbon. You already know how to make petals using the kanzashi technique. To make this hair tie, you will need to make 12 identical elements and attach them to a felt base in the shape of two connected triangles.

Between them place a central brooch with shiny rhinestones and a beautiful bow can be attached to an elastic band.
Craft for a bun
A beautiful elastic band for your daughter to put on her hair bun is made from different elements combined in one composition. These include white flowers using the kanzashi technique and large multi-layered details made of contrasting colors. Arrange the assembled elements symmetrically, leaving room for a large bow.

The elastic band looks very impressive due to the combination of different types of petals and fabrics, but all the details look harmonious together. Additional elements included blue beads and large rhinestones.
As you can see, it is not difficult to make a hair tie with your own hands from ribbons and fabric. The photographs presented in the article will make it easier to bring the described work to life. You can vary and combine different types of parts in one product. The main thing is to choose fabrics and decorative elements that look harmonious together, then the finished elastic band will turn out beautiful and tasteful. Good luck!
Those girls who were blessed by nature with gorgeous hair probably tried to decorate it using any method in order to vary their daily styling a little. The most successful and widespread option is an elastic band.
Store shelves are full of a variety of these accessories - there is something for every taste.
- If you are looking for a special piece of jewelry that will harmoniously match your clothes and overall look;
- Or if you want to have a device that no one else will have -
This is where your hands and imagination will correct the situation, because making beautiful hair bands with your own hands is much more fun if you just buy them.
An elastic band is a common hair decoration.
Different methods for creating cute rubber bands

Photo: such an elastic band almost always serves as the basis for creating decorations
Making hair ties with your own hands is a sheer pleasure, especially since the costs of creating them are minimal - the cost of some materials is mere pennies compared to a purchased accessory. In addition, maybe at home you will find beautiful, but unnecessary things from which you can make your product, then your budget will be completely saved.
What rubber bands are not made of:
- from beads,
- fabrics,
- ribbons,
- yarn,
- tulle,
- pebbles,
- button...
In general, the scope for imagination is enormous, so you can safely get down to business. The color depends on the materials with which the product will be decorated.
But it’s better to divide the scenery for summer and winter:
- for summer, choose colorful color palettes;
- for winter - something more reserved.
You will learn below how to sew a hair tie with your own hands using different techniques.
Advice! For the base of the decoration, an ordinary, but high-quality elastic band is chosen, the width of which depends on your personal preferences; it is better if it is of medium thickness, so that you can work with it comfortably.
Elastic poppy made from ribbon
DIY ribbon hair ties look great. Satin ribbons look festive and bright, and children's hairstyles will sparkle with colorful colors. Decoration with a poppy flower is suitable for both little princesses and women.
To create it you will need the following tools:

A lovely poppy will attract the attention of everyone around you
- Reddish satin ribbon – width 5 cm.
- Greenish felt or tape - a square measuring 5 by 5 cm.
- Dark and brown threads.
- Glue – PVA or “Moment”.
- Small snow-white sparkles for nail design or semolina.
- The clamp measures a maximum of 6 cm.
So, how to make a bright poppy?
The step-by-step production process is below:
- It is best to start making the flowers by creating the flower stamens - wrap the threads in the shape of a figure eight between your fingers. Tie the middle and trim the edges with nightcloths, try to keep them even. Using a brush, carefully coat the edges with glue and dip them in semolina or nail glitter.
Let the stamens dry for about a quarter of an hour.

Making stamens
- Now we need to start making the flower core. Cut a circle from the prepared square of felt or ribbon. Burn the edges very carefully over the flame of a candle (matches or lighter).
Sew a circle, put a little cotton wool inside, pull the thread and secure it. The result should be a small greenish ball - this will be the middle of the poppy. In this case, if you have the ability to felt from felt, make the core in this way.
- Carefully wrap the middle with dark brown threads, secure the tip of the thread on the wrong side. Wrap the ball in such a way that any 4th part is divided into half. When the middle is processed with thread, proceed to secure the stamen - glue it with Moment glue on the wrong side.
- The next and more important step is making flower petals. To do this, it is first better to make a paper pattern-template. Then transfer the form to the tape. The petals should be placed along the oblique thread.
Make 10 petals using the first pattern and eight using the other. Burn the edges of the purchased blanks on all sides, stretching them slightly.

Picking a flower
- The assembly of the flower proceeds as follows:. Lubricate the front side of the lower petals made according to the first template with a small amount of glue. Glue the petals together, making a small overlap.
The 1st row should consist of 5 petals, which will be placed in a circle, the 2nd row should be the same. They need to be glued together so that the crossings of the first row are invisible.
The 3rd row must be formed from eight petals made according to the second template. They must be glued with a huge overlap.
- If your idea has leaves, then you need to cut out a circle from the greenish material, the diameter of which should be approximately 4 cm. Burn the edges and stretch them. Close the underside of the mug by applying a little glue, preferably in the middle. This will create a skirt that will also serve as a sepal.
- Cover the clip with tape and then stick it to the resulting poppy. Let the flower dry for about a couple of hours. After which you can attach it to an elastic band or immediately decorate your hair with it.
Fundamentally! You need to burn the petals very carefully and carefully over the flame. Be careful, the tape may catch fire, so follow safety precautions.
Regular fabric elastic
The most ordinary elastic band from fabric is sewn very quickly; it can be made trivially without any experience in cutting and sewing. And, despite its simplicity, such a decoration will become personal to you, because the fabric can be chosen exactly to match the item in your wardrobe - a dress, blouse or skirt.
- An ordinary elastic band with a diameter of less than 3 mm.
- Fabric to choose from – length 50 cm and width 10 cm.
- Threads - according to the color of the fabric.
- Scissors.
Creation summary:

This is how you need to lay the fabric - hold the middle with your finger
- Fold a piece of fabric in half so that the right side is on the inside. Sew the material on a machine, stepping back half a centimeter from the edge. Tuck the material towards the center and hold it with your fingers. Tuck the rest inward to fold the fabric in half.

Leftovers must be wrapped inside
- Using the machine, stitch the product again from the side of the already stitched part along the entire edge. With all this, it is important not to sew up the internal folds. While sewing, remove the inner particles of the fabric, continuing the line evenly.
Be sure to leave a hole about a couple of centimeters in size 3 cm before the start of the seam for inserting the elastic.

Stitched product
- Unscrew the purchased item right side out, insert an elastic band inside and tie it. The hole can be sewn up with a machine or by hand. The hairpin is ready! Adjust the sewn cover and use the iron if necessary.

At the step of retracting the elastic band
Elastic bands using the kanzashi technique
Do-it-yourself hair ties made using the kanzashi technique turn out to be very beautiful. This method makes it possible to create incredible decorations from various tapes.
Many people wonder how to make elastic bands using this technique. We would like to point out right away that everything is quite easy, but accuracy and patience are key here.
For production you will need:

Hairpins and elastic bands made using the kanzashi technique
- Snow-white and satin ribbon - pieces 55 cm long and 5 cm wide.
- A pair of thin pink elastic bands.
- Scissors and tweezers.
- Pearl beads - 12 pieces.
- Candle or lighter.
- Silicone glue (for a gun) or superglue.

Design can be very different
Technique:
- Cut out blanks from ribbons - make 10 similar squares from both ribbons.
Pay attention! A variety of color combinations can be used for production; contrasting colors look especially great.
- Burn the edges over the fire.
- Assemble the petal - fold each square at an angle and connect the reverse corners.
- Place the snow-white and pink triangles on top of each other so that the latter is on the bottom. Grab the corner opposite the bent one with tweezers.
- Gather the two corners in the middle and secure with tweezers. Fold the resulting figure in half. Trim the edges and burn.
- Also correct the edges of the petals from the wrong side so that they do not break off in the future.
- Glue 5 petals together. It is better to use silicone glue - it glues everything tightly, and it is even more convenient to use.
- Attach the elastic bands to the flowers from the inside out. Attach beads to the center of the flower.
Results

Self-made rubber bands will help you feel personal
Making rubber bands is not as difficult a process as it seems at first glance. Here you can give free rein to your creativity and make any of your fantasies come true. Everything depends on your thoughts, as well as on the available materials (see also the article “Kanzashi hair ties and other decorations”).
We wish you inspiration and creative success, but the video in this article will help you make elastic bands using more complex techniques.
All girls whose curls are longer than with a “boy’s haircut” like to wear their hair up more or less often, and here you can’t do without elastic bands. Of course, every lady has at least a dozen of these hair accessories in her arsenal, but sometimes you want something original and unusual, which is why the question arises of how to make hair ties with your own hands. You will find some interesting ideas in this article.
What are hair bands made from?
The beauty of this idea is that in order to make a hair tie with your own hands, you can use any available materials without any restrictions:
- fabrics - leather, felt, satin, cotton, and pieces of any size, because such decoration does not require much and it can be sewn not from one, but from several scraps;
- thin inexpensive purchased rubber bands or wire;
- beads, stones, borders and everything else you can think of to decorate your jewelry;
- plastic.
 Of course, you will need some available tools and materials to hold it all together:
- threads;
- needles;
- scissors;
- small metal clips and rivets;
- wire;
- glue.
“Aster Flower”
To make such a hair tie, thin fabric of any shade is suitable. The manufacturing process is very simple:
- Cut a strip 5 cm wide, up to 10-20 cm long (depending on how lush you want to decorate the flower).
- On one side, cut strips along the entire length like a fringe - these will be the petals.
- Take a needle and thread and gather the entire strip onto the thread on the side where there are no cuts.
- Tighten it so that you get a circle with petals on the outside.
- Tie the thread and sew the edges of the fabric.
- You can insert another identical strip of this or any other color into the center, or decorate it with a bead of a suitable size.
- On the reverse side, attach a thin elastic band to the flower, which you will use to tie the strands. Rivets or a small piece of fabric are suitable for this purpose.
Important! As you can see, there is nothing complicated. As for the color, choose for yourself, but keep in mind that for blondes a soft blue or pale pink color is perfect, and for brunettes you can take a richer green or chocolate.
The simplest DIY velvet elastic band
A wide velvet elastic band always looks very luxurious, and making it is as easy as shelling pears:
- Take 1 or 2 pieces of velvet fabric of any color. If you took 2 pieces, cut out 2 rectangular parts of the same size and sew them together.
- The width of the rectangles is the width of the decoration, the larger it is, the more magnificent the decoration will be, the length is 25-40 cm, so that you can create beautiful assemblies.
- Thread a strong elastic rubber thread inside, which will gather the fabric into waves and hold the bunch of curls well, and tie it.
- Sew up the hole.
- Straighten the decoration.
Important! This option is perfect for everyday wear. If you make the decoration itself less lush and wide, you can additionally decorate it, for example, with a bow. To do this, after you have sewn the base, cut out a rectangle from velvet, felt or leather. The length of the rectangle is the length of the bow. Gather the part in the center so that folds are formed in both directions and secure it in this form with a rivet on an elastic band.
“Flower made of satin ribbons”
This decoration is more suitable for girls and will be a wonderful gift or accessory for a holiday. To understand how to make such a hair tie with your own hands, read the instructions below:
- Take a pink satin ribbon 2.5 cm wide and, using a ruler and a burner, create 5 stripes 7 cm long.
- Do the same with a purple ribbon 5 cm wide, but the stripes should be 10 cm long.
- Fold ribbons of the same color in half and sequentially sweep all the parts onto one thread and tighten so that you get a circle (do this from the side where the edges of the ribbon meet). This way we get one circle of petals.
- Do the same with the second color ribbons.
- Glue one flower on top of the other and a button in the middle.
- On the back side of the flower, glue a clip or elastic band that will hold the bunch of strands well.
Plastic rubber band
 This version of a homemade decoration for your hair will be a real godsend for fashionistas, as you can unlimitedly show your imagination and make a new model every day. For this:
- Take a piece of plastic.
- Cut out a rectangular piece from it and draw any pattern.
- To fix the paint, cover the top of the design with a clear varnish - this can also be used for nails. If you want to make your jewelry more elegant, even varnish with glitter is perfect.
- Wait until it dries, and then glue an elastic band to the plastic on the back side, into which you will collect your curls.
Important! If you have the time and desire to tinker a little longer, you can cut the plastic itself not into a rectangle, but in the form of a specific figure - a bunny, cat, flower, etc.
Stylish elastic band
Leather jewelry looks very solid and stylish when the elastic band covers the bun of hair in several circles. If you just take a strip of skin, it will slide off, causing constant inconvenience. Therefore, we offer a leather option that will definitely look extraordinary and will hold your curls firmly in the bun:
- Take a strip of leather - at least 30 cm long.
- Cut the edges “on the bias”.
- Mark the center of the strip, secure a regular thin hair elastic in this place on one side with a rivet.
Important! To collect your hair, secure the bun with a thin elastic band, and wrap a leather strip around the top of the bun and tie it in a knot. This decoration will look very original and unusual.
Video material
Now you know how to make a hair tie with your own hands. Start with the simplest option, test your design capabilities, and then show your imagination by improving the decor. Surely after a few tries you will want to create more interesting and unusual jewelry to create different hairstyles!
How to make a hair tie? Girls with long hair often ask themselves this question. A variety of elastic bands can change your hairstyle; they can be chosen both for everyday wear and for an evening out. There are options for little girls and schoolgirls, and there are original products for adult ladies.
Our article is about how to make a hair tie with your own hands. As the basis for any product, they take a purchased simple elastic band without any decorations and decorate it depending on the wishes, chosen color and style. You can wrap the elastic completely in fabric, or you can just add a central decorative element made of fabric, ribbons or lace. Often a bright brooch or button, beads or rhinestones are sewn into the middle. Let's look at some interesting ideas on how to make a hair tie in different ways.
Felt elastic band
This option is suitable for beginner craftsmen, since making such a craft is quite simple. Take a small circle cut from felt as a base. In this case, we see that the color yellow was used in the sample in the photo below. To decorate the elastic band, you need to prepare many identical pieces of pink ribbon, a package of small decorative lace flowers, beads to decorate the middle and a fluffy white pompom.

Decorating the product begins with attaching pieces of tape bent with loops. First, the edges of the tape must be melted with a candle or lighter so that the threads at the edges do not fray later. You can attach the loops with stitches to the felt base or glue them with a glue gun. The next step is to place the flowers close to each other along the inner circumference so that the ends of the ribbon are not visible. All that remains is to glue the half-beads at an equal distance or sew on round beads (you can use rhinestones or stones, beads or other decorative material) and place the fluffy ball in the very middle. When everything is ready, sew the craft onto the elastic band on the back side.
Contrast bow
Before you make your own hair tie, think about what color ribbons you will need so that the product matches your clothes and accessories. To make such a beautiful bow as in the photo below, you need to buy a wide and narrow ribbon of light chocolate color and white organza. To connect all the layers of the craft, a beige button is used, onto which you can glue a bright crown with rhinestones.

Start working on the wide ribbon. Do not cut off the segment right away, so as not to make a mistake. It is better to first fold a bow consisting of several turns, leaving small beveled edges at the beginning of the work and at the end. Melt them immediately so that the cut sides look neat and the threads do not fray when using an elastic band. At the central point, use matching threads to make several stitches, thereby securing the bow.
The next step is to gather a wide strip of organza folded in half. To do this, stepping back a little from the edge, stitch the entire length of the fabric, tighten the thread and sew it to the bottom tape. Lastly, a thin ribbon bent into loops is attached, and all layers are connected with a decorated button.
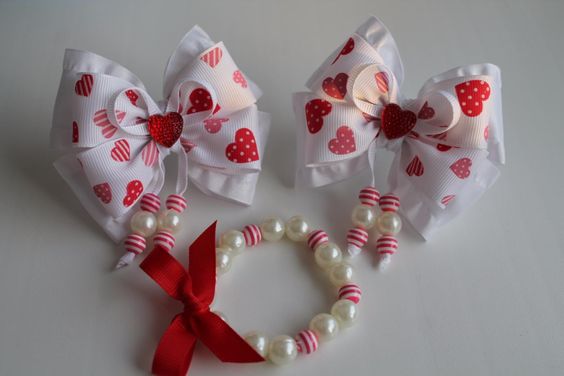
Three-layer bows with beads
Before you make a beautiful hair tie as in the photo below, choose wide and thin ribbons of white color and medium width with a contrasting pattern. A bright red heart is chosen as the central holder of all layers.

The long ends are left only on a thin ribbon located on top of two bows. On each hanging edge, string 3 beads, selected in the same color scheme as the ribbons. The edges are tied with tight knots so that the beads do not fall off when moving.
Flowers using the kanzashi technique
How to make small hair ties to make them look impressive? The kanzashi technique will help. This is making beautiful floral elements from simple satin ribbons. The flowers consist of 5 identical petals (two white and three red) and two leaves made of green ribbon. Let's see how to make such elements.

To create a petal, you need to cut squares of white and red colors. Then each is folded in half diagonally. Next, make a couple of folds on each side, gathering the edges in the center. It is most convenient to use tweezers to hold the tissue together. Then the bottom edge is trimmed with scissors and melted with a lighter, pressing all layers with tweezers. One petal is ready! Make all the other parts in the same way and glue them to each other with a glue gun, attaching a small pebble in the center for beauty.
How to make leaves
After making the main flower for the girl's gum, start working on the leaves. To do this, you need to fold a green ribbon 10 cm long in half. We leave the folded edge untouched, but draw a straight line from one of its corners to the opposite one on the other side and cut it with scissors along the intended line. You will get a triangle. Again, melt the cut edges and press them together with tweezers or your fingers. Hold it a little and they stick together securely without glue.
All that remains is to turn the workpiece over to the other side and attach the leaves under the previously made flower. Here you can use a glue gun to join the pieces together and attach the decoration to the elastic itself.
Kanzashi petal bow
Now let's look at how to make a bow-shaped hair tie from a ribbon. You will need a base to place the finished petals. It is most convenient to cut it from a sheet of felt, matched to the color of the satin ribbon. You already know how to make petals using the kanzashi technique. To make this hair tie, you will need to make 12 identical elements and attach them to a felt base in the shape of two connected triangles.
Between them place a central brooch with shiny rhinestones and a beautiful bow can be attached to an elastic band.
Craft for a bun
A beautiful elastic band for your daughter to put on her hair bun is made from different elements combined in one composition. These include white flowers using the kanzashi technique and large multi-layered details made of contrasting colors. Arrange the assembled elements symmetrically, leaving room for a large bow.

The elastic band looks very impressive due to the combination of different types of petals and fabrics, but all the details look harmonious together. Additional elements included blue beads and large rhinestones.
As you can see, it is not difficult to make a hair tie with your own hands from ribbons and fabric. The photographs presented in the article will make it easier to bring the described work to life. You can vary and combine different types of parts in one product. The main thing is to choose fabrics and decorative elements that look harmonious together, then the finished elastic band will turn out beautiful and tasteful. Good luck!


