How to make a cat out of paper. Paper figures: cat. Prepare for work
Each cat already has its own character from birth, and owners must take this into account. Heredity is of great importance, but the formation of a cat’s “personality” is also influenced by the behavior of the mother cat when raising kittens.
It is impossible to say for sure what has a greater influence on the future character of a kitten - its genetics or society. However, you can be absolutely sure that a baby born from an affectionate cat will have a better chance of growing up friendly. This quality will be even stronger if a good-natured father cat was nearby and took part in raising the kittens.
 Early interaction with humans is also an important point in the development of a kitten. Between 3 and 7 weeks of age, if kittens have positive experiences with people, being held, petted and fed, they will typically grow up to be highly socialized and very friendly.
 But sometimes your pet’s life experience is not so successful, especially for animals picked up from the street. What can you do to make a cat become affectionate if she is “evil, like a fury” - she scratches, breaks out, shys away from any attempts to pet her? And you want her to spend more time on your lap, often come up to cuddle and purr next to you.
5 ways to make your cat affectionate and tame
There are five proven ways to make your cat kind and affectionate, or at least more friendly. By following them, you will definitely achieve success, if, of course, you yourself are ready to work in this direction.
Keep calm
 Cats are afraid of sudden movements, loud voices and may mistake them for aggression. Move slowly and smoothly so that your pet has the opportunity to get used to your presence and learn to trust you. Even if your cat is new to your home and you've been sharing the roof over your head for some time, she will definitely appreciate your new manners.
 Most cats cannot stand direct eye to eye contact and regard this as a signal of challenge or danger. Animals avoid contact with people who do not know this rule of behavior.
When looking at the cat, try to blink more slowly and do not make direct eye contact. By changing your tactics, you will quickly achieve results, and the animal will soon show more trust in you.
Don't touch your cat in places where it makes her uncomfortable
 When the cat finally trustingly comes up to you to caress you, you don’t need to pick her up at that moment, especially with a sharp movement. Just sit down next to her, scratch her head between her ears or under her chin, let her rub her muzzle against you and stroke the bridge of her nose at this moment.
Many people like stroking the back, right along the spine, but the tummy and the base of the tail should not be touched. These are very vulnerable places, and many cats instinctively begin to defend themselves, even if they are touched by a familiar person who poses no threat to them.
 In the head area there are glands with the help of which a cat “marks” its friends, however, you and I do not smell these odors. But the glands in the tail area produce completely different odors that are not intended for you and me, so you should not touch these places.
Take care of your cat
 Daily grooming is another way to build a friendly relationship with your pet and make the cat more affectionate and tame. Cats love to groom themselves and each other: for them it is a form of social behavior.
Your pet will be very grateful if you brush her fur with slow, gentle, rhythmic movements, all the while talking to her in a quiet voice.
If the cat likes what you are doing, she will begin to lick herself at this moment. But if her tail begins to twitch, then the cat is tired and the procedure should be stopped.
Bribes help make a cat tame
 Always keep a few pieces of special cat treats with you to reward your beauty when she approaches you or comes to sit next to you. Of course, a double portion should be awarded for her jumping on your lap.
 Be absolutely calm at this moment so as not to frighten the animal with your wild joy about this. Be patient, first take a closer look at the animal's behavior and make sure that the cat wants to be petted.
If the pet lies down next to you and puts its head or back under your hand, then be sure to pay attention to it and immediately stop petting at the slightest sign of displeasure.
 If you follow these simple rules, then soon your communication with your cat will become a pleasant ritual for both of you.
Even if you have a talking doll and a jumping electronic puppy in your arsenal, your baby, when getting ready for bed, will put this sock cat next to him on the pillow. Absolutely, a soft, kind kitten made from a sock will become his favorite toy if you and your child sew it together on one of your free evenings. Let your future little dressmaker only know how to turn out or push filler into holes. This work will be remembered and the toy will be loved.
Playful kitten
Prepare for work:
- two socks. They may be different from lost couples. Then the toy will become even more fun and original;
- any filler (sintepon, foam rubber, sliver...);
- threads, needle;
- one button for the nose with a bow and two with holes for the eyes. You can buy special toy eyes and nose in the store;
- chalk or marker;
- scissors;
- sewing machine for long stitches.
Work order


- Turn both socks inside out. From one we will sew a tail and a head, from the other we will make a body with four legs. Entrust your little assistant to do this job. By the way, if your socks are terry on the inside, then it is better to make the inside out with the right side, then the cat will become fluffy.
- Place the sock with the heel facing up and draw paws on it.
- Draw future ears on the second sock. The heel will subsequently become the muzzle.
- Now we need to cut and sew the parts.
- Please note that holes must be left in all parts for filling with padding polyester. Leave a hole in the body between the hind legs, in the head and tail where they are sewn to the body.
- Instruct your child to turn out all the parts.
- Now you can relax, and the baby will fill them with filler. Show him how to do it and enjoy the show.
- Now you need to sew the ends and tighten the unnecessary holes.
- We connect the details. At this stage, the cat gets a head and tail from socks.
- Instruct your child to mark the eyes and nose for the cat from a sock. Let him try to draw the face himself.
- Sew buttons, embroider cheeks and toes. That's all. Your child made his own cat out of socks. You only had to help him a little.

cat Baiyun
This sock cat is cut according to a completely different pattern, so it stands not on four legs, but on two.
Cut out the socks as shown in the photo. From one the torso with the head and hind legs is cut out, and from the other the cat gets the forelimbs and tail from a sock.

Sew the parts, turn them inside out, place the stuffing inside, sew up the holes, sew the toy and decorate the face with eyes, nose and mustache.

This sock cat can be dressed up in doll clothes.

The result is a charming cat Bayun in a cap and jacket.

Striped cat - video
Let's make a little cat from a baby's sock.
Tumbler cat
The simplest and fastest scheme. This cat can be sewn in just half an hour.

To do this, you will need one sock, which you don’t even need to cut. Just shape it with your hands, compacting the padding polyester and stuffing it inside.

Sew up the elastic and draw a face. To better hold its shape, you can tie a ribbon or a beautiful collar around the toy’s neck.

Your child will definitely make this cat himself, and will love him more than all other toys.
The cat is a favorite pet of many people. In this article we will look at how to make a cute and playful cat in a step-by-step paper tutorial. For this, several techniques will be used: from easy crafts to modular origami.
How to make a cat out of paper: a quick and easy children's craft
In order to have an interesting time with your child, you can start making paper crafts. For example, make different characters for a board game.
To make a cat, fold a colored sheet of A4 paper in half along the larger side. In this case, you need to step back a little from the edge, about 1 cm, this will allow you to glue the sheet together. When the glue has dried, the workpiece is folded like an accordion in four layers. To draw all the details, print a template with additional details.
It is advisable to make them on a sheet of a different color. The cut parts are glued to the workpiece. The character is ready to play.
For those who are starting to get creative, an excellent option for making a figurine would be 3D origami. To do this, you need to print the blank, cut it out and glue it along the marked lines.

Templates for making such figures do not have to be printed. People who master the technique of drawing and three-dimensional representation can draw blanks on their own.
We look at a selection of simple origami for children and adults
To create a cat figurine using origami technique, it is enough to know the sequence of actions. The simplest are flat crafts, which are easy to master for those who are just getting acquainted with this technique.
In order to make a cat's face, you need to take a square sheet of paper. The first will be a diagonal bend. The resulting part must be folded in half again, but not smoothed. This action is only necessary to outline a central line, which will help in further work to make the craft symmetrical.
Next you need to position the workpiece with the fold line down. Fold the bottom corners up so that the central corner remains visible. It needs to be bent down a little. All that remains is to turn the craft over to face you and decorate it.
You can make a more complex pet's face, it is similar to the previous one. This craft looks more lively and believable. The picture perfectly illustrates the stages of action:

The next stage in mastering origami can be getting acquainted with crafts that contain three-dimensional elements. They are, in principle, no more complicated than the previous ones, but require a little more attention and skills. Here's one way to do this:

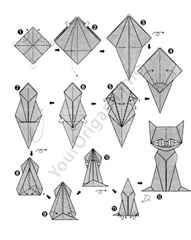
To create a voluminous cat with your own hands, you need to take a strip of paper, where the length is three times the width. To simplify the work and better orientation in the process, it is recommended to take a sheet of paper that has a different color on each side.
You need to fold the sheet in half along the long side. Then fold each half in half again. We unbend the last folds and continue working. Place the sheet of paper with the fold down and work only on the left side.
We bend the lower corner upward until the contours of the fold and the base are aligned. Next you need to mark the middle of the resulting triangle. To do this, divide the top side in half and draw a vertical line from it. Then we bend the upper corner, matching the contours of the lines, so that the fold line coincides with the middle of the triangle. Iron the fold lines well. Let's straighten it out.
The next fold should be made to the right along the drawn line marking the middle. Iron the fold and straighten the paper.
Now you need to turn the paper so that the left edge is at the top and the front part of the sheet is outside:

The arrows serve as a guide for actions: it is necessary to fold the upper side corners diagonally, making the part convex. We lift the ears up and at the same time press on the middle part of the head so that it falls down.
In the center of the picture you can see a triangle, its upper side is drawn with a white dotted line, and the other two are drawn with a dark line. After the ears and head are formed, you need to press on the upper part of this triangle from the wrong side to create a convex muzzle. In the photo below, the part that needs to be pressed on is marked in green:

After the cat's face has been drawn, we finally form the ears. This is done using zipper folds. The black dotted line indicates convex folds that were made in advance. Holding them with your fingers, you need to “push” the ears towards each other towards the center. The resulting folds should be ironed; in Figure 8.2 they are indicated by a white dotted line.
Let's shape the head. To do this, you need to bend the top strips to the wrong side. The resulting folds will form the top line of the head and secure the ears. In Figure 9, the fold lines are indicated by dotted lines.
The last step is to design the tail. Use a fold to mark the line of the tail. Then make two diagonal folds on either side of this line. Then the middle part of the figure needs to be opened slightly, the transverse fold must be bent onto the front part, and the corners adjacent to it must be bent inward. Bend the resulting tail perpendicular to the body, lay it out on the table and thin it. To do this, bend one layer of paper on one side, and make a bend on the other side, capturing the inner layer of paper. The tail can be twisted around a pencil to give it a natural shape.
The produced cat is called "Egyptian".
Modular origami.The most labor-intensive is modular origami, which consists of individual elements - modules. They are attached to each other by nesting into each other. Some models take months to assemble, it all depends on the size and number of modules. But the result obtained always justifies the effort expended.

Video selection on the topic of the article
In this collection of video lessons you can find all the listed ways to make a paper cat.
Folding paper figures is a very popular technique, which is diverse and involves not only complex three-dimensional crafts, but also simple ones. This article will tell you how to make a cat using easy classic patterns.
How to make a cat out of paper using origami technique
We bend one square from left to right diagonally, then bend the left corner slightly to the right so that it looks like a tail. With this the body is ready.
For the head, place the second sheet of paper with one of the corners up and bend it down exactly in the middle. Fold both upper corners of the triangle, aligning their vertices with the vertex of the corner below. Having pushed through the folds, we bend the same corners upwards, not all the way, so that two triangles are formed in the foreground and one corner peeks out between them in the background. Then you need to pull these corners to the sides and straighten the folds made in the two previous stages.
Before us again is a triangle with a vertex at the bottom and 4 fold lines. Next, we separate the layers of paper from below and press the paper inward in those places where folds have formed from previous actions. The result should be a diamond with ears. Its top must be folded back, the fold carefully ironed and tucked into layers of paper so that nothing sticks out from the back side. Finally, we insert the body inside the head and straighten the cat’s paws to the sides. Ready!
How to make a cat from A4 paper
This option is more difficult, but also suitable for beginners. Make a long rectangle by folding the sheet in half. We shorten it at one end by 10 cm, unfold the rectangle and cut it along the fold line. From these parts you can make two cats. One of the resulting rectangles needs to be folded in half in the same way as before, then press the fold. Turning the paper with the folding side towards you, you need to bend one of the halves up. We do the same on the other side so that the result is something like an accordion. It is very important that all fold lines are carefully ironed.
Next, unfold the sheet to the point where it was folded in half, place it with the fold down and fold the corner from the left side up. Open the workpiece and find the triangle formed by the folds, turn the paper so that it is at the top.
The point of the triangle's apex points downwards; you need to bend the top of the paper to this point and unfold the sheet completely, after pushing through the fold. The result is another smaller triangle, which will be the cat's head. Fold the edges down along the pressed lines to form a rectangular box. Then close the lines of the lower part with each other, pushing the triangle until the workpiece is completely closed.
Unfold the folded paper so that the head is on the left, then fold one of the sides in half towards you, not reaching the left side. After turning the workpiece over, you need to perform the same actions with the second part. The body is ready.

Now you need to shape the cat’s face along the outlined lines, carefully pressing the triangle inward. Then press the pressed lines to the top horizontal line. Look at the ready-made templates in order to do everything correctly and accurately.
The ears need to be formed along the upper vertical lines, next to which there are small triangles. They must be bent towards the center. Turning the cat's back to you, bend the resulting fold between the ears slightly back. At the same time, the ears themselves will also bend a little from the inside. The head is completed, all that remains is to give the body a believable appearance.
The torso must be bent and straightened in half horizontally, then slightly expanded and the lower part bent back at a right angle. At the same time, we form the legs: to do this, you need to turn the resulting fold upward at an angle until the corner closes. Roll the part at the back into a tube and slightly unfold it, resulting in a spiral-shaped tail.
The finishing touch will be to place the cat in a stable position. Open your paws slightly without touching your neck. She must remain collected. If desired, you can decorate the figurine. Such cats made from paper with a pattern look great.

It will be much more difficult to make a modular cat with your own hands, but it will look voluminous and impressive. In general, you can master the origami technique on your own by watching various master classes and video tutorials. It is ideal for teaching children, as it teaches them to read diagrams and drawings of varying complexity, develops logic and visual-figurative thinking, and teaches them perseverance and persistent goal achievement.
Working with paper provides a wide field for imagination and captivates even adults. The constant striving for perfection and mastering more complex figures delights a person. In addition, the process itself serves as an excellent relaxation and relaxation for the body.
Video on the topic of the article
A child’s creativity begins with cute and kind crafts, which often feature various animals. The cat family has always occupied first place in needlework, since the cat itself carries the meaning of comfort in the home and family peace. There is nothing complicated in the question of how to make a cat out of paper; you just need to collect suitable materials near you and start creating a figurine.
Origami "Cat"
In the technique of creating compositions from paper, the art of origami always comes up; for beginners, the figure of a cat will not be difficult.
First you need to take a regular sheet of paper and make it square. To do this, pull one corner towards the other edge of the sheet to form an isosceles triangle, and cut off the excess part of the sheet.
The first part of origami: a square folded in half, but we already have it in stock since we did the previous step. We fold this triangle in half again to make an even smaller triangle. This is necessary to outline the middle line on the large triangle. From this center line we need to wrap two side corners into small triangles. If you put the piece on the table, it will look like a tulip with three petals. The last step in creating the cat's face is to bend the upper corner of the part to the two previous triangles. On the other side of the part you can draw eyes, mustache, mouth. When folding origami, you can use the following scheme:
For the body, you need to again make a square sheet, which is also bent in half. Holding the piece with the two free vertices of the triangles towards the left hand, bend the corner on the right slightly upward to form a cat's tail. After this, we attach the head to the body; you can also make a collar for the cat from a cord. You will get a product like this:

Volume craft
Without resorting to the origami technique, you can also make a cute craft in the shape of a cat. For this you will need:
- colored paper, cardboard;
- scissors;
- glue;
- markers, pencils or pens.
The following templates can be used to make parts:


In this craft, the templates can be printed on a printer or redrawn by attaching a sheet of paper to the screen. Each template is transferred to paper or cardboard of the selected color. If paper is used, then the “paws” and “tail” parts are glued to the cardboard. The body is made from a sheet of cardboard, folded in half and secured with glue at the junction. The following cat is assembled from parts:

Another type of paper cat can be made from a thick cardboard roll, the top of which is crumpled into a crescent on one side and the other. These details should be decorated with paints, outlining future cat faces in front of this pencil.

On the side opposite the muzzle, at the bottom, you need to use an awl to make a hole for the tail-wire, which can also be painted and needs to be smoothly bent before attaching. The cat family is ready:

You can also make the cat in a natural pose on all fours. For the body, cardboard is used, which is folded in half along its greatest length, after which a cutout is made in the middle, forming the paws. The head and tail are also made from cardboard, and for the muzzle elements, parts can be cut out of paper. Everything is held together with glue. Below are templates of simple and elegant versions of such cats.


To make a cat with your own hands, you can choose a completely different needlework technique. For example, for a cat made by quilling, you will need:
- strips of paper 5 mm wide;
- tweezers;
- tool for twisting strips;
- scissors;
- glue;
- paper.
For the head you will need a piece of five turns of paper, for the body - six, slightly elongated. The parts are glued and glued onto canvas paper. The ears are curled in the form of droplets, the legs are in the form of semicircles, and are also seated on glue. The whiskers are cut out in thin straight strips and attached to the muzzle, the tail is made from a strip curled at the end. You will get a cat like this:

In addition to this type of cat-themed paper art, you can use this material to make bookmarks, packages in the shape of cats, even a hat, the printable details of which are given below.

To make a bookmark from colored paper, you need to cut a strip measuring 10x5 cm. We design one of the edges of the strip in the form of a cat's head, cutting out pointed ears and drawing the cat's face. Just below the head, on the body, you need to draw two identical U-shaped paws directed along the length of the strip. These paws should be outlined with a blade or a stationery knife, but do not cut through the area of the paws at the top. After this, the cat bookmark is ready:

To make a paper cat package, you need to print out the following template for the body.


