Kanzashi for beginners photo lessons
The art of kanzashi is the creation of beautiful flowers from ribbons. These flowers make great paintings, panels, decorations for clothing, accessories and hair. To make different flowers, you need to learn how to make a round kanzashi petal. It is the main element for creating not only flowers, but also other interesting objects using this technique.
Beautiful flowers
Satin ribbons are best suited for making kanzashi flowers. Squares are cut out of them and petals are formed by folding them according to patterns. To prevent the edges of the ribbons from fraying, they need to be scorched with a lighter or candle. The most suitable method for gluing elements is hot glue gun. Or you can choose a transparent glue, for example, “Moment Crystal” or “Dragon”. The main thing is that it does not leave stains. It is very convenient to work with tweezers, because it is inconvenient to hold small parts with your fingers, and when singeing sections, tweezers are simply irreplaceable. Flowers and products made from them can be decorated with beads, seed beads, sequins, rhinestones, and stones. To ensure that ribbon flowers keep their shape well, you can spray them with hairspray.
This type of needlework first appeared in Japan. Geishas made beautiful flowers from silk and decorated their hair with them. Now this technique has been more improved and new types of elements for jewelry are appearing. To master the kanzashi technique, you need to learn how to make basic elements, without which further work is impossible. This basic element is a round petal.
Very beautiful flowers are obtained from round petals. With the help of these flowers you can decorate your wardrobe, hairstyle, and interior items. Satin flowers can be used as a charming brooch, to decorate bags and other accessories.

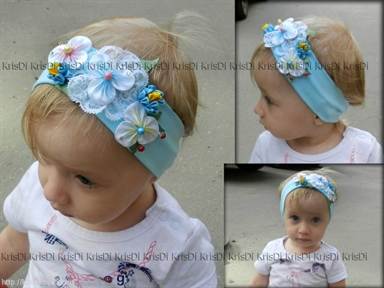
Kanzashi flowers are used to make magnificent hairpins, hairpins, elastic bands, headbands and headbands.

Panels and paintings of flowers will fit very organically into the interior. Due to the fact that the petals are very similar to real ones, it creates the feeling of the presence of fresh flowers in the house.


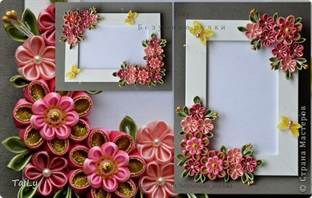
Flowers with round petals look incredibly beautiful on photo frames.

These flowers are suitable for creating various wonderful crafts and souvenirs.

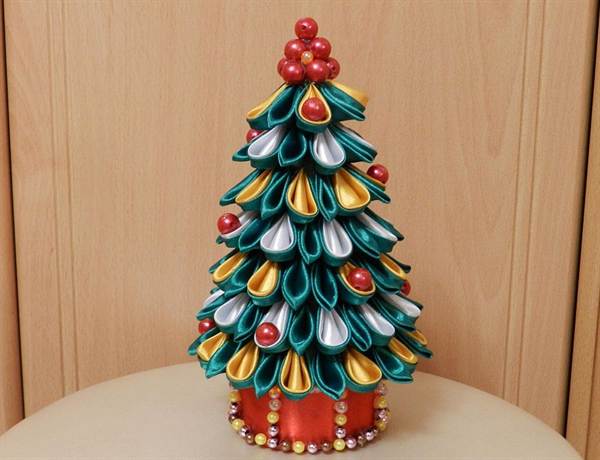
You can make original New Year's decorations from the petals.

Let's start simple
A simple round petal is the basis of kanzashi products. It can be done in several ways. In each method, the start of production will be the same.
You need to cut a square from the tape. Burn the edges with a lighter. Fold in half diagonally. Connect two side corners to the bottom corner.

Then we fold the edges back and fold the petal in half.


Then the bottom corner is cut off. Its two parts are singed separately.

The result is the first version of a round petal.

In the second option, after cutting the lower corner, its two parts are singed together.


Drop glue into the base from the front side.

Now we press the petal and wait until it sticks.

And this version of the petal will look like this:


And one more option for a simple petal. After bending the side corners towards the central one at the very beginning, we bend the edges of the petal back.


Now you need to fold the petal in half so that the curved edges are on the inside.

Then the corner is cut off and singed with a lighter.

This turns out to be another version of a simple petal.
Double round petal
To make the flower more interesting, some petals are made double. That is, it will consist of a ribbon of not one, but two colors.

A small step-by-step master class on how to make it will help you learn how to make such a petal.
You need to cut out squares from ribbons of two colors.

Fold the squares in half diagonally so that the front side of the tape is on the outside.

One triangle overlaps the second. The bottom triangle should protrude quite a bit.

We lower the side corners to the bottom corner.


We wrap the edges of the petal back and bend it.


The tip is then cut off and singed.

The bottom edges are trimmed depending on the desired height.

Each edge is singed separately.


The result was a round petal of two flowers, as in the photo.
The beauty and grace of these amazing stilettos from Japan is mesmerizing. However, you don’t have to go to the Land of the Rising Sun or buy them at auctions. You are quite capable of making such beauty at home, because this beauty, in fact, consists of simple petals. The master class below is dedicated to kanzashi petals.
How to make kanzashi petals?
For work we will need:
- fabric or silk ribbons of different widths. The latter is preferable for beginners: they are easier to work with.
glue. A hot gun is better for the same reason - it’s easier for a beginner to work with. - thick cardboard for the base. As a rule, these are simple circles with a diameter of 1.5-1.8 cm.
- needle and thread. We will collect petals on it. If you are confident in your abilities, then you can immediately glue it to the base.
- lighter or candle. It will be needed to singe the edges of fraying artificial fabrics.
- tweezers with thin “legs”. Not necessary, but they are easier to fold the fabric with than just your fingers. And it’s safer to singe the edges by holding the kanzashi petal with tweezers.
- ruler (to measure straight pieces of ribbons and fabric), tailor's pins (to secure workpieces), sharp scissors.
- center decoration
Fabric or ribbons must be cut into even squares. In my personal experience, I noticed that the smoother the edge, the easier it will be to fold and the neater the petal will be.
The general "theory" of folding is somewhat reminiscent of traditional origami. The base is a rectangular “sheet” of fabric folded in half diagonally, then in half again, and again in half diagonally. It turns out to be a kind of triangular “book” with three pages. This blank is suitable for any of the following types of petals.

Types of kanzashi petals: round, pointed and petals with curls

In the traditional folding technique there is only 3 types of petal: round, round with a central fold, or "sakura", cherry petal and sharp. From these three types, Japanese craftsmen create all the variety of these beautiful hairpins.
In my works, in addition to these three, I also use some modern types of kanzashi petals, which are more likely to be related to “flower making” rather than real hana tsumami kanzashi. Their main difference is the presence of additional folds in the middle, or simply a slightly different shape of the petal itself.
Such deviations from the classical tradition do not find support in Japan itself. However, in our country they are very common among needlewomen.
So, let's look at the basic principles of creation and application options for the main types of petals.
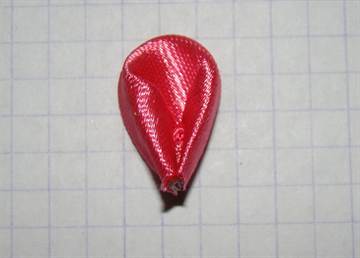
Round kanzashi petal

This is the first most popular and traditional petal. Its rounded, soft shape allows you to create pins reminiscent of peonies or the flowers of a young apple tree. They are very often used to create multi-tiered compositions. They look best when creating multi-layered, double, triple or more petals.
To fold it, we take our blank folded in three and bend one of the leaves of the “book” back, towards the tip of the petal. We straighten the upper arc and carefully secure the tip with glue or singe it with a lighter.
To make the finished element look as natural and gentle as possible:
- Firstly, I use only natural fabrics. They are more difficult to work with, but they give the most “rounded” and natural effect.
- Secondly, the size of the original square rarely exceeds 5 cm. More often it ranges from 3.5 to 4 cm.
- Thirdly, when working with artificial fabrics and ribbons, I singe the very tip, no more than 2-3 mm. blanks.
Round double petals kanzashi

The “layered” round petal looks more interesting. I use it to make larger, heavier brooches, where there is only one such flower. In general, the double petal of kanzashi allows you to play with both color and the “fullness” of shape. This is its beauty.
For this we need to slightly change the process of creating the original “little book”. Prepare squares in advance, the size of which will be slightly different from each other: the closer to the center, the smaller. I recommend taking steps of 3-5 mm, depending on the type of fabric and the number of layers. But with a double petal, the squares can be the same.
Fold both blanks in half diagonally, place them on top of each other in the order in which the color is supposed to change. Next, follow the instructions for creating a traditional round petal.
Spicy kanzashi petal

The second traditional petal, used in the ancestral tradition. It is used mainly to create flower leaves; it is used to create “greenery” around the “bud”. As a petal, it is used to imitate aster, holly, spruce legs, etc. cases.
To create such a petal, you just need to take and fasten the leaves of our book. The little book is a traditional, sharp petal.
Double pointed petal

Layered sharp petals look no less interesting than round ones. Here you can also play with color transitions and fullness.
It is folded according to the same principle as a round one: squares folded diagonally are placed on top of each other in the required order and then folded in half two more times.
Kanzashi petal with curl

My attitude towards this form is very ambiguous. It is neither classical nor neoclassical. It's more like flower making. But oh well. We will make it like this.
We take the blank, our little book, and carefully roll the inner “page” into a tube. To secure it, you can drop a little glue on the tip of the tube, and also trim the tip of such a petal a little more and glue it together.
Narrow petal kanazashi
This is a variation of the sharp petal: take the sharp petal blank and cut off the required size from the bottom edge. The petal seems to acquire a certain “sediment”, by varying which you can create very interesting effects.
I use this technique to create zigzag heights in flowers and leaves. In addition, this allows you to nest ready-made petals into each other, in layers, without the hassle of folding.
Flat petal

And this is a variation of the already round kanzashi petal in a flat form. To perform it, you will need to wrap the “legs” of the finished petal inside. The workpiece acquires a “slump” and a flatter profile.
Of course, you can trim the legs, as in the case of a narrow petal, but then you will end up with large and extensive holes on the sides. If they are beneficial to you, go for it.
Kanzashi flowers have become very popular as hair decorations, and many craftswomen now have this as their favorite type of needlework. It is more correct to call them kanzashi - these are Japanese traditional women's hair ornaments. Kanzashi is worn with a kimono. And here they are used as bows for girls, and decorate dresses, bags, cards, hairbands and much more. These products are made from satin ribbons and decorated with beads, sparkles and rhinestones. Even ribbon embroidery can be done using the kanzashi technique. Our editors have put together simple and understandable lessons for you so that you can understand everything step by step. Watch our MK, and perhaps crafts using the kanzashi technique will become your favorite hobby.
Kanzashi is a technique for creating flower jewelry made from materials such as silk, organza, and satin. The first acquaintance with kanzashi, for those beginning to understand this type of needlework, may seem quite difficult. In fact, this technique is incredibly simple. Once you understand its basics, it will be impossible to stop.
Kanzashi is a technique for creating decorations from flowers made from materials such as silk, organza, satin
Studying any type of needlework begins with the basics, since only they help to master it to perfection. One of the most common types of kanzashi, tsumami, is based on only two types of petals: round and sharp, and everything else depends on the imagination and skill of the needlewoman.
DIY basic petals
To make petals you will need the following materials and tools:
- satin ribbon 5 cm wide;
- ruler or centimeter;
- scissors;
- tweezers;
- colorless glue (for example, Moment Crystal) or glue gun;
- candle, lighter or matches (it is most convenient to work with a candle).

Learning any kind of needlework starts with the basics.
Having prepared everything you need, you can start creating the petal:
- Measure 5 cm from the tape and cut.
- Fold the resulting square diagonally to form a triangle.
- Next, fold both side ends alternately to the middle one so that you get a rhombus.
- Then fold the diamond in half along the back side, again creating a triangle.
- Now you need tweezers. They need to pinch the side of the petal that is crumbling.
- Trim the edge and singe it.
- That's all, the round petal is ready. After making a few more petals, you can collect them into a flower.
The sharp petal is made a little differently:
- To begin, cut out a square, measuring 5 cm from the tape.
- Next, it is folded in half diagonally, turning into a triangle, which also needs to be folded in half.
- You will end up with a smaller triangle that needs to be folded in half again.
- One corner of the resulting figure will have crumbling edges. It needs to be clamped with tweezers and scorched over the flame of a candle or lighter. The sharp petal is ready.
Having studied the basics of the technique and learned how to make basic petals, you can begin to make a wide variety of flowers: both simple and complex. At the very beginning, it is best to rely on master classes that describe in detail the entire process of making blanks and assembling.
Gallery: kanzashi (25 photos)


Triangular petal in a fold (video)
How to make the simplest kanzashi flower?
After making several basic petals, you can make one, albeit simple, but very beautiful flower.
The manufacturing process can be divided into three stages:
- Collection of petals is carried out using both glue and thread with a needle. Moreover, the second option is preferable, since it provides the most reliable adhesion between them.
- Decorating the back side of the flower involves gluing a base to it, suitable for further use. It can be felt or regular cardboard, covered with fabric that matches the color.
- Front side design. After collecting a flower, it is left with an open middle, which does not always look beautiful. You can hide it using various beads or other small details. They can be glued using either hot glue or Moment.

After making several basic petals, you can make one, albeit simple, but very beautiful flower.
After these stages, the flower is completely ready. It can be used as a decoration for a hair tie, headband, comb or brooch.
How to make a dahlia using kanzashi with your own hands: step-by-step instructions
A wide variety of flowers, including dahlias, are collected from satin ribbons. Moreover, the petals for them are folded in a slightly different way. Find out exactly how below.
For work, prepare the following materials:
- satin ribbon 2.5 and 1.2 cm wide;
- scissors;
- tweezers;
- glue (Moment crystal or hot);
- ruler;
- candle;
- a piece of felt.

A wide variety of flowers, including dahlias, are collected from satin ribbons
Step-by-step instructions for making a flower include:
- Preparation. At this step, blanks for the petals are made from tape. Rectangles 7 cm long are cut from a strip 2.5 cm wide, and rectangles 5 cm wide are cut from another strip. From 27 to 30 pieces are required for one flower. large rectangles and 16-20 pcs. little ones.
- Making petals. Take one of the rectangles with the wrong side facing you, and mentally divide it into three equal parts. Next, bend the left edge inward at an angle of 90º, with the apex of the corner being at the third point. Then you need to connect the top and bottom vertices by bending the left edge of the tape again. In this case, you should pay attention to its ends, they should converge. Next, on the front side of the resulting figure, fold the sides inward. Moreover, we bend the upper part slightly, but the lower part a little more (the side edges should meet in the center). Fix the edge of the petal with tweezers, and use a candle to scorch its ends. Do the rest of the flower petals in a similar way.
- Assembly. Take a piece of felt and cut out a circle with a diameter of 4 cm. The petals will be collected on it. And this is done like this: take one large petal, coat its lower corner from the wrong side, attach it to the felt base and press lightly. This is how the first circle is glued. The remaining petals are used for the second circle, and it is advisable to place their tops between the first petals. If after gluing the second circle you still have petals left, glue them to the wrong side of the base. This will make the first row of the flower more magnificent. Now all that remains is to attach the small petals. Their first row is glued to the central large petals, that is, they seem to be nested one inside the other. The remaining ones are evenly distributed inside the central circle of the felt base.
- Decoration. After all the petals of a flower are collected, its middle remains open. It can be covered with a bead, a nail or some other small decoration.
That's all, the dahlia flower using the kanzashi technique is completely ready.
Master class on the topic: how to make a kanzashi rose
Roses made in the Kanzashi style are almost as beautiful as real ones. Moreover, there are many different ways to make them. In this master class you will learn one of them.
So, to work you will need:
- two colors of satin ribbon 5 cm wide (green for the leaves and red, pink or any other for the rose itself);
- glue gun;
- thread with needle;
- scissors;
- lighter.

Recently, accessories and jewelry made in the kanzashi style with your own hands have become very popular. Don't know what it is yet? Remember beautiful flowers, butterflies, various hair clips, hair bands, brooches, necklaces, etc., consisting of fabric petals. This is kanzashi. They are usually made from satin ribbons. You can also use silk or synthetic fabrics that melt well under fire.
Such jewelry looks gorgeous. Despite this, mastering the basics of kanzashi technique is not at all difficult and even beginners can do it.
All products made using the kanzashi technique consist of petals. The most important thing in understanding the basics of kanzashi is to understand the principle of folding the petals. And it’s easy to assemble the finished product from the petals.
There are two types of petals - sharp and round, the rest are their variations.
Here we will look at how to fold the simplest petals.
To create the petals you will need:
- Satin ribbons;
- Scissors;
- Tweezers;
- Candle (lighter).
The petals are made from squares of fabric or ribbon. Accordingly, if you have a tape 5 cm wide, then it needs to be cut into pieces 5 cm long.
Kanzashi technique for beginners step by step photo
Cut the ribbon into squares.

Acute shaped kanzashi petal
Simple spicy kanzashi petal
Fold it one, two, three. Literally.
Bend the square diagonally - once.

Fold the resulting triangle in half - two.

And again in half - three.

The result is a four-layer triangle.

and melt it on the candle flame, soldering the edges.


and cut it like this

If you want the petal to have a hole, then the edges should be melted without squeezing them together.
If you need a closed petal, then pinch the bottom edge of the petal with tweezers and fuse the edges together.

The result was a simple sharp petal.

Inverted sharp kanzashi petal
If you turn out a simple petal with soldered edges, you will get an inverted petal (everything is logical 🙂).

Double sharp kanzashi petal
Fold a simple sharp petal and leave the bottom edge uncut for now.
Take a square from a wider ribbon and fold a simple sharp petal. Before melting, we insert a ready-made small petal into it. We clamp the corner of the triangle (together with the inserted small petal), cut it off, and melt it.
We pinch the bottom edge and cut off both petals. Melt it in the flame. Thus, both petals are soldered together. It turns out to be a double petal.

These petals can be made from ribbons of the same color. If you take ribbons of different colors, you will get a two-color petal.
Triple spicy kanzashi petal
We repeat the steps for making a double petal, but (as you may have guessed) add a third element. We solder all the parts when all three petals are already nested inside each other.


Round kanzashi petals step by step
Fold the square diagonally.
We unfold the resulting triangle at a right angle downwards. We bend the side corners to the bottom.


We bend along the line of combining two adjacent corners.

We clamp it with tweezers and melt it on the candle.

Clamp along the bottom edge.

Cut off the excess again and melt it.

We straighten it and get a round petal.

Below you can watch a video of MK on making sharp and round kanzashi petals.
Now you can make the simplest kanzashi petals. Based on them, you can perform more complex ones. From various variations of petals you can easily assemble chic accessories, jewelry and original decor.
Kanzashi petals made of satin ribbons (photo)Kanzashi petals made of satin ribbons (photo)
Surely, you have more than once come across types of products using the kanzashi technique that decorate accessories, clothes and hairstyles. This traditional handicraft came to us from distant Japan and has taken a worthy place in the hearts of craftswomen. Now Kanzashi products are used in different directions.
Before making a beautiful flower of any shape or with a curl, you need to master the knowledge of how to make kanzashi leaves and kanzashi petals. This master class (mk), which is also suitable for beginners, will clearly show you new ideas and types that can be done with your own hands. 


Required material

In order to properly make leaves from ribbons with your own hands, you need to select the necessary accessories:
- several shades of satin basma;
- ruler;
- a simple pencil;
- small scissors;
- flame of a candle or matches;
- glue;
- tweezers;
- needle and thread;
- beads for decoration.
We will look at several ways to create a kanzashi petal from satin ribbons. There are only two of them, these are round and pointed petals. From these, we will make an elegant flower with our own hands.
Making a narrow petal from ribbons
Prepare all new materials on your workbench. We start by cutting the satin ribbons into small squares. We should have seven pieces of yellow and five pieces of emerald color. 
If you feel uncomfortable picking up the flap with your fingers, use tweezers. Fold the piece of tape so that the fold is at the top, as in the photo. 
Connect the right corner to the left. 
Do this action again. Align the folds. 
Using small scissors, trim the ends as shown in the photo. 

Scorch this edge with fire; we do such manipulations very quickly so as not to burn our future petal for beginners.
Also pour fire over the edges that are located below. This is not done for gluing, but to prevent the threads from fraying. 

Look at the photo, such a blank should work for you too. 
In exactly the same way, we create subsequent elements.
In order to learn in detail the technology and types of creating kanzashi petal, you can study the video master class (mk) on our portal.
Video: Making a narrow petal
Round petal using kanzashi technique
Kanzashi round petal is made step by step, almost the same as in the previous master class.
Fold the yellow flap in half. 
Attach the ends that are located on the sides to the bottom. You will get all the side folds, as in the photo. 
Pull the edges back and make sure they are even. 
Trim the edges and scorch with fire.
The edge located below is also removed and burned. In this case, we not only singe the edges, but also glue them together. While the cut is still hot, press the ends together with tweezers. 

This is the inverted petal we have, look at it from both sides. 

The photo shows the blanks that are obtained as a result of our work. This means the master class (mk) is going well and what we do with our own hands works out. A detailed lesson and master class can be viewed in the video. 
Video: Round petal master class
Assembling a flower from different petals
Now all our blanks from satin ribbons, which we made with our own hands, need to be put together.
Pick up petals, yellow
on a thread. 
Build such a product. 
From thick cardboard, you need to cut out a small circle. Place it on the fabric, while covering it with textile glue.
After tucking in the ends, glue the tape onto the cardboard. Wait until this element dries and re-soak it again. 

Glue the stitched flower to our element. 
While the textile glue dries, you can straighten the round kanzashi petals with your own hands. Our master class (mk) continues. Let's start making the craft further. Look what happens after we made the inverted petal. 
Take a green kanzashi petal and drop a drop of glue on it. 
Attach the next sharp petal to it. 
We make sharp petals in two pairs, two in each pair. 
We soak another sharp petal with glue and attach it between the two primary crafts. 

Using exactly the same steps, we attach three things to the double petal.
The photo shows a twig and sharp petals on it. 
Place a drop of glue on the twig. 
Attach it between the round yellow petals.
The core of the flower can be decorated with any decorative material, such as beads or rhinestones. This master class (mk) is also completed, you can watch it on the video located on our portal. 

These petals are useful as decoration for any accessory.
Kanzashi petals with curl
Our small master class will show you how to make a sharp petal with a curl. We will need not much material, namely:
- pink and black satin ribbon;
- glue;
- scissors and tweezers;
- fire from a candle or lighter.
You need to cut the satin ribbons into small squares; this procedure will be clear even for beginners. Their size will be equal to five centimeters. 
Fold the piece of tape in half to create a triangle. Then roll it up one more time. 

Do the same with the black color of the workpiece. Place one element inside the other so that the pink piece is inside the black one. 
Using tweezers, wrap the end of the triangle into the middle, grabbing two colors of ribbon at once. 
Connect the edges of the product together. And spread the top of different colors to the sides. 
Cut off the excess edge and scorch it with a flame of fire. Thus, we got an interesting petal with a curl in the middle.
Such sharp petals with a curl will turn an ordinary headband or headband into an exquisite evening accessory. This kanzashi technique is becoming more and more popular among all fashionistas who prefer things made with their own hands. These flowers are also used to make hairpins and brooches that adorn beauties. It is important, before starting work, to watch videos of some types of petals that other needlewomen make in order to decide what kind of accessory you want to make.
Video: Petals with curls


