Crocheted carrot pattern. Carrot for the bunny. Crochet vegetables and fruits video
- not necessarily little animals or people. Very often there are knitted “animate” objects, plants or even vegetables. There is hardly an amigurumi master who has never knitted a toy in the form of a big-eyed berry, a tomato or a carrot. And all because such crafts are easy to knit. They are very simple, but incredibly cute. To knit such a smiling carrot, you will need a little yarn and a little free time. And the most important thing is that this toy is knitted entirely, you don’t have to sew various parts.
Tools and materials
To make such a cute crocheted carrot, you will need:
- yarn – orange and a little green;
- hook;
- plastic eyes;
- black floss for the mouth and pink floss for the cheeks;
- filler
Advice! If you are knitting a toy for a baby, it is better to use screw-fastened eyes.
Basic designations
Experienced amigurumi knitters are well acquainted with the basic terminology when knitting such toys with their own hands. But beginning needlewomen will find the information below useful.
This step-by-step tutorial uses the following abbreviations:
- Art. – column;
- etc. – increase;
- KA – amigurumi ring;
- ub. – decrease;
- VP - air loop
Important! You should knit without a connecting post (in a spiral).
How to Tie a Carrot: Step-by-Step Guide
Using orange yarn, start knitting a fun amigurumi toy in the shape of a carrot. To do this, follow the following steps step by step:
1) 6 tbsp. in KA – 6
2) (1 rep., 2 tbsp.) 2 times – 8
4) (1 rep., 3 tbsp.) 2 times – 10
 6) 2 tbsp., 1 tbsp., 4 tbsp., 1 tbsp., 2 tbsp. - 12
8) (1 rep., 5 tbsp.) 2 times – 14
10) 3 tbsp., 1 tbsp., 6 tbsp., 1 tbsp., 3 tbsp. - 16
12) (1 rep., 7 tbsp.) 2 times – 18
14) 4 tbsp., 1 tbsp., 8 tbsp., 1 tbsp., 4 tbsp. - 20
16) (1 rep., 9 tbsp.) 2 times – 22
18) 5 tbsp., 1 tbsp., 10 tbsp., 1 tbsp., 5 tbsp. – 24
20) (1 rep., 11 st.) 2 times – 26
22) 6 tbsp., 1 tbsp., 12 tbsp., 1 tbsp., 6 tbsp. – 28
24) (1 rep., 13 tbsp.) 2 times – 30 tbsp.
27) (1 dec., 3 tbsp.) 6 times – 24
 Next, fill the toy with filler.
28) (1 tbsp., 1 st., 1 tbsp.) 6 times – 18
29) (1 dec., 1 tbsp.) 6 times – 12
Complete the final knitting step using green yarn to create a carrot tail: 6 cc. – 6. After this, cut the orange thread, but not the green thread.
To obtain stems, use green thread to knit 1 half-stitch behind the front wall, then 8 chain stitches. Along the resulting chain, knit 7 half-columns (the first VP is not knitted). You will get a thin green petiole. Repeat 6 times and get 6 of the same. Finish with a half-column, cut the thread and hide all the tails.
Final assembly
Glue or sew on plastic eyes. Embroider the mouth and cheeks.
Funny crocheted carrot is ready!
 A master class on knitting amigurumi toys was prepared specifically for the “Wings of Inspiration” project.
Here you can also find step-by-step recommendations, or do it yourself using minimal knitting skills. Happy creativity to you!
Knitted amigurumi bunny with carrots. Description of crocheting a bunny and clothes for him - a blouse and pants - with knitting needles.
To knit a bunny you will need:
1. Yarn in 8 colors.
The main one for the body is milk. The author uses Gazzal baby cotton (50g/225m).
For clothes, brown, from the author - Children's novelty (50g/200m), light brown, peach, emerald and white, from the author - Pekhorka lace (50g/280m).
For carrots - green and orange, the author uses Pekhorka lace (50g/280m).
You will need only a little yarn, a little at a time.
2. Hooks 1 mm, 0.75 mm.
3. Knitting needles 1.5 mm. Regular socks.
4. Half bead eyes 8-9 mm.
5. Plastic spout. You can embroider.
6. Light pink felt. Or light beige. Instead of felt, you can take fabric or 1 mm foamiran.
7. Filler.
8. Pastel for tinting.
9. Sewing threads are beige or white.
10. Any glue for eyes and nose.
Master class bunny amigurumi
!!! It is prohibited to copy and publish this master class on other resources without the permission of the author - Clara Gurzhiy.
Legend:
KA - amigurumi ring
sc - single crochet
VP - air loop
p - loop
pr - increase
dec - decrease
Hook: 1mm
Yarn: BABY COTTON GAZZAL milky
Head
1. 6 sc in KA
2. 6 pr
3. (1 sc, inc)*6 (18)
4. (2 sc, inc)*6 (24)
5. (3 sc, inc)*6 (30)
6. (4 sc, inc)*6 (36)
7. (5 sc, inc)*6 (42)
8. 42 sc
9. (9 sbn, inc) * 4, 2 sbn (46)
10. 46 sc
11. (10 sbn, inc) * 4, 2 sbn (50)
12. (11 sbn, inc) * 4, 2 sbn (54)
13. (12 sbn, inc) * 4, 2 sbn (58)
14. (13 sbn, inc) * 4, 2 sbn (62)
15. (14 sbn, inc) * 4, 2 sbn (66)
16. (15 sbn, inc) * 4, 2 sbn (70)
17. (15 sc, dec)*4, 2 sc (66)
18. (9 sc, dec)*6 (60)
19. (8 sc, dec)*6 (54)
20. (7 sc, dec)*6 (48)
21. (6 sc, dec)*6 (42)
22. (5 sc, dec)*6 (36)
Stuff the detail. Stuff it very tightly!
I turned this part inside out. You don't have to turn it out. If you turn it inside out, make decreases by skipping one loop, and not as with outside knitting. This will make the fabric smoother.
23. (4 sc, dec)*6 (30)
24. (3 sc, dec)*6 (24)
25. (2 sc, dec)*6 (18)
26. (1 sc, dec)*6 (12)
27. 6 kill
Pull the remaining loops together using a needle. 
Head decoration
Make drawstrings for the eyes in the usual way, between 10 and 11 rows, the distance between the eyes is 3-4 sc, insert the needle in the neck area, bring it into the eye socket, make a stitch of two sc, bring it back to the neck area, pull the thread well, secure it. Second eye too. Glue on the eyes and nose.
The nose can be embroidered. Also embroider the partition from the nose to the mouth, mouth and eyebrows. Tint your eyebrows, add blush). Using a thin white thread, embroider the whites of the eyes. Using a thin brush, shade the area around the white of the eye with brown pastel. Don't overdo it.
Ears(2 parts)
1. 5 ch
2-4. 4 sc, ch, turn (ch, turn at end of each row unless otherwise indicated).
5. 1 sc, inc, 2 sc
6. 2 sbn, inc, 2 sbn
7-9. 6 sc
10. 2 sbn, inc, 3 sbn
11. 7 sc
12. Skip the 1st p, 6 sc
13. Skip the 1st p, 5 sc
14. Skip the 1st p, 4 sc
Cut the thread.
According to the size of the ears, cut out two pieces of felt with an allowance of 2-3 mm, sew the ear with the felt along the edge, leaving the bottom unsewn, and turn it inside out. If your threads are tight, then leave more of the unsewn part to make turning easier, sew the ears to the head, from the back. The distance between the ears, when viewed from above, is 7-8 sc. 
Legs(2 parts)
1. 6 sc in KA
2. 6 pr
3. (1 sc, inc)*6 (18)
4. 18 sc
5. (1 sc, dec)*6 (12)
6. 12 sc
7. ch, turn, 8 sc, ch, turn.
8. 8 sbn, then knit in a circle, along the side of the leg, 10 sbn, 3 dec, 1 sbn. We put a marker.
9. 10 sc, dec, 2 sc (13)
10-11. 13 sc
For the first leg, cut and fasten the thread; for the second leg, do not cut it. Stuff both parts. Heel emphasis. 
Body
1. From the last leg we knit two offset loops, that is, 2 sc, 4 ch, 13 sc along the first leg, watch for symmetry, join so that the legs point where they should, 4 sc along the chain, 11 sc along the leg to the marker
2. 2 sc, 4 sc along the chain, 28 sc to the marker
3.-14. 34 sc (12 rows)
Stuff it.
15. 6 sbn, dec, 7 sbn, dec, 6 sbn, dec, 7 sbn, dec (30)
16.-18. 30 sc
19. (4 sc, dec)*5 (25)
20. (3 sc, dec)*5 (20)
21. (2 sc, dec)*5 (15)
22. 15 sc
23. 9 sc, ch, turn
24. Skip the 1st p, 8 sc, ch, turn
25. Skip the 1st p, 7 sc, ch, turn
26. Skip the first stitch, 6 sc, ch, turn.
Leave the thread for sewing.
We don't sew the head on yet.
Pens(2 parts)
1. 6 sc in KA
2. 6 pr
3-5. 12 sc (3 rows)
6. 2 dec, 8 sc (10)
7-16. 10 sc (10 rows)
Fill halfway.
17. 5 ub
Pull the loops together and leave the thread for sewing. Sew to the body.

Blouse
Knitting needles 1.5 mm
Yarn Pekhorka Lace - 50g/280m. Thin thread. 
We will knit raglan. For those who know how, knit on four needles without a seam. When knitting in the round, replace the purl rows with knit rows. I am giving a simplified description for those who are knitting for the first time and cannot yet use many knitting needles in their work, we will knit on two knitting needles, the blouse will be sewn at the back.
Legend:
Knits - front loop
Purl - purl loop
Pr - the increase is done in different ways, from the broach (grab the partition between the loops and knit the front one) in this case, in the purl row, knit the added loop crossed so that a hole does not form.
The second option is for the base of the loop of the bottom row. (Catch a half loop from the loop on the bottom row). I do the second option, it is less noticeable. An increase in knitting does not count as two stitches, as in crocheting. You simply add one loop to the existing ones.
Nln - yo, knit 1, yo
The description is written taking into account the edges.
I didn't register the edges. But they are taken into account. If 30 faces are written, this means we remove the 1st p, 28 persons, 1 purl. At the end of each front row, remove the first p in each row.
1. Cast on 30 peach stitches onto a knitting needle.
2. 30 purl
3. 6 knits, nln, 2 knits, nln, 11 knits, nln, 2 knits, nln, 5 knits.
4. Change the color to white 38 p.
5. 7 knits, nln, 4 knits, nln, 13 knits, nln, 4 knits, nln, 6 knits.
6. Change the color to emerald 46 p.
7. 8 knits, nln, 6 knits, nln, 15 knits, nln, 6 knits, nln, 7 knits.
8. Change the color to light brown 54 p.
9. 9 knits, nln, 8 knits, nln, 17 knits, nln, 8 knits, nln, 8 knits.
10. Change the color to peach 62 p.
11. K11, knit 10, k20, knit 10, k9.
12-21. Alternate purl and front rows. (We start from the purl side). We change colors in order. (40 loops)
22. Close the loops.
Sew at the back. Put it on the body.
Panties


pant leg(2 pcs.)
1. Cast on 20 loops.
2. We will knit in the round, loops on two needles, with the third needle we knit - 10 knits on one knitting needle, 10 knits on the second.
3. Close and knit 20 knits in the round. When knitting in the round, all rows will be knit.
4-10. 20 persons. (7 rows)
11. K1, inc, k10, inc, k9.
Cut the thread. Pin. We knit the second leg the same way. Do not cut the second thread.
12. K11 on the last leg, join the second, k11 on the 2nd, knit 11 on the second side of knitting, k11 on the first leg. Connected.
13-22. 44 faces in a circle.
23. Cast off 7 stitches, cast off 7 knits, cast off 13 stitches, cast off 9 knits, cast off 6 stitches. Cut the thread and fasten.
24. Attach yarn to front 8 stitches, k8.
25. 8 p.
26-33. Alternate knit and purl rows.
Close the loops and cut the thread.
Attach the thread to the back loops.
1. 10 persons.
2. 10 p.
3-12. Repeat rows 1 and 2.
13. K3, turn. We knit only these three front (straps)
14. 3 p.
15-24. Repeat rows 13 and 14.
Close the loops and cut the thread.
Attach the thread to the remaining loops from the wrong side.
25. P3, turn. We knit only these three loops (second strap).
26. 3 p.
27-36. Repeat rows 25 and 26.
Close the loops. Cut the thread. Close the loops in the middle.
Sew on the straps. You can sew on buttons.
Cut out a small pocket from felt and stitch around the perimeter. Sew or glue the pocket to the pants.
You can sew the head to the body.
Carrot
Hook 0.75 mm. Pekhorka lace threads.
1. 6 sc in KA
2. 6 pr
3. (1 sc, inc)*6 (18)
4. (2 sc, inc)*6 (24)
5-9. 24 sc
10. (6 sc, dec)*3 (21)
11-12. 21 sc
13. (5 sc, dec)*3 (18)
14-15. 18 sc
16. (4 sc, dec)*3 (15)
17-18. 15 sc. Stuff as you knit.
19. (3 sc, dec)*3 (12)
20-21. 12 sc
22. (2 sc, dec)*3 (9)
23. (1 sc, dec)*3 (6)
Pull the loops together. Cut the thread.
Leaves
1. 10 ch
2. 4 psbn, 5 ch, 4 psbn, further along the trunk 5 psbn.
Tie three or more of these leaves. Sew to the top of the carrot. Embroider stripes on the carrot with sewing thread.
Sew or pin the carrot to the bunny's arm.
KNITTED CARROTS.
Finally, my legs and arms reached the master class on knitting our “girl in the dungeon”. But first, you need to “catch inspiration”! Catch your beloved Victoria Kirdiy!:)

Knitting materials:
Orange and green iris threads,
- synthetic winterizer,
- a needle with a wide eye,
-hook No. 1.

We knit a carrot.
We collect 4 air loops and close them into a ring.


We knit 1 row - 8 single crochets inside the ring.
2nd row - we knit with double crochets - in each loop of the previous row we knit two double crochets.
3rd row - knit with double crochets, adding after two loops: in every third loop we knit two stitches.


4th row - knit in single crochets without adding or decreasing. In each loop of the previous row - single crochet. We begin to form a “carrot body”
5th row - we cut the loops through one, that is, we knit the first with a single crochet, the second and third together.
6th and 7th row - without shortening we knit a single crochet into each loop.


8th row - we shorten through three loops, that is, we usually knit the 1st, 2nd and 3rd, we knit the 4th and 5th together. You can already fill the knitted part of the carrot with padding polyester, because the hole narrows and will continue to be filled more difficult.


Starting from the 18th row, we begin decreasing through one loop. And we continue it so many rows so that 5 loops remain.
When there are 5 loops left in the circle, we knit another 3-4 rows without decreasing. Then we decrease again after one loop.
We knit the last two loops together. We cast on 5-6 air loops - this is the carrot “tail”, cut off the thread, leaving 4-5 cm. Thread this tip into a needle and pull it through the tail in the opposite direction, hiding the thread in the body of the carrot. 

We knit carrot tops.
Let's start with the leaves. We collect a chain of 15 air loops.
We begin to knit in the opposite direction, starting from the second loop from the hook: 5 single crochets, 5 chain loops (as in the photo) and we tie them in the opposite direction with single crochets, returning to the long chain of 15 chain loops.


We knit along the long chain again 5 single crochets, again we cast on 5 chain loops. We knit single crochets in the opposite direction, returning to the long chain.
We again knit single crochets along the long chain, returning to its beginning. One air loop and turn the chain to tie it on the other side in the same way.


This way you can make the number of small “shoots” you need on the sheet. I made two shoots on this sheet on one side and one on the other. To return to the beginning of the chain, I knit connecting posts along the second side to the top of the leaf, and then make the “vein” in the middle is also connected by connecting columns.

Without breaking the thread, we knit the number of leaves you need. I knitted three.

We cut off the thread, leaving a fairly long tip. It is needed to sew the leaves to the body of the carrot and then knit the green “cap” of the carrot.
The leaves are sewn on, let's proceed to the “hat”. We cast on a chain of 10 chain loops, wrap it around the leaves, closing the chain into a ring.


We begin to tie this ring with single crochets.
We knit two or three rows with single crochets, adding: we knit 2 single crochets into each loop - the cap expands. We cut off the thread, leaving the tip for sewing the cap to the carrot.


The approximate length of the iris CARROTS KNITTED from threads is 10 centimeters.
This is the kind of girl you will get as a result
Crocheted vegetables and fruits are perfect for the interior of any apartment. They will not only be an excellent decoration, but can also serve as beautiful toys for your children. Below are simple patterns for crocheting vegetables and fruits for beginners. You can keep yourself and your children busy by doing various knitting patterns for beautiful vegetables, fruits or even berries.
Crocheted vegetables and fruits knitting patterns
In order to knit fruits and vegetables we will need: a hook, threads, filling material (sintepon, cotton wool), a large gypsy needle and scissors. First of all, we will start our master class by completing a pattern for a knitted fruit - an apple.
Master class for beginners on fruit knitting
PRODUCT 1

Below is a diagram of a knitted fruit - an apple. Before we start working with the fruit diagram, let’s familiarize ourselves with the nomenclature of our description:
Popular articles:
- air loop - v.p.,
- single crochet - st.b.n.,
- double crochet - double crochet,
- connecting column - s.s.
At the end of each row, the total number of stitches is indicated in brackets, for example (20). For the knitted fruit, we will use red, green or yellow threads for the apple itself, cinnamon threads for the twig, and green threads for the leaves.
To begin with, take a yellow thread and wrap it around your finger, make a small ring, fasten it next to 4 air loops. Our fruit will consist of 26 rows.
Description of the pattern for knitted fruit in rows:
1st row - knit 6 single crochet stitches into a ring (6);
2nd r. - we double each loop, knitting 2 columns of single crochets into it, in total we get 12 loops (12);
3rd r. - in every second loop we knit 2 double stitches, that is, we increase through 1 loop, for a total of 18 loops (18);
4th r. - add a loop to every third loop (24);
5th r. - add a new loop to every fourth loop (30);
6th r. - crochet in a circle;
7th r. - add a loop to every 5 loops (36);
8th r. - crochet in a circle;
9th r. - add a loop to every 6 loops (42);
10th r. - crochet without any additions in the round;
11th r. - crochet without any additions in the round;
12th r. - crochet without any additions in the round;
13th r. - crochet without any additions in the round;
14th r. - crochet without any additions in the round;
15th r. - add a loop to every seventh loop (48);
16th r. - crochet in a circle;
17th r. - we knit 7 and 8 loops together, as a result, the decrease occurs through 6 loops (42);
18th r. - crochet in a circle;
19th r. - decrease every 6 loops (36);
20th r. - crochet in a circle;
21st r. - decrease every 5 loops (30);
22nd r. - crochet in a circle;
23rd r. - decrease every 4 loops (24);
After the 23rd row, we fill our fruit with cotton wool or synthetic padding (you can also use buckwheat, beans or peas).
24th r. - crochet in a circle;
25th r. - remove every 3 loops (18);
26th r. - remove every 2 loops (12);

We insert the tip of the thread into the needle and tighten our fruit thoroughly. We thread the needle and thread into the edge of the knitting and pull the thread across the entire surface. Return the thread to the center of the apple. In order to give the fruit a natural shape, we perform several more similar actions. Then we cut off the excess length of the thread, and hide the small remainder inside the apple.
Now we take a brown thread to create a twig. We cast on 12 air loops (ch), then draw the hook to the 3rd loop and tie all the loops with a half double crochet. We sew the finished twig to the apple.
PRODUCT 2

Now let's look at another delicious pattern - strawberry knitting! For this we need threads of red, yellow and green colors.
First we will start knitting the berry itself, for this we take a hook and red threads. We act according to the scheme:
We make a ring and knit 2 VP (air loops).
1st row: starting from the 2nd loop from the hook, we knit 6 sc. (6);
2nd row: for each loop we make 6 increases (12);
3rd row: 1 p., 3 s.b.n * 3 times (15);
4th row: 1 p., 4 s.b.n * 3 times (18);
5th row: 1 p., 5 s.b.n * 3 times (21);
6th year: 21 s.b.n. (21);
7th row: 1 p., 6 s.b.n * 3 times (24);
8th year: 24 s.b.n. (24);
9th row: 1 p., 7 s.b.n * 3 times (27);
10th year: 27 s.b.n (27);
11th row: 1 p., 8 s.b.n * 3 times (30);
12, 13, 14th r.: 30 s.b.n (30);
15th row: 1 p., 4 s.b.n * 6 times (36);
16th, 17th r.: 36 s.b.n. (36);
18th row: 1 p, 11 s.b.n * 3 times (39);
19, 20, 21, 22nd rows: 39 s.b.n (39);
23rd r.: 1 u., 11 s.b.n * 3 times (36);
24th r.: 1 u., 4 s.b.n. * 6 times (30);
25th r.: 1 u., 3 s.b.n * 6 times (24);
Let's start filling the strawberries with filler!
26th r.: 1 u., 2 s.b.n * 6 times (18);
27th r.: 1 u., 1 s.b.n * 6 times (12);
28th rub.: 6 USD (6);
We tighten the remaining loops and tie. Now we knit a leaf. Take a green thread and a hook, make a slip knot and add 2 chain loops.
Scheme:
1st row: starting from 2 ch. we knit 5 s.b.n. in total we should get 5 loops (5);
2, 3, 4, 5th rows: 5 s.b.n (5);
6th row: 5 p. (10);
7th row: 1 p., 1 s.b.n * 5 times (15);
We sew the seeds with ordinary yellow thread. We connect all the parts of the berry together. Strawberries are ready!
PRODUCT 3

Now let's tie another fruit - plum.
Consider the laughter of knitting the main part of the fruit:
1st row: in the ring 6 st.b.n (6);
2nd r. : 6 p. (12);
3rd r. : 1 st.b.n. + p.* 6 times (18);
4th r. : 2 st.b.n., p. * 6 times (24);
5th r. : 3 st.b.n., p. * 6 times (30);
6th r. : 4 st.b.n., p. * 6 times (36);
7, 6th rows: 36 st.b.n.;
17th r. : 4 st.b.n., u. * 6 (30);
18th r. : 3 st.b.n., u. * 6 (24);
19th r. : 2 st.b.n., u. * 6 (18);
20th r. : 1 st.b.n., u. * 6 (12)
Fill the plum with filler.
21st row: 6 y. (6).
Leave a little thread and thread it into the needle. We pass the needle through the entire fruit. Pull the thread and fasten it. The plum should regain its natural shape. We knit 5-8 air loops from brown threads. We get a ready-made plum stick and sew it to the fruit.
How to crochet vegetables - step by step lessons
PRODUCT 4

Now we will look at a knitting pattern for vegetables. We will knit garlic, an easy pattern for beginners.
The nomenclature of our description remains the same:
- air loop - v.p.,
- single crochet - st.b.n.,
- with a double crochet - senior s.n.,
- column - s.s.,
- increase - n.,
- decrease - y.
At the end of each row, the total number of stitches is indicated in brackets, for example (18). For knitted garlic we will use white and green threads.
We knit the main part of the garlic:
1st row: wrap a small ring around your finger and cast on 6 loops (6);
2nd row: to each loop we add one more loop, in total we get 12 (12);
3rd row: cast on a single crochet and add a loop 6 times, (18);
4th row: cast on 2 single crochets and add a loop also 6 times (24);
5th row: 3 s.b.n. + 1 p. * 6 times (30);
6th row: 4 s.b.n + 1 p. * 6 times (36);
7th row: 5 s.b.n + 1 p. * 6 times (42);
8th and 12th rows: dial 42 s.b.n. (42);
13th year: 12th birthday + 1 decreasing * 3 times (39)
14th year: 11th birthday + 1 cu. * 3 times (36)
15th R.: 10 S.B.N. + 1 cu. * 3 times (33);
16th R.: 9 S.B.N. + 1 cu. * 3 times (30);
17th year: 3rd s.b.s. + 1 cu. * 6 times (24);
18th R.: 2 S.B.N. + 1 cu. * 6 times (18);
19th year: 1st s.b.s. + 1 cu. * 6 times (12);
We knit the green leaves and fasten them separately. In order to knit the leaves, we cast on 6 green chain stitches, then we knit the chain in the opposite direction with single crochets, starting with 2 loops from the hook. We connect the resulting petal with 1 connecting stitch into the same loop with which we started knitting (with 2 loops). We connect the finished petal with garlic using a thread and a needle. The garlic is ready!
PRODUCT 5

Now we will tie the carrots. To do this, we will prepare orange and green threads in advance. We start with the main important part, and as usual we make a ring of 6 air loops.
Further according to the scheme:
1st row: starting from the second loop we make 6 increases (an increase is 2 double stitches from two loops knitted together) (12);
2nd row: 1 single crochet with addition 6 times (18);
Rows 3, 4, 5, 6: 18 single crochets (18);
7th year: 4 st.b.n. + u. * 3 times (15);
8th, 9th year: 15 senior biological sciences (15);
10th year: 3 st.b.n. + u. * 3 times (12);
11, 12th rows: 12 st.b.n (12);
13th year: 2 st.b.n. + u. * 3 times (9);
14th, 15th year: 9 senior biological sciences (9);
Fill the carrots with filler;
16th year: 1 st.b.n. + u. * 3 times (6);
17th – 18th year: 6 senior biological sciences (6);
19th r.: 3 u. (3);
20th row: Pull out 1 loop from each stitch of the previous row and knit it all together. Cut the thread and hide the extra piece in the carrot.
Now let's take care of the leaves. We make 10 air loops, starting from 2 ch. we knit a row of st.b.n. (9); in this way we repeat the steps until we get a leaf, we do the next leaf in the same way, starting from the 2nd chain loop of the first leaf we knit another 10 ch, then we knit a row of double stitches (9), the next leaves can be made in less than 8 v.p.
We tie the finished tops to the carrots. The carrots are ready!
PRODUCT 6
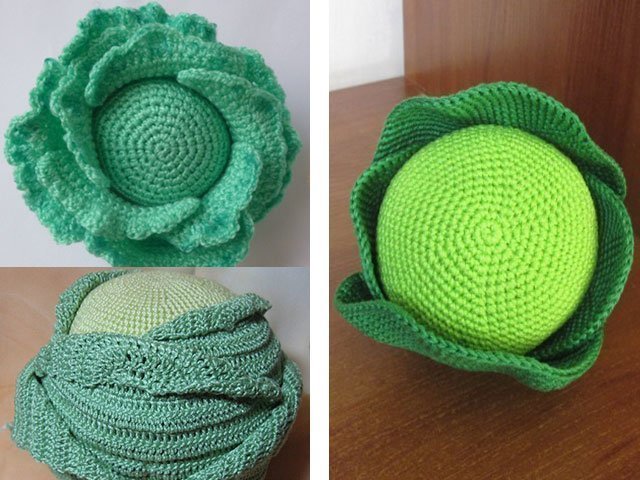
Now let's look at a more complex knitting pattern.
We knit cabbage, but before we start knitting, let's familiarize ourselves with the notations:
- air loop - v.p.,
- single crochet - st.b.n.,
- double crochet - double crochet,
- connecting column - s.s.,
- increase - p., decrease - y,
- lifting loop - p.p.,
- half-column - p.st.,
- double crochet - D.Sc.
For cabbage we will need 2 green colors, one lighter for the head.
Let's start our knitting with a head of cabbage, make a ring, wind the thread around your finger, and begin to knit the first st.b.n.
Next, look at the diagram:
1st row: knit 6 st.b.n. (6);
We pull our knitting into a ring, pull out the remaining tail from the thread
2nd r.: we knit 2 st.b.n. into each loop (12);
3 to 20th row: we knit st.b.n., in each row we knit 6 st.b.n. (120);
21 to 41st row: knit st.b.n. (120);
42 to 53rd r.: we knit dc skipping 6 loops in a scattered order (42-46);
We fill our kochak with filler and tighten the thread. The head of cabbage is ready, let's move on to the leaves.
We are guided by the scheme:
1st row: dial 18 ch. + 2 ch (20);
2nd row: knit dc (27);
3rd row: continue to knit dc (40);
4th R.: Senior S.N. (40);
5th row: st.s.n. * 2 times (60);
6, 16th row: knit dc (60);
17th row: knit st.s.n. + d.st.n. (40);
18, 19th row: knit dc (40);
20th row: knit st.s.n. + d.st.n. (27);
21st row: knit dc (27);
22nd row: knit st.s.n. + d.st.n. (18);
23rd row: we knit Doctor of Science (9);
24th row: we knit Doctor of Science (5);
The first leaf is ready! We knit 5 more leaves using a similar pattern. Then we attach the leaves to the cabbage. The cabbage is ready!
Crochet vegetables and fruits video
Crocheting is an educational activity not only for children, but also for adults. First, let's understand what amigurumi is. Amigurumi is the Japanese art of knitting small animals or creatures that have human qualities. In this video we will look at how to make a watermelon slice using the Amigurumi technique.
PRODUCT 7
So, you can watch the video free master class on how to crochet a watermelon, armed with all the necessary materials (threads, hook, scissors, needle)
PRODUCT 8
The following video will tell us how to crochet a lemon, which can perfectly complement the interior of any kitchen. Also, this lemon can become your child’s favorite toy, you just need to sew eyes and a mouth to our lemon.
PRODUCT 9
In this video we will learn how to crochet an educational toy - corn. This corn can be used for educational games with your child, because it trains imagination and develops fine motor skills. Knitted corn can serve as an excellent gift for children and adults when combined with other vegetables and fruits.
PRODUCT 10
Next, let's look at another video on how to knit a pear. On the Internet you can find many other different free videos and applications on how to crochet items such as a potholder, washcloth, stand, pineapple, mushroom, flower, as well as other kitchen decorations.
You can “treat” your loved one with such an original carrot on Valentine’s Day. He will definitely be pleased!
Required:
Yarn (acrylic baby). Colors: orange, green, white, pink.
- Hook No. 2-2.5
- Filler
- Plastic running eyes
Notes: the toy is knitted in a spiral with single crochets on one side of the loop, counterclockwise, filled as you knit, unless otherwise indicated. Knit inside out so that the “ribbing” of the fabric is inside the toy.
Abbreviations:
V.p. - air loop
Senior Biological Sciences - single crochet
Connection Art. - connecting post
Increase - two single crochets in one loop
Decrease - knit two single crochets together
*…* - from * to * repeat N number of times
Description of knitting a romantic carrot
Carrots (orange color)
3rd row: 12 st.b.n. (=12)
4th row: *1 st.b.n., increase* 6 times (=18)
5-6 row: 18 st.b.n. (=18)
Row 7: *2 st.b.n., increase* 6 times (=24)
8-9 row: 24 st.b.n. (=24)
Row 10: *3 st.b.n., increase* 6 times (=30)
11th row: 30 st.b.n. (=30)
Row 12: *4 st.b.n., increase* 6 times (=36)
13th row: 36 st.b.n. (=36)
Row 14: *5 st.b.n., increase* 6 times (=42)
15-16 row: 42 st.b.n. (=42)
Row 17: *6 st.b.n., increase* 6 times (=48)
18-19 row: 48 st.b.n. (=48)
Row 20: *7 st.b.n., increase* 6 times (=54)
21-22 row: 54 st.b.n. (=54)
Row 23: *8 st.b.n., increase* 6 times (=60)
24-25 row: 60 st.b.n. (=60)
Row 26: *9 st.b.n., increase* 6 times (=66)
27-28 row: 66 st.b.n. (=66)
Row 29: *10 st.b.n., increase* 6 times (=72)
30-31 row: 72 st.b.n. (=72)
Row 32: *11 st.b.n., increase* 6 times (=78)
33-34 row: 78 st.b.n. (=78)
Row 35: * 4 st.b.n., decrease * 13 times (=65)
Row 36: *3 dc, decrease* 13 times (=52)
Row 37: *2 dc, decrease* 13 times (=39)
38-39 row: 39 st.b.n. (=39)
Row 40: *1 st.b.n., decrease* 13 times (=26)
41 row: 26 st.b.n. (=26)
Row 42: *decrease* 13 times (=13)
Leaves (green color)
Cast on a chain of 25 vp. + 1 v.p. for lifting. Go to the other side of the chain. Next knit according to the pattern:
Knit 3-5 pcs. such twigs. Sew to the carrot.
Head (white):
1st row: 6 st.b.n. into an amigurumi ring (=6)
2nd row: *increase* 6 times (=12)
3rd row: *1 st.b.n., increase* 6 times (=18)
4th row: *2 st.b.n., increase* 6 times (=24)
Row 5: *3 st.b.n., increase* 6 times (=30)
Row 6: *4 st.b.n., increase* 6 times (=36)
7th row: 36 st.b.n. (=36), conn.st..
Ears (2 pcs.):
In pink, cast on a chain of 15 chain stitches.
Go to the other side of the chain. Starting from the second loop from the hook, knit 14 dc.
Attach a white thread. Turn knitting.
3rd row: 2 ch. for lifting. Next tie the st.s.n. round. Make 2 increments at the turn. Leave the thread for sewing and trim.
Assembly:
Sew the ears to the head.
Decorate the bunny's face: glue (sew, embroider...) eyes, embroider nose, eyebrows, mouth.
Sew the head to the carrot, first fill it with filler.
Embroider the inscription on the carrot: “To my bunny” (you can “To my bunny”).


